How to Cut ClosetMaid Wire Shelves?
ClosetMaid wire shelving transforms cluttered spaces into organized storage havens. However, standard shelf sizes don’t always fit your unique space requirements. Learning how to cut ClosetMaid wire shelves opens up endless customization possibilities for your home organization projects.
Wire shelving systems have become the go-to solution for homeowners seeking affordable, versatile storage options. The ability to modify these shelves ensures they fit perfectly in any space, from narrow pantries to custom closet configurations.
Essential Tools and Materials for Cutting Wire Shelves
Before starting your wire shelf cutting project, gather the proper tools and materials. Having everything ready prevents frustration and ensures clean, professional results.
Primary Cutting Tools
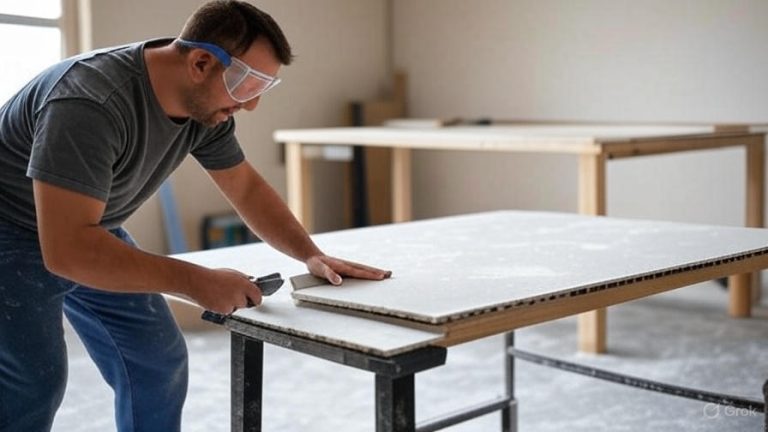
Heavy-duty wire cutters serve as your primary cutting tool for most ClosetMaid wire shelf modifications. Look for cutters with comfortable grips and sharp, durable blades capable of handling thick wire construction.
Bolt cutters work exceptionally well for thicker wire shelving or when you need extra leverage. These powerful tools slice through metal wire with minimal effort, making them ideal for larger cutting projects.
Angle grinders equipped with metal cutting discs provide the fastest cutting method for multiple shelves. While they require more safety precautions, angle grinders deliver clean cuts through even the heaviest wire construction.
Hacksaw with metal cutting blade offers precise control for detailed cuts. This manual option works well when you need exact measurements or when working in tight spaces where power tools won’t fit.
Safety Equipment
Safety glasses protect your eyes from metal fragments that fly during cutting. Wire cutting produces small metal pieces that can cause serious eye injuries without proper protection.
Work gloves shield your hands from sharp wire ends and provide better grip on tools. Choose gloves that balance protection with dexterity for handling small components.
Dust masks prevent inhalation of metal particles when using power tools. While wire cutting doesn’t produce as much debris as other materials, protection remains important for respiratory health.
Measuring and Marking Tools
A measuring tape ensures accurate shelf dimensions before cutting. Double-check all measurements to avoid costly mistakes that waste materials.
Permanent markers or chalk help mark cutting lines clearly on wire surfaces. Visible marks guide your cuts and prevent errors during the cutting process.
Metal rulers or straight edges assist in drawing precise cutting lines across the shelf width. Straight cuts create professional-looking results that fit properly in your storage system.
Planning Your Wire Shelf Cuts
Proper planning prevents mistakes and ensures your modified shelves fit perfectly in their intended locations. Take time to measure carefully and consider how cuts will affect the shelf’s structural integrity.
Measuring Your Space
Start by measuring the exact width of your storage area. Account for any obstacles like pipes, electrical outlets, or irregular wall surfaces that might affect shelf placement.
Record multiple measurements along the depth of your space. Walls aren’t always perfectly parallel, and slight variations can cause installation problems if not considered during planning.
Consider the height clearance above and below your planned shelf location. Ensure adequate space for the items you intend to store while maintaining easy access.
Determining Cut Locations
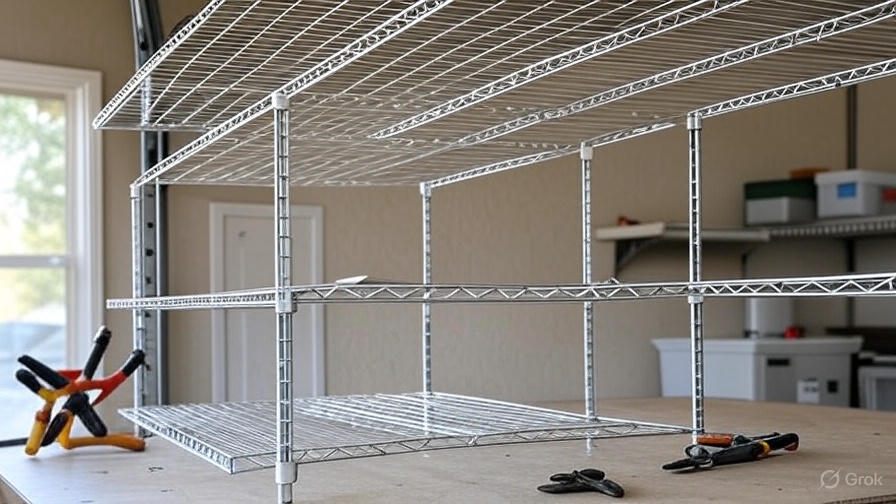
Standard ClosetMaid wire shelves feature support wires running perpendicular to the main shelf surface. Plan your cuts to maintain structural integrity by keeping support wires intact whenever possible.
Avoid cutting too close to existing mounting holes or brackets. Leave enough material around attachment points to maintain the shelf’s load-bearing capacity.
Consider the spacing between wire supports when planning cuts. Maintaining even spacing ensures your modified shelf maintains its strength and appearance.
Calculating Material Waste
Plan cuts to minimize waste while meeting your storage needs. Sometimes making multiple smaller shelves from one large piece proves more economical than creating single custom-sized pieces.
Consider future projects when planning cuts. Extra wire shelf pieces can serve as drawer organizers, cabinet shelving, or other storage solutions throughout your home.
Document your measurements and cut plans before starting. Having a written plan reduces errors and helps you stay organized during the modification process.
Step-by-Step Wire Shelf Cutting Process
Follow these detailed steps to achieve clean, professional cuts in your ClosetMaid wire shelving. The process requires patience and attention to detail for the best results.
Preparation Phase
Secure your work area on a stable surface with adequate lighting. Good visibility prevents cutting errors and ensures safety throughout the project.
Lay the wire shelf flat on your work surface with the cutting line clearly visible. Ensure the shelf doesn’t move during cutting by securing it with clamps if necessary.
Double-check your measurements one final time before making any cuts. Once you cut the wire, you cannot easily repair mistakes or add material back.
Making the Initial Cut
Start cutting from one edge of the shelf, following your marked line carefully. Apply steady pressure without forcing the cutting tool, allowing the blade or cutters to do the work.
Cut through one wire at a time when using hand tools. This approach provides better control and reduces the risk of the cutting tool slipping or binding.
Maintain a consistent cutting angle to ensure all wire ends align properly. Inconsistent angles create jagged edges that look unprofessional and may not fit properly in your mounting system.
Finishing Wire Ends
File or sand sharp wire ends smooth after cutting. Sharp edges can tear clothing, cut hands, or scratch other surfaces during handling and installation.
Use a metal file to remove burrs and create smooth, rounded wire ends. Take time to file each wire individually for the best results.
Check that all wire ends align evenly across the shelf edge. Uneven ends indicate cutting problems that should be corrected before installation.
Quality Control Check
Test-fit your cut shelf in its intended location before final installation. This trial fitting reveals any adjustments needed before permanent mounting.
Verify that the shelf maintains its structural integrity after cutting. The shelf should feel solid and stable, not wobbly or weak.
Examine all cut edges for sharp points or rough areas that need additional finishing. Address any issues now rather than discovering them during installation.
Advanced Cutting Techniques for Complex Modifications
Some wire shelf projects require more sophisticated cutting approaches to achieve specific design goals or fit unusual spaces.
Creating Custom Curves
Heat the wire gently with a heat gun to make it more pliable for bending into curves. Work slowly and test the flexibility frequently to avoid overheating.
Use a template or form to guide consistent curve shapes. Cardboard templates work well for planning and ensuring symmetrical results.
Support the shelf adequately while bending to prevent kinking or breaking the wire structure. Gradual pressure produces better results than sudden force.
Cutting Angles and Notches
Mark angle cuts carefully using a protractor or angle guide for accuracy. Precise angles ensure proper fit against walls or other surfaces.
Cut angles in multiple steps rather than attempting single cuts through thick sections. This approach provides better control and cleaner results.
Create notches by making two perpendicular cuts that meet at the desired depth. Remove the waste material carefully to avoid damaging surrounding wires.
Joining Cut Pieces
Small wire connectors or zip ties can join cut pieces when necessary. This technique works well for creating longer shelves from shorter pieces.
Overlap joining areas by at least two wire spacings for adequate strength. Insufficient overlap creates weak points that may fail under load.
Test joint strength before installing loaded shelves. Joints should feel as solid as the original shelf construction.
Troubleshooting Common Cutting Problems
Even experienced DIYers encounter challenges when cutting wire shelving. Recognizing and addressing these issues quickly prevents wasted materials and frustration.
Dealing with Bent or Damaged Wire
Straighten bent wires using pliers before cutting. Bent wires interfere with cutting tools and produce uneven results.
Replace severely damaged wire sections when possible. Sometimes cutting out damaged areas and splicing in new wire produces better results than attempting repairs.
Work slowly through damaged areas to prevent tool binding or slipping. Rushing through problem areas often makes situations worse.
Handling Tough Cutting Situations
Switch to heavier-duty cutting tools when standard wire cutters struggle. Don’t persist with inadequate tools that damage both the shelf and your equipment.
Apply cutting oil or lubricant to stubborn wires. This technique reduces friction and makes cutting easier while extending tool life.
Consider alternative cutting approaches when initial methods fail. Sometimes attacking the problem from a different angle or using different tools solves difficult situations.
Correcting Measurement Errors
Salvage incorrectly cut shelves when possible by repurposing them for different applications. Storage areas throughout the home can often use smaller shelf pieces.
Create extension pieces to correct shelves cut too short. While not ideal, this approach can save materials and provide functional storage solutions.
Learn from measurement mistakes to improve future projects. Keep notes about what went wrong and how to prevent similar errors.
Safety Considerations and Best Practices
Wire shelf cutting involves sharp tools and metal fragments that require careful attention to safety protocols throughout the project.
Personal Protective Equipment
Wear safety glasses at all times during cutting operations. Metal fragments can fly unexpectedly and cause serious eye injuries even during seemingly safe procedures.
Use work gloves that provide protection while maintaining tool control. Bulky gloves can interfere with tool operation and actually increase accident risk.
Protect your work area with drop cloths or cardboard to catch metal fragments. This precaution makes cleanup easier and prevents sharp pieces from hiding in your workspace.
Tool Safety Guidelines
Keep cutting tools sharp and properly maintained. Dull tools require more force and are more likely to slip or bind during use.
Store cutting tools safely when not in use. Sharp tools left lying around create hazards for anyone working in the area.
Inspect tools before each use for damage or wear. Replace or repair damaged tools rather than risking injury or poor results.
Workspace Safety Measures
Ensure adequate lighting throughout your work area. Poor visibility increases the risk of cuts, measurement errors, and other accidents.
Maintain a clean, organized workspace free from clutter. Trip hazards and misplaced tools cause unnecessary accidents during projects.
Keep a first aid kit readily available for treating minor cuts or injuries. Quick treatment of small injuries prevents them from becoming serious problems.
Installation Tips for Modified Wire Shelves
Properly installing your cut wire shelves ensures they provide years of reliable service while maintaining their appearance and functionality.
Mounting Bracket Considerations
Verify that existing mounting brackets align with your modified shelf dimensions. Sometimes shelf modifications require bracket adjustments or replacement.
Use appropriate wall anchors for your wall type and expected load. Wire shelves can hold substantial weight when properly supported.
Check bracket alignment carefully before final installation. Misaligned brackets cause installation problems and may affect shelf stability.
Load Distribution Guidelines
Distribute weight evenly across modified shelves to prevent sagging or failure. Concentrated loads can overwhelm areas weakened by cutting.
Consider adding support brackets for heavily loaded shelves. Extra support prevents problems and extends shelf life significantly.
Test load capacity gradually after installation. Start with lighter items and increase weight slowly while monitoring shelf performance.
Maintenance and Care
Inspect cut edges periodically for signs of corrosion or damage. Address problems early to prevent them from spreading to other areas.
Clean wire shelves regularly to prevent buildup of dust and debris that can hide developing problems. Regular cleaning also maintains appearance.
Lubricate moving parts in adjustable systems to ensure smooth operation. Proper maintenance extends system life and improves functionality.
Cost-Effective Solutions and Money-Saving Tips
Cutting your own wire shelves saves money compared to purchasing custom-sized alternatives while providing exactly the dimensions you need.
Budget-Friendly Tool Options
Borrow specialized tools for occasional projects rather than purchasing expensive equipment. Many neighbors or friends have tools they’re willing to share.
Consider renting power tools for large projects involving multiple cuts. Rental costs often prove less expensive than purchasing tools used infrequently.
Invest in quality hand tools that will last through multiple projects. Good wire cutters and measuring tools provide years of reliable service.
Material Sourcing Strategies
Purchase wire shelving during sales or clearance events to reduce material costs. Stock up when prices are low for future projects.
Check discount stores and warehouse clubs for ClosetMaid wire shelving at reduced prices. These retailers often offer significant savings on organization supplies.
Consider buying slightly larger shelves and cutting them down rather than purchasing multiple smaller pieces. This approach often proves more economical.
Project Planning for Efficiency
Plan multiple cutting projects together to maximize tool setup time. Cutting several shelves in one session proves more efficient than separate projects.
Coordinate with friends or neighbors who might need similar modifications. Group purchases and shared tool costs reduce individual expenses.
Keep detailed records of successful cuts and measurements for future reference. This documentation saves planning time on similar future projects.
Creative Applications for Cut Wire Shelves
Modified wire shelves serve numerous purposes beyond basic storage, opening up creative possibilities throughout your home.
Custom Pantry Solutions
Create stepped shelving systems that maximize vertical space in narrow pantries. Different shelf depths accommodate various container sizes efficiently.
Build pull-out drawers using cut wire shelves and sliding hardware. These systems provide easy access to items stored in deep cabinets.
Design specialized storage for unusual items like baking sheets, serving trays, or cleaning supplies. Custom cuts ensure efficient use of available space.
Garage and Workshop Organization
Configure tool storage systems using cut wire shelves as dividers and organizers. Wire construction allows easy visibility and access to stored items.
Create mobile storage carts by mounting cut shelves on wheels. These systems provide flexible storage that moves where you need it.
Build overhead storage systems for seasonal items using modified wire shelves. Overhead storage maximizes floor space while keeping items accessible.
Closet Customization Projects
Design clothing organization systems that match your specific wardrobe needs. Custom shelf dimensions ensure efficient use of closet space.
Create shoe storage solutions that accommodate your collection size and style preferences. Wire construction promotes air circulation and visibility.
Build accessory storage systems for jewelry, belts, ties, and other small items. Custom compartments keep everything organized and easily accessible.
Conclusion
Cutting ClosetMaid wire shelves empowers you to create custom storage solutions that perfectly fit your unique spaces and needs. With proper tools, careful planning, and attention to detail, you can modify standard wire shelving into exactly what your home requires.
The techniques and tips outlined in this guide provide the foundation for successful wire shelf modification projects. Start with simple cuts to build your skills and confidence before tackling more complex modifications.
Remember that practice improves your cutting technique and results. Each project teaches valuable lessons that improve your next effort. Soon you’ll be creating custom storage solutions that rival expensive professional installations at a fraction of the cost.
Your investment in learning these skills pays dividends through years of organized, efficient storage throughout your home. Take pride in your custom solutions and enjoy the satisfaction of creating exactly what you need with your own hands.