How to Cut Drywall?
Cutting drywall intimidates many homeowners, but this essential skill becomes straightforward once you learn the proper techniques. This comprehensive guide walks you through every step of the drywall cutting process, from gathering tools to making perfect cuts for outlets and fixtures.
Essential Tools for Cutting Drywall
Before you begin any drywall project, gather the right tools. A sharp utility knife serves as your primary cutting instrument. The blade should snap off easily to maintain sharpness throughout your project. Dull blades tear the paper facing and create ragged edges that require extra finishing work.
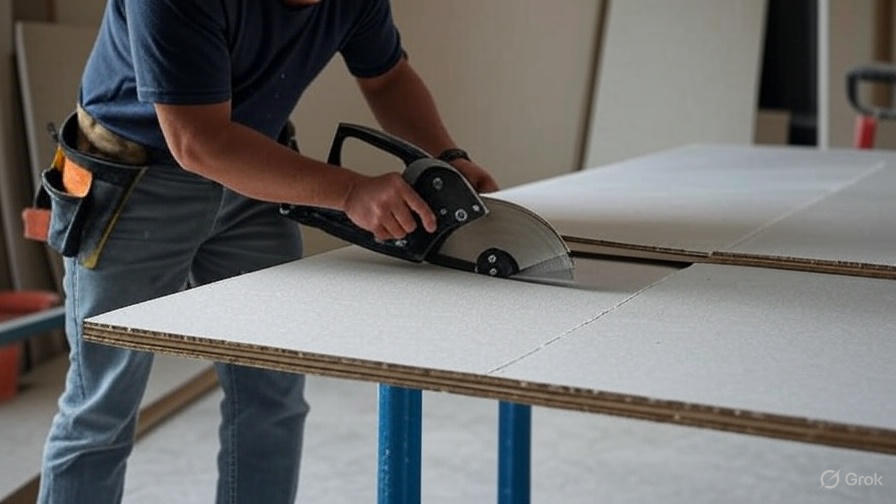
A drywall saw, also called a keyhole saw, handles cuts that utility knives cannot manage. These saws cut through drywall quickly and work well for rectangular openings. The pointed tip allows you to start cuts without pre-drilling holes.
A T-square or straightedge ensures straight cuts across large sheets. Professional drywallers often use 4-foot T-squares specifically designed for drywall work. These tools have a lip that hooks over the sheet edge, preventing the square from sliding during cuts.
Measuring tools include a tape measure and pencil for marking cut lines. A chalk line helps mark long cuts across full sheets. Keep several pencils handy since drywall dust dulls pencil points quickly.
Safety equipment protects you during cutting operations. Safety glasses prevent dust and debris from entering your eyes. A dust mask reduces inhalation of gypsum particles. Work gloves protect your hands from sharp edges and rough drywall surfaces.
Types of Drywall Cuts
Different situations require different cutting approaches. Straight cuts represent the most common type and typically involve trimming sheets to fit room dimensions. These cuts run parallel or perpendicular to the sheet edges.
Curved cuts accommodate rounded architectural features like archways or curved walls. These cuts require special techniques and often involve scoring and snapping methods combined with careful trimming.
Outlet and switch cuts create openings for electrical boxes. These rectangular cuts must be precise to ensure proper fit without gaps that require excessive mud work later.
Fixture cuts accommodate ceiling fans, light fixtures, and plumbing penetrations. These cuts often involve circular or irregular shapes that require careful measurement and cutting techniques.
Basic Straight Cutting Technique
Start by measuring the required drywall piece carefully. Mark your measurements on the front (finished) side of the drywall sheet. Use a pencil to make light marks that you can easily see but won’t show through paint later.
Position your straightedge along the marked line. A T-square works best for cuts perpendicular to the sheet edge. For cuts parallel to the edge, use a chalk line or long straightedge to ensure accuracy across the entire sheet length.
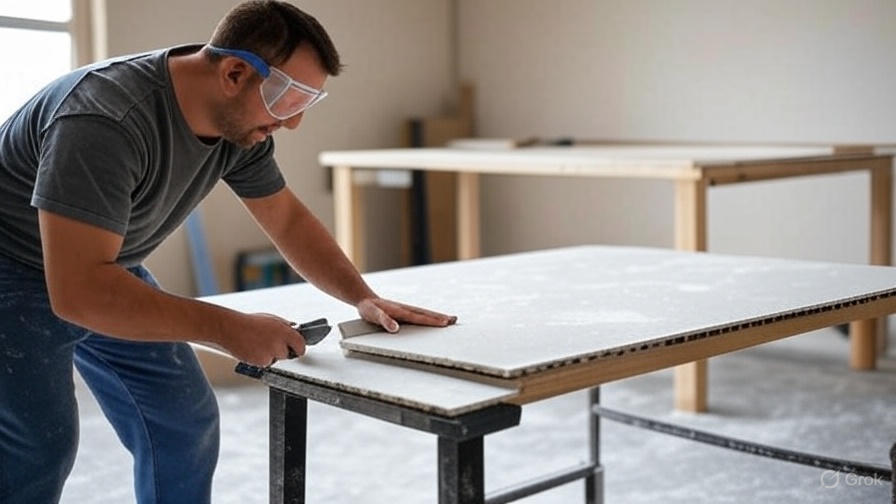
Score the drywall face with your utility knife. Apply firm, consistent pressure while drawing the blade along the straightedge. One deep score usually suffices, but you may need two passes on thicker drywall. The knife should cut completely through the paper facing and slightly into the gypsum core.
Flip the sheet over and align the scored line with a table edge or sawhorses. Apply gentle pressure to the unsupported portion while lifting the supported section. The drywall will snap cleanly along the scored line.
Complete the cut by slicing through the paper backing with your utility knife. Hold the two pieces at a slight angle to expose the paper backing, then cut along the fold line. This technique produces clean, straight edges that fit together tightly.
Cutting Drywall for Outlets and Switches
Electrical outlet cuts require precision to avoid gaps around electrical boxes. Start by locating the electrical box position relative to the drywall sheet. Measure from fixed reference points like adjacent walls or previously installed drywall.
Mark the outlet opening on the drywall face. Standard outlet boxes measure approximately 3 inches by 2 inches, but always measure your specific boxes. Mark all four corners of the opening with small dots or crosses.
Connect the corner marks with straight lines to create the cutting template. Double-check your measurements before cutting since mistakes require patching or new drywall pieces.
Several cutting methods work for outlet openings. The plunge cut method involves starting the drywall saw at one corner and cutting along the marked lines. Push the saw point through the drywall at a corner, then saw along each line to complete the rectangle.
Alternatively, drill holes at each corner with a large drill bit, then connect the holes with a drywall saw or utility knife. This method provides more control and reduces the chance of overcuts.
Score and snap methods work for some outlet cuts. Score deeply along all four lines, then carefully snap out the center piece. This technique requires practice but produces very clean edges.
Making Circular and Curved Cuts
Circular cuts for light fixtures or pipes require different techniques than straight cuts. Start by finding the exact center point of the required opening. Measure carefully from multiple reference points to ensure accuracy.
Create a compass using a pencil tied to a string. Mark the center point, then use the string compass to draw the required circle. Keep the string taut while drawing to maintain a perfect circle.
For small circles under 4 inches in diameter, drill a starter hole inside the marked circle, then use a drywall saw to cut along the line. Work slowly and check your progress frequently to maintain the circular shape.
Larger circles benefit from the score and snap technique. Score along the marked line with repeated passes of a sharp utility knife. Make multiple light passes rather than trying to cut deeply in one pass. Once scored, carefully snap out small sections working around the circle.
Curved cuts for archways or rounded corners require patience and multiple techniques. Score the curve with a utility knife, making many light passes. Break away small sections at a time rather than trying to remove large pieces.
A rasp or coarse sandpaper smooths rough edges on curved cuts. Work slowly to avoid removing too much material. Test fit the drywall frequently during the smoothing process.
Measuring and Marking Techniques
Accurate measurements prevent waste and ensure proper fit. Always measure twice before cutting any drywall. Use the longest measuring tape possible to reduce cumulative errors from multiple measurements.
Mark measurements on the finished side of the drywall when possible. Light pencil marks disappear under primer and paint. Avoid using pens or markers that might bleed through finish coats.
For complex cuts involving multiple outlets or fixtures, create a paper template first. Measure the wall carefully and transfer all opening locations to paper. Test the template against the wall before transferring marks to the drywall.
Transfer measurements from your template to the drywall sheet using a square and straightedge. Mark each corner precisely, then connect the marks with straight lines. This method reduces errors and provides visual confirmation of cut accuracy.
Consider the drywall orientation when marking cuts. Drywall installs with the long edge horizontal in most applications. Plan your cuts to minimize waste and reduce the number of joints requiring taping.
Safety Considerations
Drywall cutting creates dust that irritates respiratory systems. Always wear a dust mask rated for fine particles. Work in well-ventilated areas when possible, and consider using a fan to blow dust away from your work area.
Sharp edges on cut drywall can cause cuts and scrapes. Handle cut pieces carefully and sand rough edges before installation. Wear work gloves when carrying or positioning cut drywall pieces.
Utility knife blades become extremely sharp when new and dangerous when dull. Change blades frequently to maintain clean cuts and reduce the force required for cutting. Dispose of used blades safely in a blade disposal container.
Support drywall sheets properly during cutting to prevent injury from falling pieces. Use sawhorses or a stable work surface that supports the entire sheet. Never attempt to hold large sheets while cutting.
Keep your work area clean and organized. Drywall scraps create tripping hazards and can damage saw blades if stepped on. Sweep up debris regularly during your project.
Common Mistakes and Solutions
Tearing the paper facing creates rough edges that require extra finishing work. This problem usually results from dull knife blades or insufficient scoring pressure. Replace blades frequently and make firm, confident cuts.
Overcuts extend beyond the marked lines and create gaps around outlets or fixtures. These mistakes often occur when rushing or applying too much saw pressure. Work slowly and stop frequently to check your progress.
Inaccurate measurements lead to pieces that don’t fit properly. Always double-check measurements before cutting, and consider making pieces slightly oversized for final trimming after test fitting.
Crooked cuts result from inadequate guide support or moving the straightedge during cutting. Secure your guide firmly and apply consistent pressure throughout the cut. Use clamps when necessary to prevent guide movement.
Broken or cracked sheets occur when using improper snapping technique or attempting to snap pieces that are too small. Support both sides of the scored line adequately and apply gentle, even pressure when snapping.
Professional Tips and Tricks
Score multiple times for thick drywall rather than attempting to cut through in one pass. Three or four light passes produce cleaner cuts than one heavy pass. This technique also extends blade life significantly.
Back-cut slightly when making pieces that must fit tightly between existing surfaces. A slight bevel on the back edge allows easier fitting without gaps on the finished side. Use a utility knife held at a slight angle to create the back-cut.
Test fit pieces before final installation whenever possible. This practice allows for minor adjustments and prevents installation problems. Mark any areas requiring trimming before removing the piece for adjustments.
Use drywall screws as temporary handles when positioning large pieces. Drive screws partially into the drywall surface to create handles for lifting and positioning. Remove the screws after installation or drive them flush for permanent installation.
Keep blades sharp by replacing them frequently. Professional drywallers change utility knife blades after every few cuts to maintain optimal performance. Sharp blades require less pressure and produce cleaner cuts.
Finishing Cut Edges
Smooth any rough edges with sandpaper or a drywall rasp before installation. Rough edges create gaps that require excessive joint compound to fill. Spend time on edge preparation to reduce finishing work later.
Chamfer the edges of butt joints slightly to create a shallow groove for joint compound. This technique helps create stronger joints and reduces the likelihood of cracking. Use a utility knife held at a 45-degree angle to create the chamfer.
Remove any loose gypsum or paper fragments from cut edges. These fragments can interfere with proper joint compound adhesion and create weak spots in finished joints. Brush edges clean with a dry brush before installation.
Check cut edges for square using a framing square. Out-of-square edges create gaps and alignment problems during installation. Trim high spots with a utility knife or rasp to ensure proper fit.
Specialized Cutting Situations
Fire-rated drywall requires special cutting considerations due to its density and fiber reinforcement. Use extra-sharp blades and score more deeply than with standard drywall. The fibers resist cutting and may require sawing instead of scoring and snapping.
Moisture-resistant drywall cuts similarly to standard drywall but may require slightly more pressure due to its denser composition. Change blades more frequently as the material dulls blades faster than standard drywall.
Flexible drywall for curved applications cuts best with a utility knife using multiple light passes. Avoid attempting to snap flexible drywall as it tends to tear rather than break cleanly. Cut completely through with the knife for best results.
Sound-dampening drywall contains additional materials that affect cutting. These products often require sawing for all cuts due to their composition. Standard scoring and snapping techniques may not work effectively.
Tool Maintenance and Care
Keep utility knife blades sharp by changing them regularly. Dull blades require more pressure and create rough cuts. Store spare blades in the knife handle compartment for easy access during projects.
Clean drywall saws regularly to prevent gypsum buildup on the teeth. Brush or blow out accumulated dust after each use. Gypsum dust can gum up saw teeth and reduce cutting efficiency.
Store cutting tools in a dry location to prevent rust. Moisture accelerates tool deterioration and affects cutting performance. Apply light oil to metal surfaces if tools will be stored for extended periods.
Check straightedges and squares for accuracy periodically. Dropped or damaged tools may lose their precision. Test squares against known straight edges and replace damaged tools promptly.
Planning Your Cuts
Plan cuts to minimize waste and reduce the number of pieces required. Standard drywall sheets measure 4 feet by 8 feet, but other sizes are available. Consider using 12-foot sheets for rooms with high ceilings to reduce horizontal joints.
Arrange cuts to use factory edges when possible. Factory edges are perfectly straight and square, reducing fitting problems. Plan your layout to take advantage of these edges for the most visible joints.
Consider joint locations when planning cuts. Avoid creating joints that align with door or window openings where they will be highly visible. Stagger joints between courses to create a stronger installation.
Account for electrical and plumbing rough-in when planning cuts. Coordinate with other trades to ensure accurate measurements for all penetrations. Verify rough-in locations before cutting outlet and fixture openings.
Cutting drywall successfully requires practice, patience, and attention to detail. Start with simple straight cuts to build confidence before attempting more complex shapes. With proper tools and techniques, you can achieve professional-quality results on your drywall installation project.
Remember that perfect cuts reduce finishing time and improve the final appearance of your project. Take time to measure accurately, mark clearly, and cut carefully. These steps will pay dividends during the taping and finishing phases of your drywall project.