How to Add Backsplash to Kitchen?
Your kitchen backsplash is more than just a pretty face. It protects your walls from splashes, spills, and splatters. It also gives your kitchen a fresh new look that can completely transform the space. The best part? You can install a kitchen backsplash yourself without hiring a contractor.
This guide walks you through everything you need to know. We’ll cover tools, materials, step-by-step instructions, and helpful tips. By the end, you’ll feel confident tackling this kitchen project.
Why Add a Backsplash?
Before we jump into how to install backsplash, let’s talk about why this project matters.
A kitchen backsplash serves real purposes. It catches water, oil, and food particles that bounce or splash during cooking. Your walls stay cleaner longer. You won’t see grease stains building up behind your stove.
But here’s the thing—backsplashes also make your kitchen look expensive. A new tile backsplash behind the sink or range instantly updates the whole room. You get a custom kitchen look without a full renovation price tag.
Backsplashes come in tons of styles too. Subway tile backsplash designs are timeless. Glass backsplash options look modern. Peel and stick backsplash tiles work for renters. Natural stone backsplash creates luxury vibes. You pick what matches your style.
Installing a backsplash takes a weekend. It costs way less than hiring someone. You save money while getting a beautiful result. That’s a win-win.
What You’ll Need: Tools and Materials
Let’s talk supplies. You don’t need a huge collection of fancy tools. Most items are cheap and easy to find.
Essential Tools
Start with basics. You need a notched trowel. This spreads mortar or adhesive evenly on your wall. A four-quarter-inch notched trowel works for most small tiles. For larger tiles, get a half-inch notched trowel.
Next, get a grout float. This tool spreads grout between tiles and removes excess. It’s inexpensive and essential for a clean finish.
Grab a tile cutter. A wet saw gives the cleanest cuts, but a manual tile cutter costs less and works fine for most projects. Both are available at hardware stores.
You’ll need a level. Tiles must sit straight. A two-foot level helps you check as you work.
A tape measure, pencil, and straight edge keep things aligned. Have a grout sponge for cleanup. A bucket holds water and grout.
Grab safety gear too. Wear work gloves and safety glasses. Tiles have sharp edges.
Materials for Your Backsplash
Backsplash tiles are your main material. You have choices here. Ceramic tile is affordable and comes in tons of colors. Porcelain tile is tougher and resists stains better. Glass tiles look sleek. Natural stone tiles feel fancy. Pick what fits your budget and style.
Count your square footage first. Measure the wall area. Most backsplashes run about thirty-six inches high. Measure from countertop to cabinets. Add a few extra tiles for mistakes.
You need adhesive or thin-set mortar. Some people use premade tile adhesive. It’s convenient but costs more. Traditional thin-set mortar is cheaper and works great. Mix it with water to get the right thickness.
Grout fills the gaps between tiles. Unsanded grout works for narrow gaps under one-eighth inch. Sanded grout suits wider gaps. Both come in tons of colors. Match your tile or go bold with contrast.
Caulk seals the corners where tile meets wall or cabinet. Use silicone caulk rated for wet areas. It stays flexible when the house shifts.
Get a primer or sealer if your walls are bare drywall. This helps adhesive bond better.
Preparing Your Kitchen Walls
Preparation makes a huge difference. Don’t skip this step.
Clean Your Wall
Start by removing anything on the wall. Take down outlet covers, switch plates, and light fixtures. Scrape off old wallpaper, paint chips, or loose stuff. Your surface needs to be clean and stable.
If your wall has gaps or damaged spots, fill them now. Use spackle for small holes. For bigger damage, use joint compound or patch drywall. Sand smooth once dry.
Check Your Wall
Use your level to see if the wall is even. Most walls have bumps and dips. Mark high spots with a pencil. You may need to sand them down.
For super uneven walls, consider using a self-leveling wall primer. This helps tiles sit flat even if the wall isn’t perfect.
Prime if Needed
If you’re working with bare drywall, apply primer. It helps adhesive stick better and creates a smoother surface. Let it dry completely before moving on.
Planning Your Layout
Good layout work saves headaches later. It’s worth taking time here.
Find Your Starting Point
Don’t start a tile backsplash at a corner. Corners rarely look good with cut tiles. Instead, start near the center of your wall.
Measure your wall width. Find the middle point. This is usually your best starting spot. It ensures matching tiles on both sides and makes the layout look balanced.
Mark a vertical line with a pencil. Use your level to make sure it’s straight. This is your guide line.
Account for Countertop Height
Countertops aren’t always perfectly level. Measure up from your countertop at three different spots. Mark where your tiles will start.
Use a level again to draw a horizontal line. Tiles sit on this line. If your countertop isn’t level, your tiles won’t be either. That’s okay. It looks right because it follows the countertop.
Plan for Outlets and Obstacles
Most kitchens have outlets in the backsplash area. Mark these spots. You’ll need to cut tiles around them.
Mark any other obstacles like light switches or soap dispensers. Tile around these items rather than removing them. It’s faster and easier.
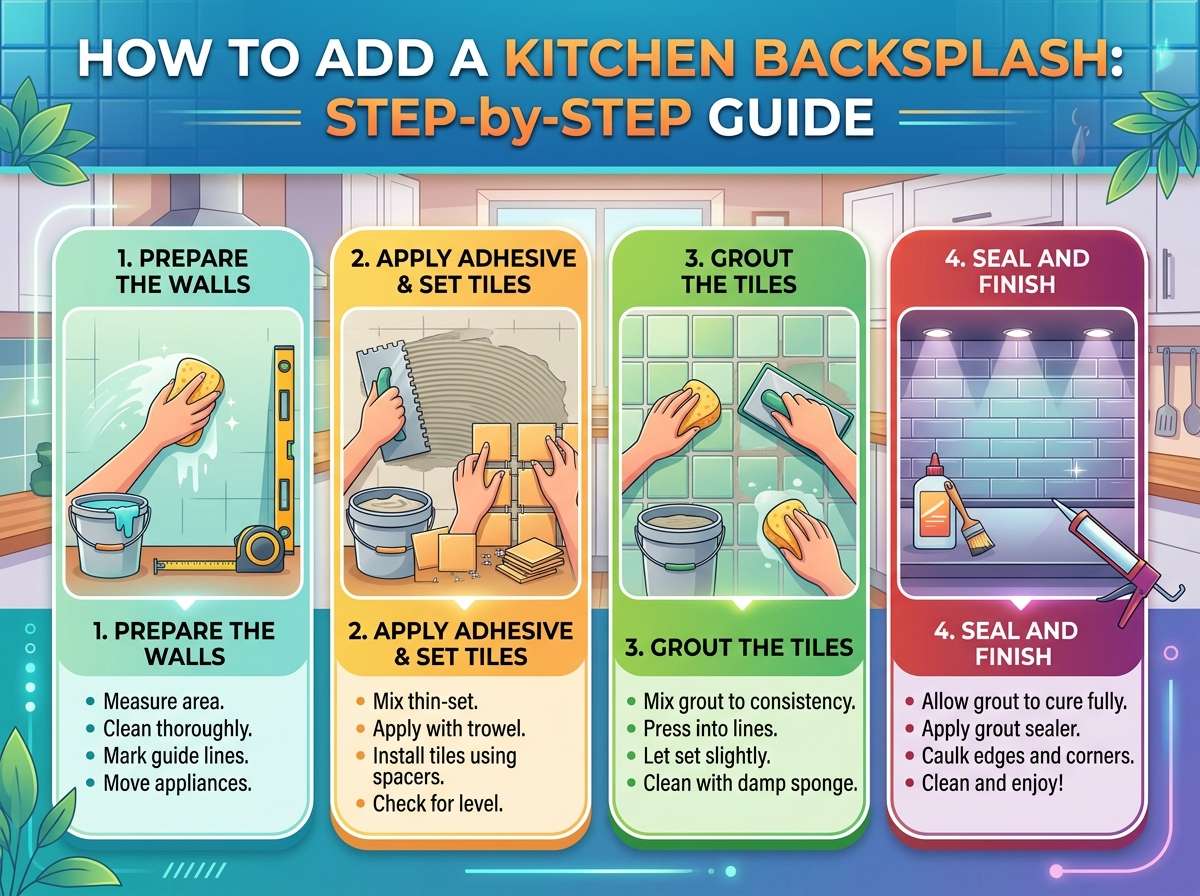
Applying Adhesive and Setting Tiles
Now the fun part—putting tiles on the wall.
Mix Your Adhesive
Follow package directions. Mix thin-set mortar or adhesive with water until it looks like peanut butter. Not too thick, not too thin. Let it sit for five minutes, then stir again. This resting time helps it work better.
If using premade adhesive, you might skip the mixing step. Check the container.
Apply Thin-Set
Use your notched trowel. Hold it at a forty-five-degree angle. Push mortar onto the wall in sweeping motions. You want even coverage with lines showing. The notches create ridges. These ridges help tiles grip better.
Work in small sections. Don’t cover more than three or four square feet at once. Mortar dries fast. You need to set tiles while it’s still tacky.
Place Your First Tile
Start at your center line and baseline. Press the first tile firmly into mortar. Wiggle it slightly to seat it. Use spacers between tiles. Most spacers are small plastic crosses that create consistent gaps.
The gap size depends on your look. Tight grout lines look modern. Wider gaps feel traditional. Pick what matches your style.
Continue Setting Tiles
Move along your baseline. Place one tile next to another. Keep pressure consistent. Use spacers every time.
Work outward from your center point. You’ll eventually hit your corners and edges. These need cuts. We’ll get to that.
Check frequently with your level. Tiles should be flush and even. Tap gently with a rubber mallet if they sit too high or low.
Let It Set
Stop when you’ve covered your planned area. Let the thin-set cure. Check the package—usually six to twenty-four hours. Don’t skip this wait. Tiles will shift if you grout too early.
Cutting Tiles for Edges and Obstacles
Most kitchens need cut tiles. Don’t stress—it’s easier than you think.
Measure Carefully
Measure twice, cut once. That old saying is true.
Measure from your last full tile to your edge. Subtract the grout gap width. That’s your cut size.
Write the measurement down. Mark your tile with a pencil. Keep marks on the back—they’ll disappear after installation.
Use Your Cutter
A wet saw is easiest if you have one. It’s loud but makes straight cuts. Some hardware stores rent them cheaply.
For a manual tile cutter, score the tile first. The cutter has a scoring wheel. Push it across your mark. Push hard enough to make a visible line, but don’t press so hard you break the tile.
Once scored, use the lever to snap the tile. The cutter has a snapping bar. Push down sharply. The tile breaks along your score line.
Handle Outlet Holes
This looks harder than it is. Mark your tile. Measure exactly where the outlet box sits. Mark this on your tile.
Use a wet saw with a diamond blade. Or use a tile file to carefully grind away material. Go slow. It’s easy to crack a tile rushing this part.
Test fit before applying mortar. Make sure the tile fits properly. You can adjust if needed.
Grouting Between Tiles
Grouting brings everything together. It fills gaps and locks tiles in place.
Mix Your Grout
Like mortar, grout needs proper mixing. Add water slowly to grout powder. Stir until smooth. No lumps. Let it sit five minutes, then stir again.
Consistency matters. It should be thick enough to hold peaks but spread smoothly.
Apply Grout
Use your grout float. Hold it at a forty-five-degree angle. Push grout into gaps between tiles. Work diagonally across the tiles, not parallel. This prevents pulling grout out of the joints.
Press firmly. You want grout packed solidly in every gap. No air pockets. Those create weak spots.
Remove Excess
After five to ten minutes, grout firms up. Now remove excess from the tile surface.
Hold your float at a steeper angle. Drag it across tiles diagonally. This removes grout from the surface while leaving it in the joints.
Rinse your float frequently in clean water. Squeeze it out. Wet grout is easier to remove than dried grout.
Clean Thoroughly
After another few hours, a haze appears on tiles. This is dried grout dust.
Wipe it with a damp sponge. Use circular motions. Rinse your sponge often in clean water. Keep water clean—murky water dirties tiles.
This cleanup step takes patience but pays off with shiny tiles.
Let Grout Cure
Grout needs time to harden. Most types need three days. Don’t splash water or touch the backsplash during this time.
Check your grout brand. Some cure faster than others.
Sealing and Protecting
Some tiles and grout need sealing. This step protects your work long-term.
Seal Porous Materials
Natural stone tiles and unsealed grout are porous. They soak up stains. Sealer prevents this.
Wait until grout is completely cured. Usually one week is safe.
Apply sealer with a small brush or applicator. Follow product directions. Usually you apply thin coats and let them dry between coats.
Sealer adds shine and protects your backsplash for years.
Caulk the Edges
Where your tile meets your countertop or cabinets, use caulk instead of grout. Grout cracks at movement joints. Caulk flexes with the house.
Use 100-percent silicone caulk. Apply a smooth bead along the joint. Smooth it with a wet finger. Let it cure per package directions.
Caulk keeps water out of gaps. It’s crucial for a long-lasting backsplash.
Different Backsplash Tile Options
Your tile choice changes the whole look. Here’s a breakdown.
Subway Tile Backsplash
Subway tile is classic. These rectangular tiles are usually white or cream. They’re named after old subway stations.
Subway tiles are affordable and forgiving for beginners. They hide imperfections better than larger tiles. Grout lines create visual interest.
You can run them straight, staggered, or herringbone. Each style looks different. Staggered patterns are trendy. Herringbone patterns look fancy.
Glass Tile Backsplash
Glass tiles look modern and sleek. They reflect light and make spaces feel bigger.
They’re pricier than ceramic. They show fingerprints and dust more. Cleaning takes extra care.
Glass tiles are gorgeous behind sinks. They add a refined touch to any kitchen.
Mosaic Tile Backsplash
Mosaic tiles are small pieces combined into patterns. They come as sheets of preassembled tiles.
Mosaics are fun and creative. They work great for small areas or accents. Full backsplashes in mosaic can feel busy.
Installing sheets is faster than individual tiles. There are fewer grout lines to manage.
Peel and Stick Backsplash Tiles
Peel and stick tiles have adhesive backing. No mortar needed. No grout needed.
These are perfect for renters. They install in hours, not days. Removal is possible without damaging walls.
Quality varies. Some look cheap and plastic. Others look surprisingly nice. Read reviews before buying.
Natural Stone Backsplash
Marble, granite, slate, and travertine create luxury feels.
Natural stone is expensive. It needs sealing and careful maintenance. Acidic foods can damage some stones.
The beauty is worth it if budget allows. Each stone is unique. Your backsplash becomes a design statement.
Large Format Tiles
Big tiles mean fewer grout lines. Fewer lines mean a cleaner, more modern look.
Large tiles are trickier for beginners. Any imperfection shows clearly. Your walls must be very level.
Once installed, they look spectacular. Professional-grade results are achievable with patience.
Common Mistakes to Avoid
Learning from others saves time and frustration.
Skipping Wall Prep
Rushing through preparation leads to problems. Uneven walls cause tiles to crack. Dirty walls prevent good adhesion. Take your time here.
Not Planning Layout
Jumping straight to tiling leads to awkward cut tiles at edges. Bad layout looks unbalanced. Spend thirty minutes planning. It pays off in the final look.
Using Wrong Adhesive
Tile adhesive isn’t one-size-fits-all. Check your tile type. Some tiles need specific adhesive. Using the wrong type causes tiles to fall off.
Mixing Too Much Mortar
Thin-set dries fast. Mixing huge batches wastes product. Start with small batches. You can always mix more.
Rushing Curing Times
Patience is hard. Impatience causes disaster. Let layers cure fully before moving forward. This prevents tiles from shifting and cracking.
Uneven Grout Lines
Inconsistent spacing looks sloppy. Use spacers every single time. They’re cheap insurance for a professional look.
Ignoring Outlets
Outlets need careful handling. They’re electrical. Cutting carelessly is dangerous. Measure twice. Mark clearly. Cut slowly.
Maintenance and Care
Your backsplash lasts longer with proper care.
Regular Cleaning
Wipe your backsplash weekly with a damp cloth. This removes dust and splatters before they dry.
Use mild soap and water. Avoid harsh chemicals that damage grout or stone.
Dry with a soft cloth. This prevents water spots and mineral buildup.
Dealing with Stains
Grout stains happen. Light stains come off with baking soda paste and a soft brush.
Tougher stains might need grout cleaner. Test it on a hidden area first.
Stone tiles need stone cleaner. Regular household cleaners can damage natural stone.
Preventing Damage
Don’t bang pots or pans against the backsplash. Tiles can crack. Be gentle when cleaning.
Keep acidic foods away from natural stone. Lemon juice and vinegar can etch marble and limestone.
Use coasters under wet bottles. Minerals from standing water leave marks.
Grout Repair
Grout cracks over time. Small cracks usually mean the backsplash is settling normally.
Use grout colorant for touch-ups. It matches your existing grout and hides small cracks.
For bigger cracks or missing grout, remove the damaged area with a grout saw. Re-grout following the same process. Let it cure fully before using.
Tools and Equipment Rentals
Some tools are one-time purchases. Others you might rent.
Wet Saw Rentals
A wet saw makes perfect tile cuts. Rental shops have them. Daily rentals cost thirty to fifty dollars.
This is worth it for large backsplash projects. Straight cuts look professional. You finish faster.
Grinder Rentals
For thick or hard tile, a grinder helps. It’s less common for small jobs but available.
Paint Tray Alternatives
You can skip fancy mixing containers. A paint roller tray holds mortar or grout nicely. It’s cheaper than buying tile trays.
Hiring Help if You Need It
Sometimes DIY isn’t the answer. That’s okay.
Professional installers are worth it for complex layouts. If your walls are very uneven, professionals have techniques you’ll learn from.
Large projects take forever alone. Hiring someone for a day speeds things up dramatically.
Get multiple quotes. Interview installers. Ask for references.
Expect to pay more than just materials. Labor adds cost. But professional results might justify it.
Backsplash Trends and Styles
Your backsplash reflects your style. Here’s what’s popular.
Minimalist Look
Clean lines. Neutral colors. Minimal grout. Modern and sophisticated.
Bold Patterns
Geometric tiles create visual interest. Mixed colors and shapes make statements.
Mixed Materials
Combining tile types creates texture. Subway tile with glass accents looks interesting.
Earth Tones
Warm colors like terracotta, sage, and cream feel welcoming. They work with many kitchen styles.
Metallic Finishes
Copper, gold, or silver tiles shimmer. They add glamour and light reflection.
Final Thoughts on Your New Backsplash
Installing a kitchen backsplash is totally doable. It’s a perfect first project for DIY beginners.
You don’t need advanced skills. You just need patience and care. Take your time. Follow instructions. You’ll be proud of your finished work.
Your kitchen gets an instant upgrade. The backsplash protects your walls and beautifies your space. Every time you cook, you’ll love how it looks.
Plus, you did it yourself. That pride is worth something too.
Now get out there. Grab your tools. Transform your kitchen. Your new backsplash is waiting.
Hi, I’m Mary, the founder of Homygear.com. I’m passionate about creating a comfortable, smart, and beautiful home. I share practical insights and real-world experience on home gear that makes everyday life easier. Behind the scenes, my dedicated research team studies products in depth, and our writers craft honest reviews using trusted, authentic sources—so you can choose home gear with confidence.