How to Install a Dishwasher?
So you just got a new dishwasher. Great choice. Hand-washing dishes every night is no fun, and a dishwasher saves you time, water, and a whole lot of effort.
But now comes the big question — can you install it yourself?
Yes, you can. It’s not as hard as it looks. Plenty of homeowners do this without calling a plumber. You just need the right tools, a bit of patience, and this guide right here.
Let’s walk through the whole process together — from start to finish.
Before You Start: What You Need to Know
Before you touch anything, take a breath and read this section. A little prep work saves a lot of trouble later.
First, check your space.
Open up the cabinet under your sink. Look at the water supply line, the drain line, and the electrical connection. Your dishwasher needs all three to work. If any of these are missing, you may need a plumber or electrician before you start.
Second, read your dishwasher manual.
Every brand is a little different. Bosch, Samsung, GE, Whirlpool — they all have slight differences. The manual covers specifics that this guide can’t. Keep it nearby.
Third, turn off the power and water.
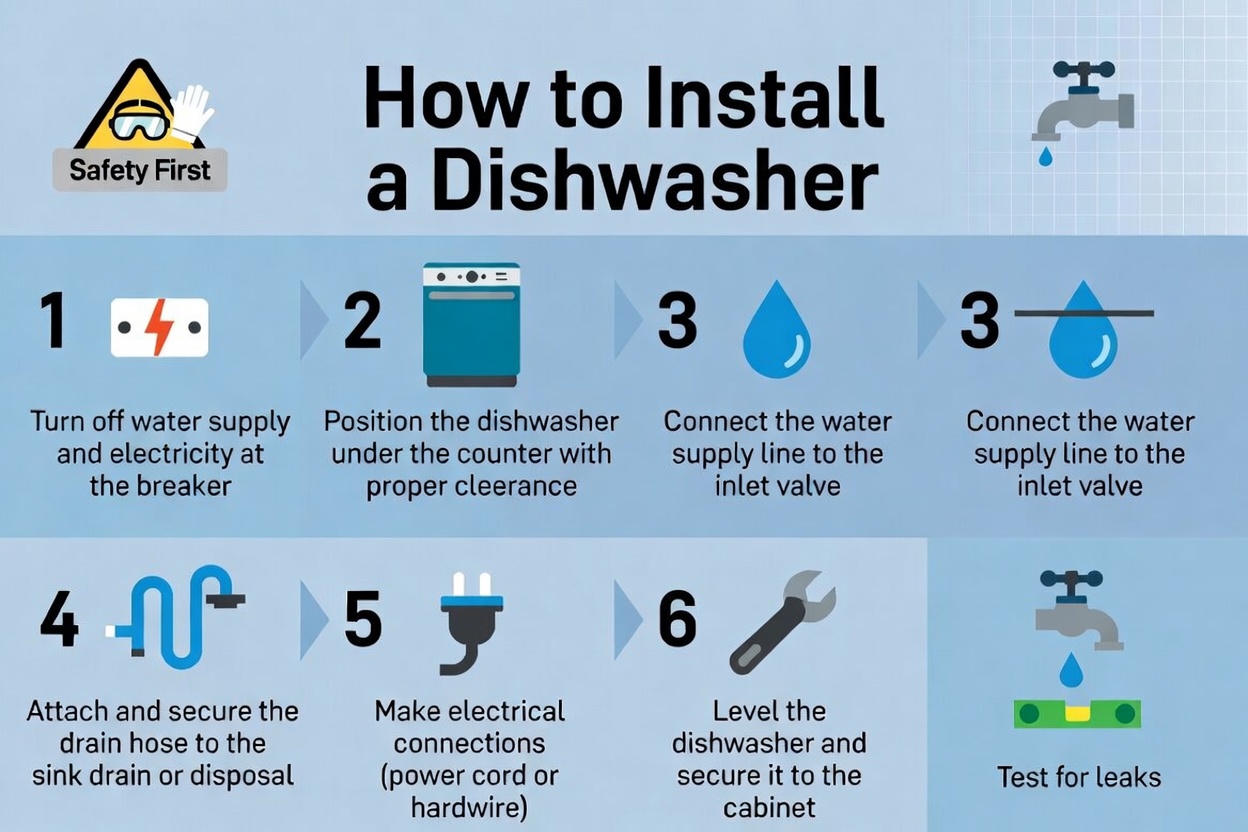
Go to your circuit breaker. Find the circuit for your kitchen or dishwasher. Turn it off. Then shut off the water supply valve under the sink. These two steps keep you safe. Don’t skip them.
Tools and Materials You’ll Need
Here’s what to gather before you start. Most of these are basic tools you probably already have.
- Adjustable wrench — for tightening water connections
- Screwdrivers — both flat-head and Phillips
- Pliers — needle-nose pliers are very helpful
- Drill and drill bits — for mounting under the counter
- Pipe tape (Teflon tape) — wraps around threads to stop leaks
- Bucket and towels — water will drip, guaranteed
- Flashlight or headlamp — under the sink is dark
- Level — keeps the dishwasher sitting straight
- Wire nuts — for the electrical connection
- Voltage tester — confirms the power is off before you wire anything
You may also need a dishwasher installation kit. These kits include the water supply line, drain hose, and elbow fittings. Check if your new dishwasher comes with these. If not, grab a kit at any hardware store.
Step 1: Remove the Old Dishwasher (If There Is One)
If you’re replacing an old unit, start here. If this is a brand-new installation, skip ahead to Step 2.
Disconnect the power first.
You already shut off the breaker. Now pull the dishwasher out slightly. Find the junction box at the bottom front. Remove the cover plate. You’ll see wires connected inside. Use your voltage tester to double-check that there’s no power. Once confirmed, disconnect the wires.
Disconnect the water supply.
Under the sink, you’ll find a water supply line running to the dishwasher. Use your wrench to loosen the fitting. Have your bucket ready — water will drip out.
Disconnect the drain hose.
The drain hose runs from the dishwasher to either the garbage disposal or the sink drain. Loosen the clamp with a screwdriver and pull the hose free.
Remove the mounting screws.
Open the dishwasher door. Look at the top edge — or on some models, the sides. You’ll find screws holding the unit to the counter. Remove them.
Slide it out.
Pull the dishwasher forward slowly. It sits on adjustable legs, so it should slide out without too much effort. If it’s stuck, lower the front legs a bit using a screwdriver.
Set the old unit aside. You’re now ready for the new one.
Step 2: Prepare the Space
With the old dishwasher out, take a moment to inspect the space.
Check the floor. Is it level? Use your level tool to confirm. A dishwasher that sits crooked will vibrate, make noise, and not clean as well.
Check for damage. Look at the floor, walls, and inside of the cabinet. If there’s any water damage or mold from the old unit, fix that first. Don’t trap a moisture problem behind your new appliance.
Check measurements. Standard dishwashers are 24 inches wide, 24 inches deep, and 35 inches tall. Most kitchen openings match these dimensions. If your space is different, double-check before installing.
Check the connections. You need three things in place:
- A water supply valve (usually under the sink)
- A drain connection (either at the disposal or a drain air gap)
- A dedicated electrical circuit (usually 120 volts)
If anything is missing or damaged, handle it before you proceed.
Step 3: Prep the New Dishwasher
Take the new dishwasher out of the box. Lay it on its back on a soft surface — a flattened cardboard box works great. This gives you easy access to the bottom.
Install the water inlet valve fitting.
Find the water inlet on the bottom of the dishwasher. It’s usually a threaded port. Wrap Teflon tape around the threads. Then screw in the elbow fitting from your installation kit. Hand tighten it first, then use your wrench to snug it up. Don’t overtighten — you’ll crack the fitting.
Attach the drain hose.
Slide the drain hose onto the drain port on the dishwasher. Secure it with a hose clamp. Make sure it fits snugly — a loose drain hose causes leaks and flooding.
Check the leveling legs.
At the front bottom of the dishwasher are two adjustable legs. You’ll adjust these later to get the unit sitting level. For now, just make sure they’re there and can turn freely.
Step 4: Run the Drain Hose and Water Line
Now you need to get your hoses into the right positions under the sink.
Route the drain hose first.
The drain hose needs to run from the dishwasher into the cabinet under the sink. Most dishwasher openings have a hole at the back or side for this. Thread the drain hose through that opening.
High loop or air gap — pick one.
This is important. The drain hose needs to be protected from backflow — meaning dirty water from the sink should never flow back into the dishwasher.
You do this one of two ways:
- High loop method: Loop the drain hose up as high as possible under the counter before connecting it to the drain. Secure it in place with a zip tie or hose clamp. This is simple and works well.
- Air gap method: An air gap is a small fitting mounted on the countertop or sink. It physically separates the drain hose from the sink drain. Some local codes require this. Check your local plumbing codes to be sure.
Connect the drain hose to the garbage disposal’s dishwasher port, or to the sink drain tailpiece using a dishwasher drain adapter. Secure the connection with a hose clamp.
If connecting to a garbage disposal: There’s a knockout plug inside the disposal’s dishwasher inlet. You must remove it before connecting the hose. Use a screwdriver and hammer to knock it out. Reach inside and remove the plastic piece. If you forget this step, water won’t drain — a very common mistake.
Route the water supply line.
Thread the water supply line from the dishwasher through the same opening into the cabinet below the sink. Leave enough slack to make connections comfortably.
Step 5: Slide the Dishwasher Into Place
You’re almost ready to push the unit in. But first, thread the electrical wires through the opening too, so they’re accessible from the front of the unit.
Tilt the dishwasher slightly.
Lean it back a little as you slide it in. This helps the hoses and wires feed through properly without getting pinched.
Slide slowly.
Push the dishwasher into the opening carefully. Watch that the hoses and wires don’t kink or get pinched against the cabinet walls. Straighten anything that looks bent.
Don’t push it all the way in yet.
Leave it sticking out a few inches. You still need to make your water and electrical connections.
Step 6: Connect the Water Supply
Under the sink, connect the water supply line to the hot water valve.
Use Teflon tape on the threads. Wrap it around the male threads a few times before connecting. This prevents leaks.
Hand tighten first, then use your wrench to tighten a half turn more. Snug is enough. Over-tightening strips threads and causes more leaks, not fewer.
Once connected, slowly turn on the water supply valve. Look underneath for drips. If you see a drip, tighten slightly. If it keeps dripping, turn off the water, remove the fitting, re-wrap with Teflon tape, and reconnect.
Step 7: Make the Electrical Connection
This part sounds scary. It’s actually straightforward — as long as the power is off.
Find the junction box. It’s at the front bottom of the dishwasher, behind a small metal plate. Remove the cover.
Feed your wires through the cable clamp. The wires from your house come in through here. Tighten the clamp so the wires are held securely.
Connect the wires.
- Black to black (hot wire)
- White to white (neutral wire)
- Green or bare copper to green (ground wire)
Use wire nuts to join each pair. Twist them on firmly. Tug each wire to confirm it’s secure.
Replace the cover plate. Close it up and tighten the screws.
Step 8: Level the Dishwasher and Secure It
Push the dishwasher fully into the opening now. Open the door and place your level on the top edge of the tub — both front-to-back and side-to-side.
Adjust the front legs.
Use a flat-head screwdriver to turn the legs. Turn clockwise to raise, counter-clockwise to lower. Get it as level as possible. A level dishwasher cleans better and won’t vibrate loose over time.
Secure the mounting brackets.
Open the door and look at the top. You’ll see two metal tabs or brackets. These screw into the underside of your counter. Use the screws that came with the dishwasher. This step keeps the unit from tipping forward when you pull the rack out.
Some dishwashers — especially if your counter is stone or tile — mount to the sides of the cabinet instead. Check your manual for the correct method.
Install the kick plate.
The kick plate is the small panel that covers the bottom front of the dishwasher. Snap or screw it into place.
Step 9: Run a Test Cycle
Almost done. Now let’s make sure everything works.
Go back to the circuit breaker and turn the power back on.
Return to the dishwasher. Set the controls to a short rinse or normal wash cycle. Press start.
Watch and listen for the first few minutes.
- Does water flow in? Good.
- Do you hear the pump running? Good.
- Do you see any water on the floor? Not good.
Check under the sink while the cycle runs. Look at both the water supply connection and the drain hose connection. Any drips need to be addressed right away.
Check the drain.
When the cycle hits the drain phase, watch the drain hose. You should hear water pumping out. Check the drain connection at the disposal or sink drain for leaks.
Let the cycle complete.
If everything looks dry and the dishwasher fills, washes, and drains properly — you’re done. You just installed a dishwasher yourself.
Common Problems and How to Fix Them
Even with careful work, small issues come up. Here’s how to handle the most common ones.
Water is leaking from the supply line.
Turn off the water. Disconnect the line. Re-wrap the threads with Teflon tape. Reconnect and tighten. Turn the water back on and check again.
Water isn’t draining.
This is almost always the garbage disposal knockout plug. Turn off the dishwasher. Check that the plug was removed from inside the disposal. If it’s still there, knock it out and remove it.
The dishwasher is leaking from the door.
This usually isn’t an installation issue. It can happen if the unit isn’t level. Re-check the legs and adjust until the dishwasher is perfectly level.
The dishwasher is noisy.
It’s probably not level. Use your level tool and adjust the legs. Also check that no hoses or wires are pressed against the side of the cabinet — vibration noise often comes from contact between the unit and cabinet walls.
The dishwasher won’t start.
Check the power connection. Make sure the circuit breaker is on. Open the junction box and verify the wire nut connections are tight. Also check the door — many dishwashers won’t run if the door latch isn’t fully engaged.
Tips to Keep Your Dishwasher Running Well
Now that it’s installed, a little care goes a long way.
Clean the filter regularly. Most modern dishwashers have a filter at the bottom of the tub. Rinse it under warm water every month or so.
Use the right detergent. Dishwasher pods or powder work better than dish soap. Never use regular hand soap — it creates too many suds and can cause leaks.
Run hot water before starting. Turn on your kitchen faucet until the water runs hot. Then start the dishwasher. This means the first fill cycle uses hot water, which cleans better.
Don’t overload it. Cramming too many dishes in blocks the spray arms. Space things out so water can reach all surfaces.
Check the spray arms. Every few months, spin the spray arms by hand. Make sure the holes aren’t clogged. A toothpick clears blocked holes easily.
Leave the door cracked after a cycle. This lets moisture escape and prevents musty smells inside the tub.
When to Call a Professional
This is a DIY-friendly project, but some situations call for a pro.
Call a plumber if:
- You don’t have a water shutoff valve under the sink
- The drain connection is complicated or damaged
- You see signs of water damage or mold behind the old unit
Call an electrician if:
- There’s no dedicated circuit for the dishwasher
- The wiring looks old, damaged, or confusing
- You’re not comfortable working with electrical connections at all
There’s no shame in calling for help. A licensed plumber or electrician can handle these parts, and you can do the rest yourself.
Final Thoughts
Installing a dishwasher is one of the most satisfying home improvement jobs you can do. It saves money, teaches you how your home works, and gives you a useful appliance for years to come.
Take it slow. Read each step before you do it. Keep your tools nearby and your manual handy.
The whole job — from start to finish — takes most people two to three hours the first time. Experienced DIYers can knock it out in under an hour.
You’ve got this.
Once your new dishwasher is up and running, load it up and enjoy the fact that you never have to stand at the sink scrubbing plates again. That’s a win worth celebrating.

Hi, I’m Mary, the founder of Homygear.com. I’m passionate about creating a comfortable, smart, and beautiful home. I share practical insights and real-world experience on home gear that makes everyday life easier. Behind the scenes, my dedicated research team studies products in depth, and our writers craft honest reviews using trusted, authentic sources—so you can choose home gear with confidence.