How to Install Crown Molding?
Crown molding is one of those home improvement projects that looks fancy and complicated. But here’s the truth: you can absolutely do this yourself. It might take some patience and a few practice cuts, but the final result is worth every bit of effort. This guide walks you through the entire process, from planning to finishing touches.
What Is Crown Molding and Why Install It?
Crown molding is the decorative trim that sits at the top of your walls where they meet your ceiling. Think of it as the finishing touch that makes a room look polished and expensive. When you look at a professionally designed room, crown molding often plays a big role in that finished appearance.
Installing crown molding yourself saves thousands of dollars compared to hiring a contractor. A professional installation can cost between two and five dollars per linear foot, plus labor. By doing it yourself, you only pay for materials.
Beyond the cost savings, crown molding adds real value to your home. It increases curb appeal. It makes your rooms look taller and more elegant. It gives your interior design a complete, thoughtful look that ties everything together.
Tools You’ll Need
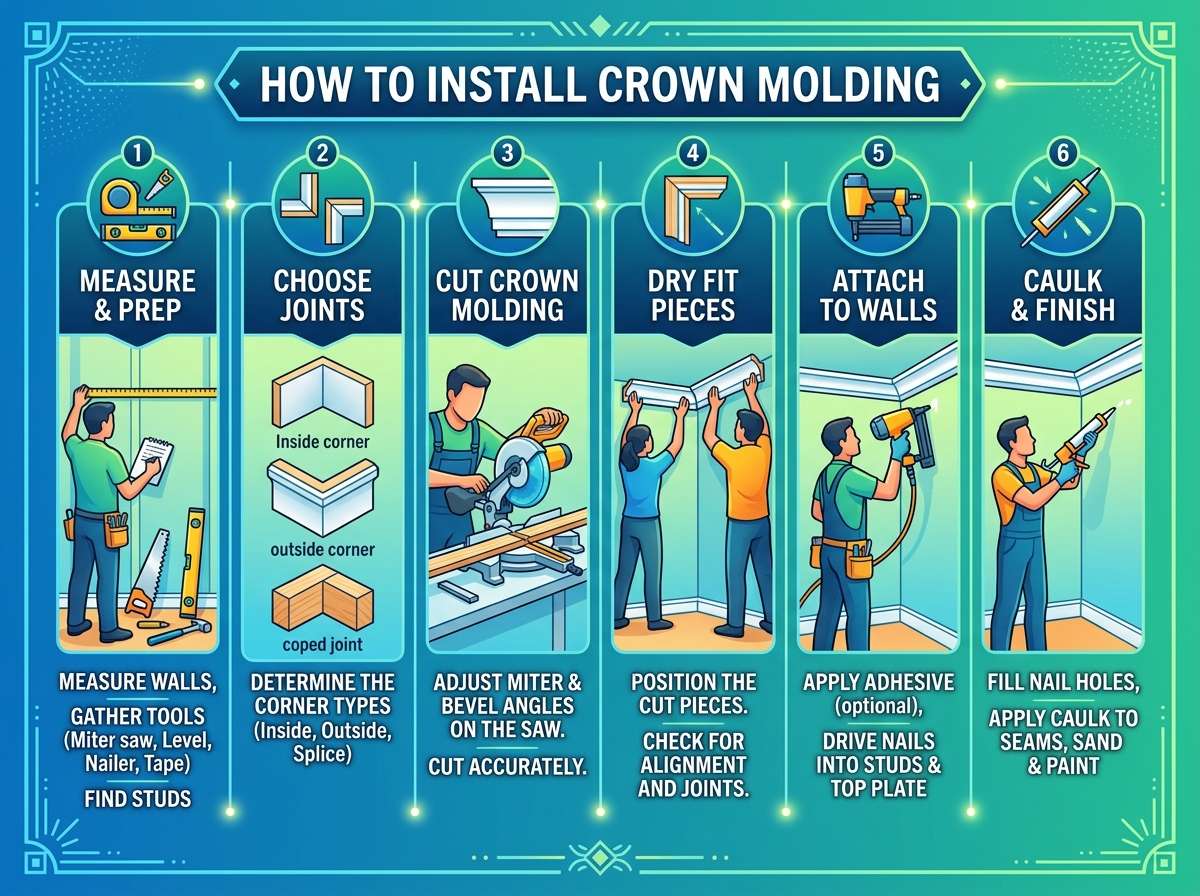
Before you start any crown molding project, gather your tools. Having everything ready prevents frustrating trips back to the store in the middle of work.
A miter saw is essential. This tool cuts your molding at the angles needed for corners and joints. You can use a hand saw and miter box, but a power miter saw makes the job much faster and easier.
You’ll need a stud finder. Crown molding is heavy, so it needs support from the wall studs and ceiling joists. A stud finder helps you locate these structural supports behind your drywall.
Get a level. A good level ensures your molding stays straight and true. A crooked installation looks cheap, even if the molding itself is expensive.
You’ll want a nail gun, either pneumatic or cordless. Nailing by hand is possible but exhausting. A nail gun drives fasteners quickly and leaves clean holes. If you don’t own one, they’re affordable to buy or rent.
Have a tape measure, pencil, and square on hand. These basic tools help with planning and marking cut lines.
A caulking gun and paintable caulk seal gaps between the molding and wall. Even small spaces get caulked for a seamless look.
Get a drill with bits for pilot holes. Pre-drilling reduces splitting and makes fastening easier.
Sandpaper and a sanding block smooth rough edges and joints.
Materials to Gather
Crown molding comes in different styles and materials. The most common choice is wood molding, which looks great and is easy to work with.
Measure your room carefully. Add up all the linear feet of crown molding you need. Always buy about 10 percent extra. You’ll have waste from cuts, and mistakes happen. It’s better to have extra than to run short.
Pick out your molding profile. This is just the shape of the trim. Stores have many options from simple and modern to ornate and traditional. Choose whatever matches your room’s design style.
You’ll need fasteners. For crown molding, use finish nails or pocket-hole screws. Finish nails are smaller and less visible. They come in different lengths. For typical molding, 2.5 inch nails work well.
Get paintable caulk that matches your finish. This fills small gaps and imperfections.
Pick your paint or stain. Crown molding looks best when painted or stained to match your trim or contrast with your walls. Choose a finish that works with your room’s color scheme.
Planning Your Installation
Good planning makes installation much smoother. Start by walking around the room with a tape measure.
Measure each wall. Write down the exact length of each wall section. Add about half an inch to each measurement for overlap at joints.
Check your walls and ceiling for level. Most older homes have slightly uneven walls and ceilings. A level helps you spot these issues before you install anything.
Look for obstacles. Light fixtures, vents, and other ceiling features affect where you install molding. Plan how you’ll handle these before you start cutting.
Find your wall studs and ceiling joists. Mark them lightly with a pencil. Your fasteners must hit these structural elements to hold the weight of the molding.
Dry fit your first corner. Cut two pieces at your corner angles (usually 45 degrees for outside corners, 90 degrees for inside corners) and hold them in place. This test fit helps you verify your cuts are accurate before you permanently install anything.
Understanding Crown Molding Angles
This is the part that confuses many beginners, but it’s really just basic geometry.
Outside corners need 45 degree cuts on each side. These two pieces meet at a right angle. Your miter saw has a 45 degree setting for this job.
Inside corners are trickier. Many people try 45 degree miters, but these don’t fit well. Instead, use the coping method. Cut the first piece straight into the corner. For the second piece, cut a coped joint that follows the profile of the first piece. This technique sounds hard but produces perfect results once you practice.
Some installers use scarf joints to hide seams on long runs. A scarf joint is two 45 degree cuts that create a diagonal seam. When caulked and painted, this seam is barely visible.
Your miter saw might have a crown molding stop or guide. This helps you position the molding correctly for cutting. If yours doesn’t, you can make a simple guide from scrap wood.
Cutting Your Crown Molding
Accurate cuts make the whole job easier. Practice on scrap pieces first.
Set up your miter saw in a comfortable workspace. A table or bench at a good height prevents back strain.
For an outside corner, place your molding flat on the saw. Set the blade to 45 degrees. Cut your first piece. Now rotate the blade to 45 degrees in the opposite direction and cut your second piece. These pieces should fit together in a perfect point.
For coped inside corners, cut the first piece straight. Then look at the profile of the molding. You’re going to cut along this profile on the second piece to make them fit together. Use a coping saw or a fine tooth saw. Go slowly and follow the contour. Sand your cut smooth afterward.
Cut your straight sections carefully too. Measure twice and cut once. This sounds like a cliche, but it works.
After cutting, sand all the cut edges smooth. Rough edges don’t fit together well and look unfinished.
Preparing Your Walls and Ceiling
Before you install anything, prepare the surfaces. This step makes fastening easier and produces better results.
Fill any gaps between your wall and ceiling with caulk and let it dry. This creates a uniform surface for your molding to rest against.
If you’re painting your molding, consider painting it before installation. This is much easier than painting around all the corners and seams after installation. Apply a primer and two coats of paint, sanding lightly between coats.
Mark your stud locations on the wall. You can use light pencil marks. These guides help you aim your fasteners.
Installing Crown Molding Step by Step
Now for the actual installation. Take your time and enjoy the process.
Start with an inside corner. This is the best place to begin because any mistakes are less visible than mistakes at eye level at outside corners.
Hold your first piece against the corner where the wall and ceiling meet. Make sure it’s level and true. Get a helper if possible. One person can manage this, but two people make it much easier.
Drive your first nail through the molding into the ceiling joist. Drive another nail into the top of the wall stud. Use at least three fasteners per corner section.
Check with your level frequently. Adjust the molding if needed before driving all the fasteners home.
For your next piece, match up the coped joint with the end of the first piece. Make sure everything looks right before fastening.
Continue around the room, corner by corner. Work on one wall at a time. This helps you maintain straight lines and even spacing.
When you reach an outside corner, fit your two pieces together. They should meet at a perfect point. Drive fasteners into studs and joists just like you did with the inside corners.
For long walls without corners, you might need a scarf joint to connect two pieces. Cut both pieces at 45 degrees, with the slope pointing down toward the wall. These should match up like a puzzle piece. After fastening, sand and caulk this joint for an invisible seam.
Dealing with Irregular Walls
Not all walls are perfectly straight or true. Older homes especially have quirks.
If your wall curves slightly, you might need shims. These are thin wedges of wood. Use them behind the molding to keep everything aligned. Drive fasteners through the shims into the studs.
For gaps between your molding and wall, use caulk after installation. Choose a caulk that matches your paint color.
At obstacles like light fixtures or vents, you have choices. You can install molding around the obstacle, notching the molding to fit. Or you can run the molding straight and install trim around the obstacle afterward.
Filling Gaps and Seams
After all your molding is installed, you have seams and small gaps to deal with.
Use paintable caulk to fill gaps between the molding and walls or ceiling. Apply caulk with a caulking gun, keeping a steady hand and smooth motion. A damp cloth smooths the caulk line before it dries.
Gaps at joints need attention too. If your joints are tight, light caulking might be all you need. If there are larger gaps, check that your cuts were accurate. You might need to make adjustments.
Fill nail holes with paint-matched caulk or wood filler. These small holes don’t need caulk, but it looks neater.
Painting and Finishing
Your crown molding deserves a great finish to look its best.
If you didn’t paint before installation, now’s the time. Paint around all the corners and seams. Use a good quality trim paint. It’s more durable and hides imperfections better than cheap paint.
Apply primer first if the molding is raw wood. Then apply two coats of paint, sanding lightly between coats.
If you prefer a natural wood look, apply stain instead of paint. Stain shows the wood grain and creates a warm, elegant appearance. Follow your stain instructions and apply a clear protective coat after staining.
Allow everything to dry completely before moving furniture back and using the room normally.
Common Mistakes to Avoid
Learning from others’ mistakes saves time and frustration.
Don’t skip the stud finding step. Fastening only into drywall causes sagging and failure. Your molding needs structural support.
Don’t rush your corner cuts. Practice on scraps. Good corners make everything look professional.
Don’t forget to account for the thickness of your molding when planning corners. This small detail makes a big difference in how well pieces fit together.
Don’t install molding crooked. Use a level throughout the process. A laser level makes this easier.
Don’t skimp on fasteners. Use enough nails or screws to properly support the molding weight.
Don’t paint before ensuring everything fits perfectly. If you need to adjust pieces, paint gets scratched off.
Don’t ignore caulk and gaps. These small imperfections are visible on molding, so take time to fill them properly.
Room by Room Considerations
Different rooms have different challenges and styles.
In living rooms and bedrooms, go with the design style you’ve chosen elsewhere in the home. Traditional molding works in classic homes. Modern profiles suit contemporary designs.
In kitchens, use moisture resistant molding or finish. Kitchens have more humidity than other rooms. Proper finishing protects your investment.
Bathrooms also need extra attention to moisture. Consider using PVC molding in bathrooms. It resists moisture, won’t rot, and requires no wood stain or finish.
In basements, watch for moisture issues. A dehumidifier helps keep conditions stable. Moisture resistant molding works better in basements than standard wood.
High ceilings make rooms feel grand, but they make installation harder. Use a sturdy ladder and have a helper. Consider using a lifter tool to hold molding while you fasten it.
Tips for DIY Success
Experience comes from doing. Here are tips that help.
Take your time on your first corner. Rushing leads to mistakes. If you mess up, cut a new piece and try again.
Use a helper when possible. Crown molding installation is much easier with two people.
Invest in a good miter saw. It’s the most important tool for this job. Don’t cheap out here.
Test your cuts on scrap pieces before cutting your actual molding.
Keep your saw blade sharp. A dull blade produces rough cuts that don’t fit well together.
Wear safety glasses when cutting and sanding. Dust and small pieces fly around.
Use a dust mask when sanding. Wood dust isn’t good to breathe.
Walk around the room at different times of day. Lighting changes reveal imperfections. Fix them while you can still see them clearly.
Troubleshooting Problems
Even experienced installers run into issues. Here’s how to handle common problems.
If pieces don’t fit at corners, your cuts are off. Check your blade angle. Verify that your saw is set correctly. Practice a few more times on scrap before trying your actual molding.
If molding sags between fasteners, you didn’t use enough nails. Pull it down carefully and add more fasteners into studs or joists.
If there are large gaps between molding and walls, your wall is very uneven. Use shims and caulk to fix this. It’s normal in older homes.
If paint looks streaky, you might need another coat. Or you used low quality paint. Prime and seal with better paint.
If your joints look visible after caulking and painting, sand them down and re-caulk. Sometimes multiple thin layers of caulk work better than one thick layer.
If the molding pulls away from the wall or ceiling, check that your fasteners hit studs and joists. If not, it will sag over time.
Finishing Touches
Your crown molding installation is almost complete.
Do a final walk around the room. Look for any spots that need touch up caulking or painting.
Inspect all joints and seams. Make sure everything looks straight and professional.
Clean up your workspace. Remove dust, tools, and extra materials.
Step back and admire your work. You just completed a major home improvement project that adds real value to your home.
The Cost Breakdown
Understanding costs helps you plan your budget.
Crown molding material costs vary based on the profile and wood type. Simple profiles cost less. Ornate designs cost more. You might spend anywhere from one dollar to five dollars per linear foot.
Paint costs are minimal. A gallon of trim paint might be twenty dollars and covers a huge amount of molding.
Fasteners, caulk, and sandpaper cost very little.
Your biggest investment is likely the miter saw if you don’t own one. A good saw costs several hundred dollars, but you’ll use it for many projects. Or you can rent one for fifty to a hundred dollars for a few days.
Labor is completely free if you do it yourself.
For a typical room of around 240 linear feet, you might spend between 300 and 800 dollars on materials. A professional would charge 1500 to 2000 dollars or more for the same work.
Special Molding Projects
Once you master basic crown molding, other options become possible.
Coffered ceilings use crown molding to create geometric patterns on the ceiling. This is an advanced project, but the basic skills are the same.
Chair rail molding is installed partway up the wall. It protects walls from chair backs and adds visual interest.
Base molding is installed at floor level. It finishes the seam between wall and floor.
Picture rail molding holds artwork without damaging walls. It’s installed high on the wall.
The installation techniques for all these types are similar to crown molding.
Long Term Maintenance
After your installation is complete, keep your molding looking great.
Dust regularly with a soft cloth. Crown molding collects dust over time.
Check for cracks or gaps that develop as your home settles. Fill these with caulk as needed.
Touch up paint if it gets damaged. This keeps everything looking fresh.
In high humidity areas, watch for wood swelling or warping. Dehumidifiers help maintain stable conditions.
If you painted your molding, repaint every few years or as needed. This prevents it from looking dated and protects the wood.
Conclusion
Installing crown molding yourself is an achievable goal for most homeowners. Yes, it requires some skill and patience. Yes, your first attempts might not be perfect. But the learning curve is not steep, and the results are impressive.
This project teaches you valuable skills you’ll use for other trim work and home improvement projects. The confidence you gain from completing it is priceless.
You’re adding actual value to your home. You’re saving money compared to professional installation. You’re learning something new and expanding your abilities.
Start with one room. Take your time. Make mistakes if you need to, and fix them. By the time you finish, you’ll be ready to tackle the next room or even the whole house.
Crown molding is no longer some mysterious professional task. It’s a project you can absolutely do. Put on your safety glasses, fire up that miter saw, and get started. Your home will look more beautiful and you’ll feel proud every time you look at your work.

Hi, I’m Mary, the founder of Homygear.com. I’m passionate about creating a comfortable, smart, and beautiful home. I share practical insights and real-world experience on home gear that makes everyday life easier. Behind the scenes, my dedicated research team studies products in depth, and our writers craft honest reviews using trusted, authentic sources—so you can choose home gear with confidence.