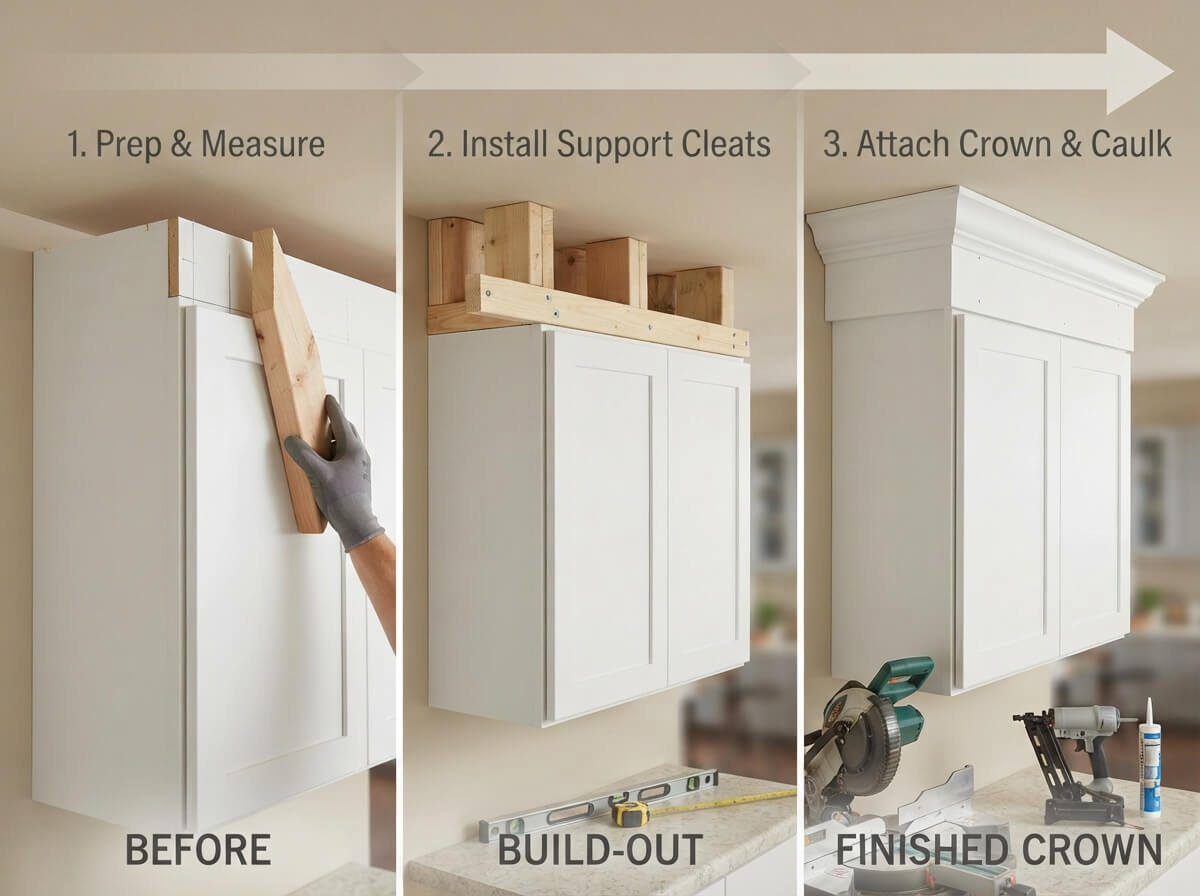
How to Add Crown Molding to Cabinets?
Your kitchen cabinets work hard every single day. They store your dishes, your food, and all those kitchen gadgets you swear you’ll use someday. But let’s be honest—they might not look as fancy as you’d like them to. That’s where crown molding comes in. This simple finishing touch can make your cabinet space look way more expensive and polished than it actually cost you.
Crown molding is basically decorative trim that sits on top of your cabinets where they meet the ceiling. It fills that awkward gap and adds a touch of elegance to your whole kitchen. The best part? You can totally do this yourself, even if you’ve never picked up a nail gun before. This guide walks you through everything you need to know.
Why Crown Molding Makes Such a Big Difference
When you walk into a fancy kitchen, what catches your eye? Sure, the countertops and new appliances help. But have you noticed the trim running along the top of the cabinets? That’s crown molding doing its job. It frames your cabinet space and makes the whole kitchen feel more complete.
Adding crown molding to your cabinets serves real purposes beyond looking nice. It hides that gap between the top of your cabinets and your ceiling. It also protects that space from dust and debris piling up. Since cabinets go all the way to the ceiling, that top edge can look really unfinished without trim. Crown molding solves this problem beautifully.
The cabinet trim also adds depth and dimension to your kitchen. When light hits the molding, it creates shadows that make the space feel more sophisticated. You’re basically getting high-end cabinet design without paying high-end prices. That’s a win in any kitchen renovation.
Tools You’ll Actually Need
Before you start, grab these tools from your garage or local hardware store. You don’t need anything super fancy or expensive.
Measuring and marking tools come first. Get a tape measure, pencil, and level. You need the level to make sure your molding goes on straight. A crooked crown molding screams DIY disaster, so don’t skip this tool.
Cutting tools are next on your list. A miter saw cuts the angles at the ends of your molding pieces. If you don’t have one, your local home improvement store rents them pretty cheap. A hand miter box works too, though it takes longer. You also need a coping saw for making inside corner cuts. A regular handsaw does the job if that’s all you have.
Installation tools include a nail gun or hammer, finishing nails, a stud finder, and a nail set. The nail gun makes this project way faster, but a hammer works fine if you’re patient. A stud finder helps you hit solid wood where your nails will grip best.
Safety gear matters more than you think. Wear safety glasses and a dust mask when cutting the molding. Get work gloves to protect your hands from splinters.
Finishing supplies wrap up your tool list. Get wood filler, sandpaper, and paint or stain that matches your cabinets. You’re going to want everything to look like one cohesive piece.
Types of Crown Molding to Consider
You have options when it comes to cabinet crown molding. Different styles work better in different kitchens.
Solid wood molding looks amazing and feels premium. It takes stain beautifully if you want to match your cabinet finish. The downside? It costs more money and requires more finishing work.
Finger-jointed pine molding costs less and still looks great once it’s painted. It’s made from pine pieces joined together, so it’s more affordable than solid wood. Most people paint this type anyway, so the joints aren’t visible.
Pre-finished molding saves you tons of time. It comes already painted or stained, so you skip the whole finishing step. This option rocks if you want fast results and don’t mind the limited color choices.
Composite or engineered molding lasts forever and doesn’t require sealing. It resists moisture better than real wood, which matters in kitchens. The trade-off is that it can’t be stained, only painted.
Flexible molding bends around curved cabinet edges. If your cabinets have a curved top or you’re dealing with an unusual ceiling layout, this material saves the day. It costs more than regular molding but solves real problems.
Measure Everything Before You Cut Anything
This step determines your whole project’s success. Bad measurements mean wasted molding and headaches. Good measurements mean smooth sailing.
Start by measuring around the top of your cabinets. Run your tape measure along the front of the cabinets and around any corners. Jot down each measurement on paper. Write down wall-to-wall distances for each straight section.
Check your ceiling line with a level. Sometimes ceilings aren’t perfectly level, and this matters when you’re running molding around. If your ceiling dips in some spots, you might have gaps between the molding and the ceiling. You can handle this with caulk, but knowing about it ahead of time helps you plan.
Measure your corner angles too. Most corners are ninety degrees, but older homes sometimes have wonky angles. Use an angle finder tool to get the exact degree if your corners look weird. This info tells you how to cut your miter angles.
Draw a quick sketch of your cabinet layout on paper. Mark which walls have cabinets and which don’t. Sketch where your corners are. This visual guide keeps you from making mistakes when you’re up on a ladder.
Cutting Corners: The Most Important Skill
Crown molding has to meet at corners, and that’s where most people mess up. Learn this once and you’re golden.
Outside corners are where your molding runs out and meets perpendicular molding, like at the end of a cabinet run. These need forty-five degree miter cuts on each piece. Set your miter saw to forty-five degrees and cut slowly. The angle has to be perfect or you’ll see gaps.
Inside corners happen when your molding runs into a wall or an indent. These need coping cuts. A coping saw removes the back portion of the molding so the front edge of one piece fits perfectly against the other piece. This technique looks way better than simple miter cuts at inside corners.
To make a coping cut, first cut the end of your molding at a forty-five degree angle. Then use the angle line as your guide for the coping saw. Cut along that line to remove the back portion. The front profile stays intact and fits perfectly into the corner. It sounds complicated but feels intuitive once you try it.
Practice your cuts on scrap pieces first. You’ve got this, and practicing prevents expensive mistakes on your actual molding.
Install One Piece at a Time
Start at one corner and work your way around. Don’t try to cut all your pieces at once. Measure, cut, test fit, and install before moving to the next section. This process catches mistakes early.
Find the studs in your wall using your stud finder. Nail your molding into these studs whenever possible. They provide solid backing for your nails. If you’re nailing into just drywall, your molding will eventually sag or pop loose.
Position your first piece of molding on top of your cabinets. Use your level to make sure it sits perfectly horizontal. Tap in a couple of nails by hand first to hold it in place. Then drive your nails home with the nail gun or hammer.
Space your nails about sixteen inches apart along the length of the molding. You want enough nails to hold it secure but not so many that you’re wasting effort. This spacing works in most situations.
For longer runs of molding, you might need to join two pieces end-to-end. Use a scarf joint for this. Cut both ends at shallow angles and overlap them slightly. This joint looks better than a straight butt joint and feels more solid.
Making Caulk Your Secret Weapon
Even professional installers use caulk. This stuff is your friend when there are small gaps between the molding and the ceiling or wall. It blends everything together seamlessly.
Get paintable caulk that matches your molding color. Apply it along the top seam where the molding meets the ceiling. Use the tip of a caulk gun to lay down a smooth bead. Let it dry according to the package directions, then paint over it.
Caulk also hides the gaps where molding pieces meet at corners. Fill these gaps and sand them smooth once dry. Nobody will ever know where the joints are.
Paint or Stain Your Molding
Your molding looks way better finished than bare. Whether you paint or stain depends on your preference and molding type.
If you bought raw wood molding, start with sandpaper. Sand the whole thing smooth to remove any rough spots. Use fine-grit sandpaper for the final sanding pass.
Fill any gaps or nail holes with wood filler. Let it dry completely, then sand it smooth. This step makes your molding look professionally installed.
Paint goes on next if you’re going that route. Use a paint and primer combo to save time. Brush on two coats for full coverage. Let each coat dry before applying the next one.
Stain works great if you want to match your cabinet wood. Apply it with a brush or rag, following the product directions. Stain usually needs a protective topcoat to resist kitchen moisture and cooking splashes.
Handle Obstacles Like a Pro
Kitchens have stuff that gets in the way. Understand how to work around common obstacles.
Recessed lights in the ceiling require notching your molding. Measure the light fixture location and mark it on your molding. Cut a notch that fits around the fixture. This takes a bit of work but looks clean once finished.
Soffit areas above your cabinets create angles and changes in height. Measure these carefully and cut your molding to fit the specific angles. It might take extra cuts but the results are worth it.
Ceiling fans, vents, and other fixtures need space around them. Don’t try to run molding directly into these objects. Stop your molding slightly before the fixture and use trim pieces to fill the gap neatly.
Cabinets that don’t reach the ceiling create gaps above them. You can either run molding along the full length of the wall or stop at the cabinet edge. Either approach works, but plan it out before you start cutting.
Common Mistakes That Mess Everything Up
Learning from other people’s mistakes saves your project. Skip these common problems.
Installing molding without finding studs causes it to sag over time. Those drywall fasteners can’t support the weight alone. Always nail into studs when possible.
Using cheap caulk that shrinks and cracks ruins your final look. Invest in good paintable caulk. The difference in price is tiny compared to the difference in results.
Rushing the measuring step leads to cut pieces that don’t fit. Measure twice, cut once. This old saying exists because it saves projects.
Mixing paint and stain or using products that don’t work together creates weird finishes. Read all product labels and follow their instructions for compatibility.
Forgetting to test fit before nailing means you drill holes in the wrong spots. Always hold the piece in place and check the fit first.
Using the wrong nails makes molding pop loose. Use finishing nails that grip well and won’t split the wood. Avoid nails that are too large or small for your molding thickness.
Finishing Touches That Matter
Your molding installation isn’t complete until you handle these final details.
Walk around your whole installation and look for any gaps. Fill them with caulk. Sand and paint as needed.
Check that every nail is set flush with the molding surface. Use a nail set to tap any protruding nails deeper. Fill these holes with wood filler.
Make sure all your joints are tight and clean-looking. Any gaps get caulk. Any rough edges get sanding.
Apply a second coat of paint if needed for perfect coverage. Some areas might need touch-ups and that’s totally normal.
Step back and admire your work. This finishing touch completely transforms your kitchen cabinets into something special.
Time and Cost Breakdown
You’re probably wondering how much this whole project actually costs and how long it takes.
Crown molding material ranges from fifty cents to a few dollars per linear foot depending on the type. A typical kitchen needs about forty to sixty linear feet of molding. Do the math for your space to figure out material costs.
Tools cost varies depending on what you already own. If you need to buy or rent a miter saw, that’s the biggest expense. Most hardware stores rent them daily for reasonable prices.
This project takes a weekend for most people. Faster if you’ve done it before. Slower if your kitchen has lots of corners and obstacles.
Compare this to hiring a professional, who charges labor rates plus material costs. You’re saving hundreds of dollars by doing this yourself and learning a skill in the process.
Your Cabinet Space Just Got an Upgrade
Crown molding transforms ordinary cabinets into something that looks intentional and finished. Your kitchen instantly looks more put-together without major renovation costs.
This project proves you can handle DIY home improvement. The process teaches you real skills that apply to other projects around your house. You learn how to cut angles, work with tools, and install trim properly.
Your investment of time and money pays back in both beauty and functionality. That awkward gap above your cabinets disappears. Dust stops collecting where the cabinets meet the ceiling.
Start planning your project today. Measure your space. Pick your molding style. Round up your tools. Then tackle this weekend project that delivers results that look like you hired a professional.
Your kitchen cabinets are ready for their upgrade. Get started on adding that crown molding and watch your space transform into something special.

Hi, I’m Mary, the founder of Homygear.com. I’m passionate about creating a comfortable, smart, and beautiful home. I share practical insights and real-world experience on home gear that makes everyday life easier. Behind the scenes, my dedicated research team studies products in depth, and our writers craft honest reviews using trusted, authentic sources—so you can choose home gear with confidence.