How to Use a Vacuum Cleaner?
If you’ve never used a vacuum cleaner before, don’t worry. The process is simple and straightforward. This guide will walk you through everything you need to know to get your floors clean and keep your vacuum in great shape for years to come.
Why a Vacuum Cleaner Matters for Your Home
A vacuum cleaner is one of the best tools you can have for keeping your home clean. It picks up dirt, dust, and pet hair from your floors fast. You’ll spend less time cleaning when you use the right vacuum cleaner technique. Your carpets will last longer too. Dust and debris can damage carpet fibers over time. A good vacuum removes these particles before they cause harm.
A clean home feels better and looks better. Your family will feel the difference. Allergies often improve when you vacuum regularly. Dust mites and their waste accumulate in carpets. Regular vacuuming keeps these allergens under control.
Getting Started: Before You Vacuum
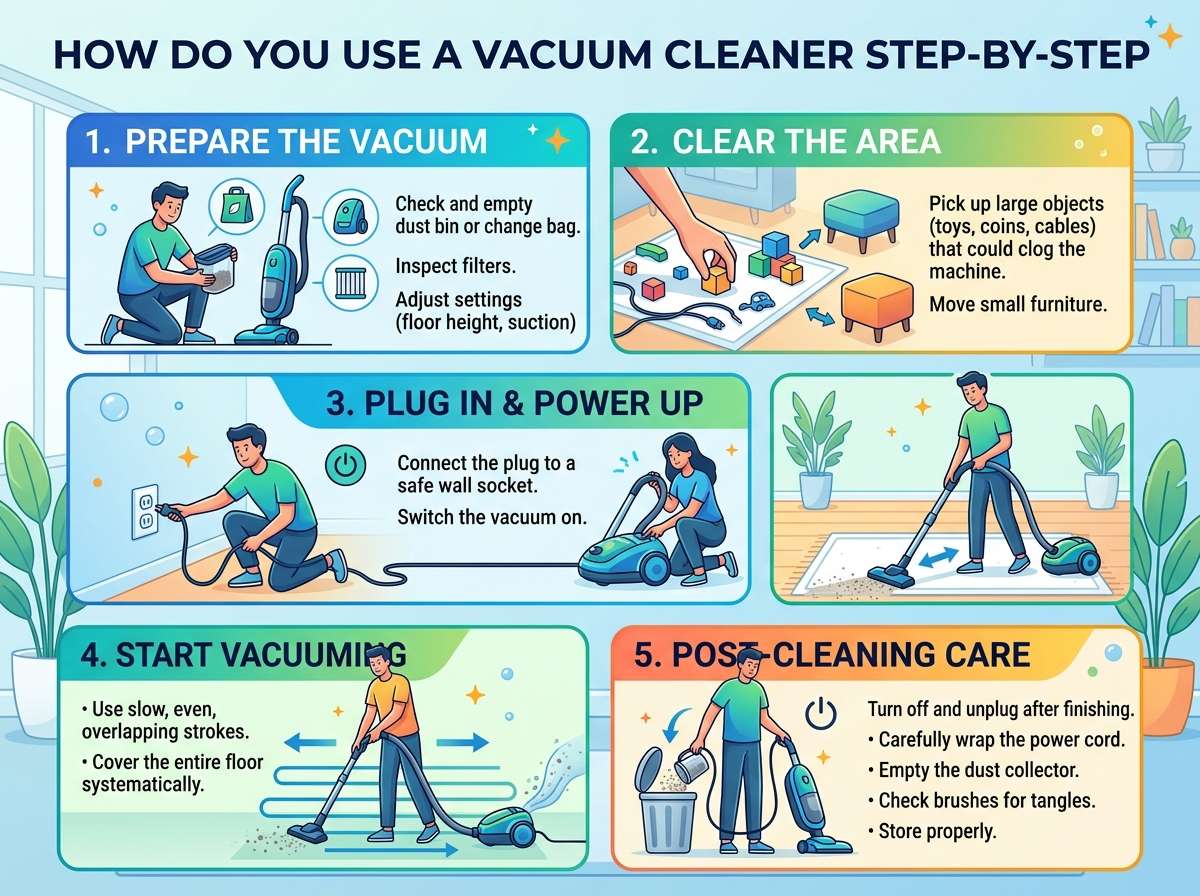
Before you start vacuuming, prep your space. This step takes just a few minutes and makes a huge difference in how well your vacuum works.
Clear the Floor
Walk through your room and pick up items from the floor. Large toys, shoes, and cables can jam your vacuum. They can also get tangled in the brush roll. Remove throw rugs and area rugs too. You can vacuum these separately. Put books, small objects, and clutter in a basket. Set it aside until you finish vacuuming.
This sounds like extra work, but it actually saves time. You won’t stop to untangle hair from the brush roll. You won’t have to dig out a sock that got stuck. You’ll vacuum faster and your machine will work better.
Check Your Vacuum’s Condition
Spend a moment checking your vacuum before use. Look at the dust bin or bag. If it’s full, empty it now. A full bin reduces suction power. Your vacuum will work harder and slower. It might not pick up dirt as well.
Check the brush roll too. Hair and string wrap around this part. Grab a pair of scissors and cut away any tangled debris. A clean brush roll picks up dirt better. It also helps your vacuum last longer.
Look at the filters. Most vacuums have a main filter. Some have pre-filters too. Tap the filter gently to loosen dust. If it looks very dirty, rinse it with water. Let it dry completely before putting it back. A clean filter means better air flow and better cleaning power.
Understanding Carpet Types
Different carpets need different treatment. Knowing your carpet type helps you clean better.
Low-Pile and Berber Carpets
Low-pile carpets have short, dense fibers. These are easy to clean. Berber carpets are similar. They have a nubby texture. Both handle regular vacuuming well. You can use standard upright vacuums or robot vacuums on these surfaces.
High-Pile and Shag Carpets
High-pile and shag carpets have long, fluffy fibers. These need gentle care. Use a vacuum with adjustable height settings. Set it higher than you would for low-pile carpet. Aggressive vacuuming can damage the fibers.
Hard Floors and Bare Floors
Hard floors include tile, wood, and laminate. These don’t require a vacuum to work as hard. Many vacuums have a setting for hard floors. This reduces the brush roll’s power so it won’t scatter dirt. Some people prefer a broom and dustpan for hard floors. A lightweight cordless vacuum also works great.
Adjusting Your Vacuum for Your Flooring
Your vacuum probably has height settings. These matter more than you think.
If you have an upright vacuum, look for a dial or lever near the base. It usually has options like “low,” “medium,” and “high.” Set it to match your flooring. Plush carpet needs a higher setting. Low-pile carpet needs a medium setting. Hard floors need a lower setting.
Too high and the brush roll won’t touch the carpet enough. Too low and the brush roll will wear out your carpet. The right height gives you the best clean and protects your floors.
If your vacuum has an auto-height feature, it adjusts automatically as you move between different floor types. This is convenient. Just press a button and let the machine handle the details.
Preparing Your Vacuum Cleaner
Now it’s time to get your vacuum ready to work.
Assembly and Setup
Most vacuums come partially assembled. Check your manual for assembly instructions. Connect the handle to the base if needed. Attach any hoses or extension tubes. Make sure everything clicks into place securely.
If you have a cordless vacuum, check the battery charge. Plug it in if the battery is low. Most cordless models take a few hours to charge fully. Don’t start vacuuming if the battery is nearly dead. You’ll run out of power halfway through.
For corded vacuums, find a convenient outlet. Plug the cord in but don’t turn it on yet. Unwind the entire cord so it doesn’t tangle. You can trip on a bundled cord. This is a safety hazard.
Turn It On and Test
Press the power button and let the vacuum run for a few seconds. Listen for any unusual sounds. A normal hum is good. Grinding noises or rattling sounds mean something is wrong. Turn it off and check for debris near the brush roll or suction area.
Feel the suction at the end of the hose or brush head. Strong suction is a good sign. Weak suction means the bin is full, a filter is dirty, or there’s a blockage. Fix these issues before you vacuum.
The Actual Vacuuming Process
Now for the main event. The actual vacuuming is easier than you might think.
Start in One Room
Don’t try to vacuum your whole house at once. Start with one room. This helps you get into a rhythm. You’ll also see your progress, which feels rewarding.
Stand in the far corner of the room. This way, you’re not walking over dirty areas as you work. Move backward toward the door. This keeps you from stepping on areas you’ve already cleaned.
Use Slow, Steady Strokes
Push the vacuum forward slowly. Don’t rush. The slower you move, the more time the suction has to pull dirt from the carpet. Quick, fast strokes miss dirt. Slow strokes pick up more debris.
Move the vacuum in overlapping rows. Overlap each pass by about half the width of the vacuum head. This makes sure you don’t miss any spots.
Vacuum in Different Directions
Your first pass should go one direction. Then, vacuum the same area at a right angle to your first pass. Carpet fibers lie in different directions. Vacuuming from different angles picks up more dirt. It also helps restore carpet pile. The carpet looks fuller and healthier.
A third pass at a diagonal can help too. This technique takes a bit longer but gives you the cleanest carpet possible.
Pay Extra Attention to Problem Areas
Some areas get dirtier than others. Entryways collect dirt from outside. Doorways see lots of foot traffic. Spots where people sit often trap dust and pet hair. Spend extra time on these areas. Make more passes over them.
Dark spots and stains often have buildup underneath. Vacuum these spots multiple times from different directions.
Move Furniture When Possible
Don’t just vacuum around furniture. Move pieces to the side when you can. Clean the area underneath. Dust accumulates under couches and beds. Pet hair gathers in these hidden spots. You might be shocked by what you find.
Be careful not to damage your vacuum or furniture. Don’t force a piece. If it’s too heavy, skip it. You can go back another time with help.
Cleaning Different Surfaces
Not all cleaning happens on carpet. Your vacuum should handle different types of flooring.
Vacuuming Hard Floors
Hard floors include wood, tile, laminate, and concrete. Many vacuums work on these surfaces. Switch to hard floor mode if your vacuum has one. This typically turns off the brush roll or lowers its power. A spinning brush can scatter dirt on hard floors.
Move the vacuum slowly across the floor. Let the suction pull dirt into the bin. You can also use a hard-floor attachment if your vacuum has one. Some look like a soft bristle brush. Others are flat with a squeegee-like design.
Hard floors are often easier to clean than carpet. You might finish faster. Don’t skip these areas though. Dust settles on hard floors too. Regular vacuuming keeps them fresh.
Cleaning Stairs
Stairs are tricky because you can’t use a full-size vacuum. Handheld vacuums and portable units work best for stairs. If you have an upright vacuum with a hose attachment, you can use that too.
Start at the top of the stairs. Work your way down. This prevents you from pushing dirt back up the stairs. Grab the handheld vacuum and move it up each step. Make several passes.
Don’t forget the corners and edges. Dust hides in the gap between the step and the riser. Run the nozzle along these edges.
Stairs take a bit of extra effort. Do them regularly so dirt doesn’t build up too much.
Cleaning Furniture and Upholstery
Your couch and chairs trap lots of dust and pet hair. Many vacuums come with an upholstery attachment. This usually looks like a flat brush head.
Turn on your vacuum and attach the upholstery tool. Brush it across your furniture surface. Use gentle pressure. You’re not trying to damage the fabric. Move in the direction of the nap if your furniture has one. Overlap your strokes just like you do on carpet.
Pay special attention to crevices and seams. Dirt gets trapped in these areas. Use a thin crevice tool if you have one. Wiggle it into tight spaces. Pet hair collects in seams. Make several passes.
Cushions can be vacuumed too. Remove them if possible and vacuum underneath. Then, vacuum the cushions themselves on both sides.
Caring for Your Vacuum During Use
Your vacuum works hard for you. Show it some care and it will last for years.
Empty the Bin Regularly
Don’t wait until the bin is completely full. Empty it when it reaches the fill line. A bin that’s too full loses suction. Your vacuum has to work harder. It might overheat. Regular emptying keeps performance high.
To empty the bin, carry it to a trash can. Press the release button to open the bottom. Let the debris fall into the trash. Close the door and click it back into place. Tap the bin gently to shake loose any clinging dust.
Check for Blockages
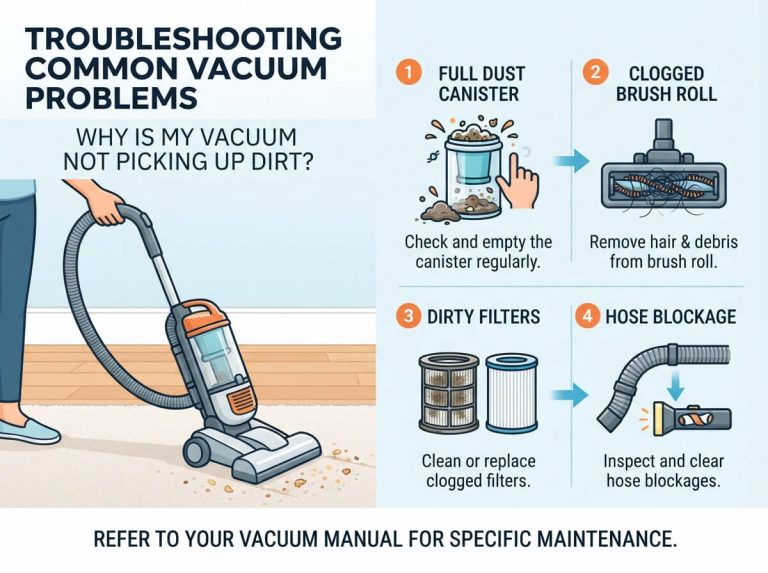
If suction suddenly drops, there might be a blockage. A blockage is usually hair or string caught somewhere. Check the brush roll first. Flip the vacuum upside down and look at the bottom. Cut away any tangled hair.
Check the hose next. Hold it up to a light and look through it. If you can’t see light on the other side, something is blocking it. Use a straightened coat hanger or plumbing snake to poke out the blockage.
Check the dust bin opening too. Sometimes a large clump blocks the airway. Remove any visible debris.
Watch for Unusual Sounds
Your vacuum should make a steady hum. Grinding sounds or rattling noises mean something is wrong. Turn it off immediately. Look for visible problems. A pebble in the brush roll can cause grinding. A loose part can rattle.
Don’t ignore strange sounds. Continuing to use a broken vacuum can make damage worse. A small fix now beats a big repair later.
After You Finish Vacuuming
Your work isn’t quite done. A few quick steps keep your vacuum in top shape.
Empty the Dust Bin
If you haven’t already, empty the dust bin now. Don’t let debris sit overnight. Dust can pack down and become harder to remove. Bacteria and mold can grow in damp conditions.
For bag vacuums, replace the bag if it’s full. Keep extra bags on hand so you’re ready next time.
Clean the Brush Roll
Hair wraps around the brush roll every time you vacuum. Remove tangles now. A pair of scissors or a seam ripper works well. Cut the hair and pull it away. A clean brush roll works better and lasts longer.
Tap Out the Filter
Tap your main filter gently over a trash can. This loosens dust that has settled on the filter. A cleaner filter means better airflow.
If the filter looks very dirty, rinse it with water from the sink. Use cool water. Hot water can damage some filters. Let it dry completely in the sun or in a warm room. Never put a wet filter back in the vacuum.
Store Your Vacuum Safely
Find a good spot to store your vacuum. A closet or cabinet works well. Make sure the space is dry. Moisture can damage the motor and electrical components.
Wind the cord neatly around the cord hooks on your vacuum. Don’t wrap it too tightly. Tight wrapping can damage the cord over time. Leave a little slack.
Keep your vacuum upright. Storing it on its side can damage the wheels or cause leaks. An upright position protects your machine.
Vacuum Cleaner Maintenance Tips
Regular maintenance keeps your vacuum running strong.
Replace Filters Regularly
Your vacuum’s filter gets dirty fast. Most vacuums need a new filter every 6 to 12 months. If you have pets, you might need to change it more often. Check your manual for specific guidance.
A new filter improves suction power and airflow. It also prevents dust from escaping back into your room.
Check the Brush Roll
Inspect the brush roll every few months. Remove wrapped hair and debris. If the bristles look worn or broken, it might be time for a replacement. A worn brush roll doesn’t clean as well.
Some brush rolls last for years. Others wear out faster depending on your carpet type and use. Rough carpets wear out brush rolls quicker than smooth carpets.
Clean the Hose
Over time, dust builds up inside the hose. This reduces suction. Run water through the hose occasionally. Let it dry completely before using it. For tough blockages, use a plumbing snake. Straighten a wire coat hanger and push it through the hose.
Inspect the Wheels
Wheels can break or get flat spots from sitting still for too long. Roll your vacuum around to move air and prevent flat spots. If wheels are cracked, order replacements. Broken wheels make vacuuming harder.
Check Seals and Connections
Make sure all connections are tight. Loose seals reduce suction. Wiggle the hose, dust bin, and head to ensure they’re secure. Tighten any loose connections by hand.
Common Vacuum Cleaner Mistakes to Avoid
Even experienced people make these errors. Learning what not to do saves you time and trouble.
Don’t Vacuum Up Wet Materials
Water damages your vacuum. Never vacuum up spilled liquids or wet items. Moisture can ruin the motor. It can also cause electrical hazards.
If you spill something wet, wipe it up with a cloth first. Let the area dry completely before vacuuming. Dry particles only.
Don’t Ignore Empty Bins and Full Bags
A full bin or bag reduces suction. Your vacuum works twice as hard to pull dirt. This strains the motor. It uses more electricity. It might overheat. Get in the habit of checking before you start vacuuming.
Don’t Forget to Adjust Height Settings
Using the wrong height setting wears out your carpet or your vacuum. Take the time to set the correct height. It only takes a few seconds and makes a big difference.
Don’t Vacuum Up Large Debris
Small pebbles, large food bits, and similar items can break your vacuum. Pick up large debris by hand first. Your vacuum is designed for dust and small particles, not rocks.
Don’t Use Your Vacuum as a Broom
Some people avoid sweeping and just use a vacuum instead. Sweeping first actually saves you money. Sweeping picks up large items and surface dirt. Then your vacuum focuses on deep cleaning. This combination keeps your vacuum cleaner and lasts longer.
Don’t Store Your Vacuum in Damp Places
A garage or basement can be too humid. Moisture damages the motor. Store your vacuum in a dry room. A closet inside your home is ideal.
How Often Should You Vacuum?
The answer depends on your situation. A busy household with kids and pets needs frequent vacuuming. A quiet home with one person can vacuum less often.
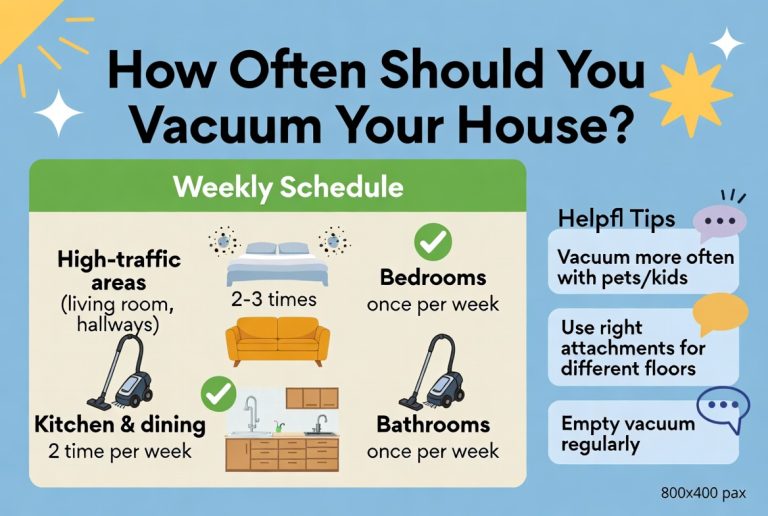
High-traffic areas like living rooms and bedrooms should be vacuumed at least once a week. Hallways and other spaces can go longer. If you have pets, vacuum twice a week in their favorite areas. Pet hair builds up fast.
Allergy sufferers should vacuum more often. Weekly vacuuming reduces allergen levels. Twice a week is even better.
Homes with light foot traffic might vacuum every other week. There’s no one right answer. Look at your carpet and vacuum when you see dirt building up.
Quick Vacuum Cleaner Tips for Busy People
Not everyone has hours for cleaning. Here are some fast tactics.
Spot Clean Between Full Vacuuming
You don’t need to vacuum the whole house every time. Quickly vacuum high-traffic areas. This takes 10 minutes. Spot cleaning extends the time between full vacuums.
Use a Cordless Vacuum for Speed
Cordless vacuums are lightweight and maneuverable. You grab them and go. No cords to untangle. They charge while you’re doing other things. For quick daily pickups, cordless is hard to beat.
Vacuum Before Bed
Vacuum your bedroom in the evening. You’ll sleep on a clean surface. Morning dust and debris settle while you sleep. Evening vacuuming removes these particles.
Keep Your Vacuum Accessible
Store your vacuum in an easy-to-reach spot. If it’s hidden away, you’re less likely to use it. A hall closet is perfect. You can grab it fast when needed.
Choosing the Right Vacuum Cleaner for Your Needs
Different vacuums work best for different situations.
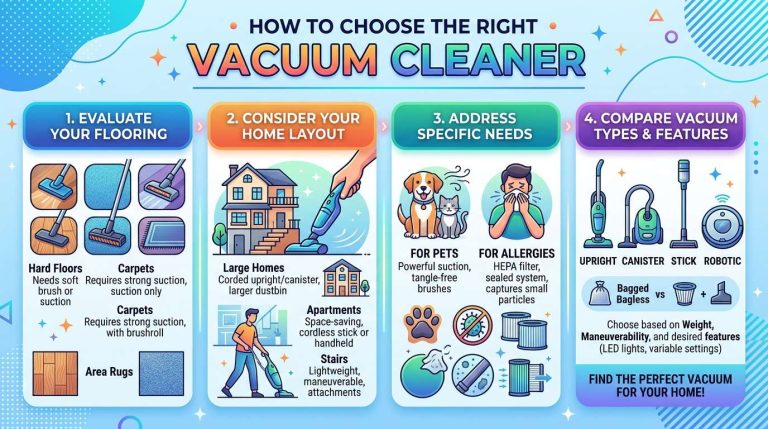
Upright vacuums are powerful and work well on carpet. They’re good for large homes. Canister vacuums are lighter and easier to move around. They work on any floor type. Handheld vacuums are perfect for stairs, furniture, and spot cleaning. Robot vacuums run automatically, but they need a clear floor and work best on hard floors and low-pile carpet. Cordless vacuums are convenient and lightweight but have limited battery time.
Think about your home layout, flooring types, and how much time you want to spend. The best vacuum is one you’ll actually use regularly.
Final Thoughts on Vacuum Cleaning
Using a vacuum cleaner is a basic skill that makes a huge difference in your home’s cleanliness. The process is straightforward once you learn the steps. You’ll get faster with practice.
The most important things to remember are these. Clear the floor before you start. Adjust your vacuum to the right height setting. Make slow, overlapping passes. Vacuum from different directions. Empty the bin when it gets full. Clean the brush roll of tangled hair. Store your vacuum in a dry place.
A clean home feels fresh and healthy. Regular vacuuming is one of the easiest ways to achieve this. Your family will appreciate the clean floors. Your carpets will last longer. Your allergies might improve. And you’ll feel the satisfaction of a job well done.
Start with one room today. Follow the steps in this guide. You’ll be amazed at how much dirt comes out of your carpet. Once you get the hang of it, vacuuming becomes second nature. Before you know it, you’ll be cleaning like a pro.
So grab your vacuum cleaner and get started. Your floors are waiting.
Hi, I’m Mary, the founder of Homygear.com. I’m passionate about creating a comfortable, smart, and beautiful home. I share practical insights and real-world experience on home gear that makes everyday life easier. Behind the scenes, my dedicated research team studies products in depth, and our writers craft honest reviews using trusted, authentic sources—so you can choose home gear with confidence.