How to Add a Pressure Gauge to a Pressure Washer?
If you’ve ever used a pressure washer and wondered if you were blasting away at the right power level, you’re not alone. Many pressure washers come without built-in gauges, which means you’re basically flying blind. That’s where a pressure gauge comes in handy. Adding one is easier than you might think, and it’ll transform how you use your equipment.
A pressure gauge lets you see exactly how many PSI (pounds per square inch) your washer is pushing out. This simple addition keeps your machine running better and helps you clean different surfaces without causing damage. Whether you’re scrubbing a deck or cleaning a car, you’ll know the exact power you’re working with.
Why Your Pressure Washer Needs a Gauge
Most of us grab the pressure washer, turn it on, and hope for the best. The problem is that different cleaning jobs need different pressure levels. Your deck can handle high PSI, but your car’s paint will get ruined if you blast it too hard. A pressure gauge takes the guesswork out of the equation.
Here’s the thing: without a gauge, you can damage surfaces without even realizing it. Soft materials like wood siding can splinter. Paint on vehicles can strip off. Even your lawn can suffer if you hit it with too much force. A gauge helps you dial in the perfect pressure for every job.
Another reason to add a gauge is maintenance. You can track whether your engine is losing power over time. If the pressure drops when it shouldn’t, you know something needs fixing. This early warning system saves money on repairs down the road.
Understanding Your Pressure Washer Setup
Before you pick up any tools, let’s talk about how pressure washers work. The engine powers a pump, and that pump forces water through a hose at high speed. The pressure rating tells you how hard that water comes out.
Most gas pressure washers range from 2500 to 4000 PSI. Electric ones typically go from 1300 to 3100 PSI. The higher the number, the more force behind the water. But here’s what catches people off guard: the pump itself always produces the same amount of pressure. The trigger on the wand just controls how much water flows out.
This is why adding a gauge makes sense. You get real numbers instead of guesses. You can see if something has changed with your machine’s performance. You’ll know if the pump is wearing out or if something else is causing reduced power.
What Type of Gauge You’ll Need
Not all pressure gauges work the same way. For pressure washers, you need one that can handle water and reads in PSI. Most pressure washer gauges max out at 5000 PSI, which covers almost every residential machine on the market.
Look for a gauge with a glycerin-filled case. The glycerin dampens the needle movement, making the reading steadier and easier to track. This matters because pressure fluctuates, and glycerin helps smooth out those bounces. Stainless steel cases hold up better against rust and moisture than brass ones.
The gauge itself should have a back connection or bottom connection. Back-mounted gauges sit perpendicular to the flow, while bottom-mounted ones sit inline with it. Either works, but back connections take up less space on most washers.
Get a gauge sized between 2 to 4 inches in diameter. Anything smaller gets hard to read from a distance. Anything larger takes up too much space on your equipment.
Tools and Materials You’ll Gather
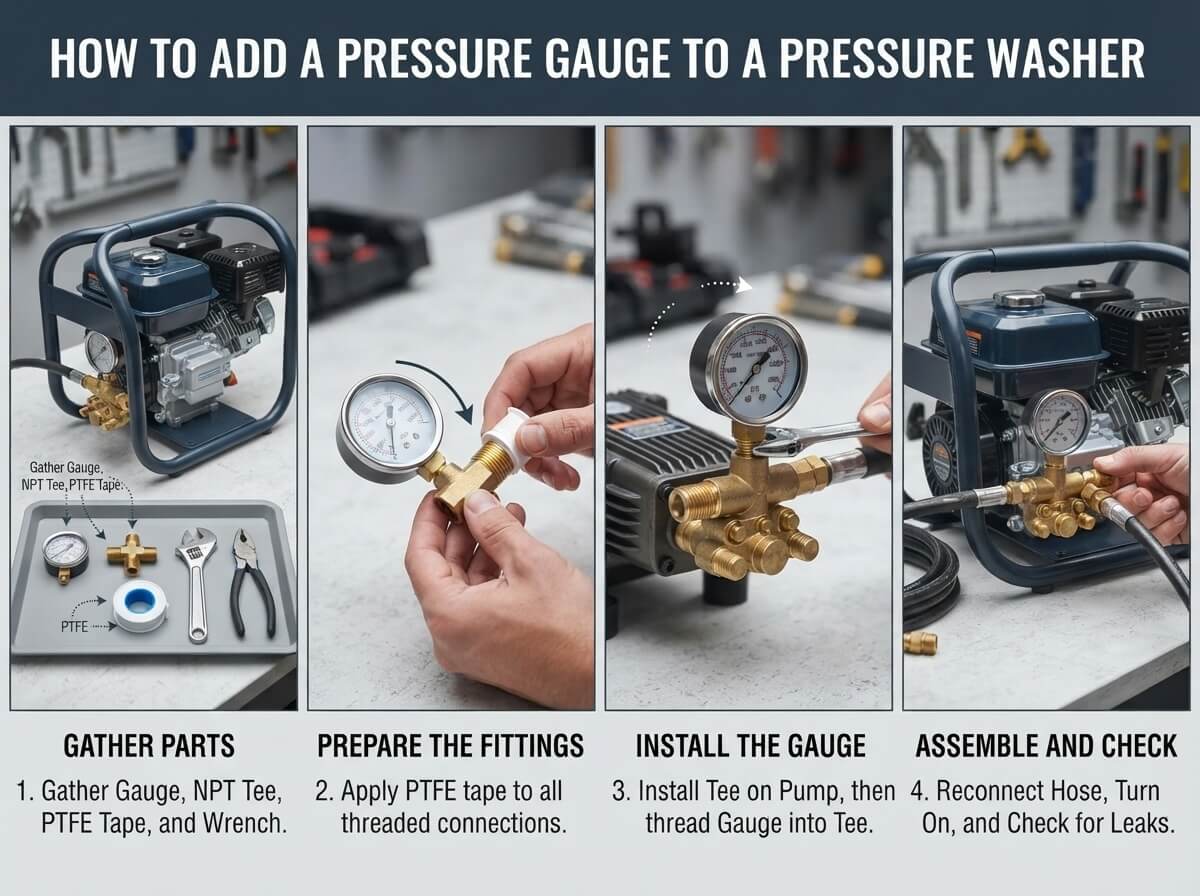
Grab these items before you start:
A pressure gauge rated for at least your washer’s maximum PSI. Teflon tape or plumber’s tape keeps the connection watertight. Get an adapter if your gauge connection doesn’t match your washer’s port. A wrench set handles different bolt sizes. A bucket catches any water drips. Channel locks or adjustable wrenches tighten connections. Safety glasses protect your eyes from splash-back.
Pro tip: buy your gauge from a store that sells pressure washer parts. Staff there can verify that the gauge works with your specific machine model. This saves you from guessing about compatible connections.
Finding the Right Spot on Your Washer
Now comes the detective work. You need to find where to mount this gauge. Most pressure washers have a connection point between the pump and the hose. This is the ideal location because you’ll get the truest reading of the actual pressure the pump produces.
Some washers have a small threaded port on top of the pump. Others have a connection on the side of the pump housing. Check your owner’s manual first. If you don’t have the manual, search for your exact model online. Most manufacturers post PDFs for free.
If your washer has a pressure relief valve port, that’s another good spot. The relief valve opens when pressure gets too high, so reading near it tells you what the pump actually produces. This information helps you monitor the health of your equipment.
Never mount a gauge on the discharge side of the hose. That location reads lower than actual pump output because you lose pressure as water travels through the hose. The whole point is to know what your pump does, not what comes out the nozzle.
Preparing Your Washer
Safety first. Turn off your engine and let it cool. An operating pressure washer will hurt you badly if something goes wrong. Pressure and heat are a dangerous combination, so give your machine time to relax.
Open the fuel valve if your washer has one. Let any remaining pressure in the system bleed off. Some machines have a small bleed valve for exactly this reason. Open it and listen for air to escape.
Grab your bucket and place it under the connection point where you’ll mount the gauge. Water will spill out, and you want to catch it instead of making a mess. Having a rag nearby helps too.
Locate all the fasteners around your chosen connection point. You might need to remove a hose, loosen a bolt, or pop off a cap. Take a photo with your phone before you disconnect anything. This helps you remember how it went together when you’re putting it back.
The Installation Process
Now for the actual work. Start by removing whatever is currently at the connection point. If a hose is attached, loosen the clamp or unscrew the fitting. Let water drain into your bucket. Some pressure will still be in the line, so be patient and let it all come out.
Clean the connection threads with a dry rag. Any debris or water that sits there causes leaks. Get the area as clean as you can with what you have available.
Wrap your gauge’s threaded connection with Teflon tape. Go around 3 to 4 times, wrapping clockwise. This tape fills tiny gaps in the threads and prevents leaks. It’s the same stuff plumbers use, and it works great for pressure systems.
If your gauge’s thread size doesn’t match the port, use an adapter. Screw the adapter onto the gauge first, then attach the adapter to the washer. Thread things by hand at first. You want to feel them seat properly before using a wrench.
Once you’ve got the threads started by hand, grab your wrench. Tighten snugly, but don’t apply brutal force. You’ll strip the threads or crack the gauge. The goal is secure and watertight, not cranked down with maximum effort.
Reattach any hoses or connections you removed. Tighten those fittings too, but again, snug is all you need. Over-tightening damages connections and makes future removal harder.
Testing Your New Setup
This part is crucial. Before you use your washer for real, you need to check for leaks. Fill the fuel tank and prime the pump with water if that’s required for your model. Some washers need water in the system before starting.
Start your engine and let it run at idle for a moment. Keep your eye on the gauge. Pressure should rise slowly. Listen carefully for any hissing sounds that indicate leaks around your new gauge connection.
Let the engine run for about a minute. The pressure reading should stabilize. Jot down that number. This is your baseline. You’ll use it later to check if something has changed with your machine’s performance.
Now stop the engine. Walk around the gauge connection and check for any wet spots. A tiny drip is okay and often stops after a few minutes. But if water streams out, something isn’t tight enough. Let the system cool, tighten your connection a bit more, and test again.
Once you’re confident there are no leaks, you’re done with installation. Seriously. It’s that simple.
Reading Your Gauge and What Numbers Mean
Your gauge now shows the real story of your pressure washer’s performance. The needle points to a number representing PSI. This is the force the pump generates when the nozzle is closed.
The rated PSI on your washer is what it should produce under perfect conditions. Most washers deliver within 10 percent of this rating. So if yours is rated 3200 PSI, you might see anywhere from 2880 to 3520 PSI. That’s normal.
Lower readings than expected usually mean one of three things. The pump is wearing out from regular use. The air filter is clogged, starving the engine of oxygen. Or you’re running on a low fuel tank, which hurts engine performance. Clean the filter first. Fill the fuel tank. If pressure still lags, your pump probably needs attention.
A reading that’s way higher than rated is actually bad too. It means the relief valve might not be working. This can damage internal components over time. Stop using the washer and have someone look at the relief valve.
Maintenance Tips for Your Gauge
A pressure gauge is tough, but it still deserves care. After each use, let your system cool completely before you touch anything. Pressure and temperature go hand-in-hand, and a hot gauge can look different than a cool one.
Check occasionally for cracks in the plastic cover or gauge face. Cracks let water in, which ruins the gauge’s ability to read accurately. Replace a damaged gauge rather than trying to fix it.
If you live somewhere cold, drain your pressure washer completely before storing it. Frozen water in the system can damage connections, including your new gauge. Bypass the gauge when you drain to avoid leaving water inside it.
Keep the gauge clean. A quick wipe with a dry cloth after each use prevents dirt and grime buildup. This keeps your readings accurate and the gauge looking good.
Common Problems and How to Fix Them
Water leaks from around the gauge connection. Stop the washer. Let it cool. Tighten the connection by hand or with a wrench. Don’t over-crank it. If that doesn’t work, you might need new Teflon tape. Loosen, remove the tape, rewrap with fresh tape, and retighten.
The gauge needle sticks or bounces wildly. Sometimes debris gets into the gauge line. Disconnect the gauge and run water through the port to flush any particles. Reconnect and test. If it still jumps around, the gauge itself might be failing and needs replacement.
The gauge reads zero even when the engine runs. Check that the gauge line isn’t kinked or bent. A bent line blocks pressure from reaching the gauge. Straighten it out. Also verify that your engine is actually producing pressure by listening for the pump noise. No sound means the engine isn’t running right.
Pressure drops over several uses. This is often normal as your pump wears. Track your readings over time. If you see a gradual decline, the pump is aging. Sudden drops suggest a leak somewhere, possibly at the gauge connection. Check all connections for water.
Improving Your Pressure Washer Experience
With a gauge installed, you gain control over your cleaning process. You can adjust your nozzle or distance from a surface based on what the gauge tells you. Lower pressure for delicate work, higher pressure for stubborn dirt.
You can also extend your pump’s life by not running it at maximum pressure constantly. Let the relief valve do its job by occasionally backing off the throttle. Your gauge helps you understand when you’re pushing hard versus giving the engine an easier time.
Keep a small notebook or phone notes app to log your pressure readings. Track them over several weeks or longer. You’ll spot trends. You’ll notice if performance drops after storing the washer. This data helps you maintain your equipment properly.
Wrapping It Up
Adding a pressure gauge to your pressure washer is a smart, simple upgrade. You’ll spend maybe thirty minutes on installation, and you’ll gain the ability to use your equipment more effectively. You’ll know exactly how hard you’re working your machine. You’ll spot problems early before they turn into expensive repairs.
The actual steps are straightforward. Find the right connection point, clean it, add Teflon tape, screw on the gauge, test for leaks, and you’re finished. Even if you’ve never worked on equipment before, you can handle this project.
Your pressure washer will thank you for it. Your cleaned surfaces will look better. Your equipment will last longer. And you’ll never again wonder if you’re pushing too hard or need more power. That gauge tells you everything.
Start this weekend. Pick up a gauge. Spend thirty minutes. Step back and admire your work. You just made your pressure washer smarter and your cleaning efforts better. That’s worth the effort.