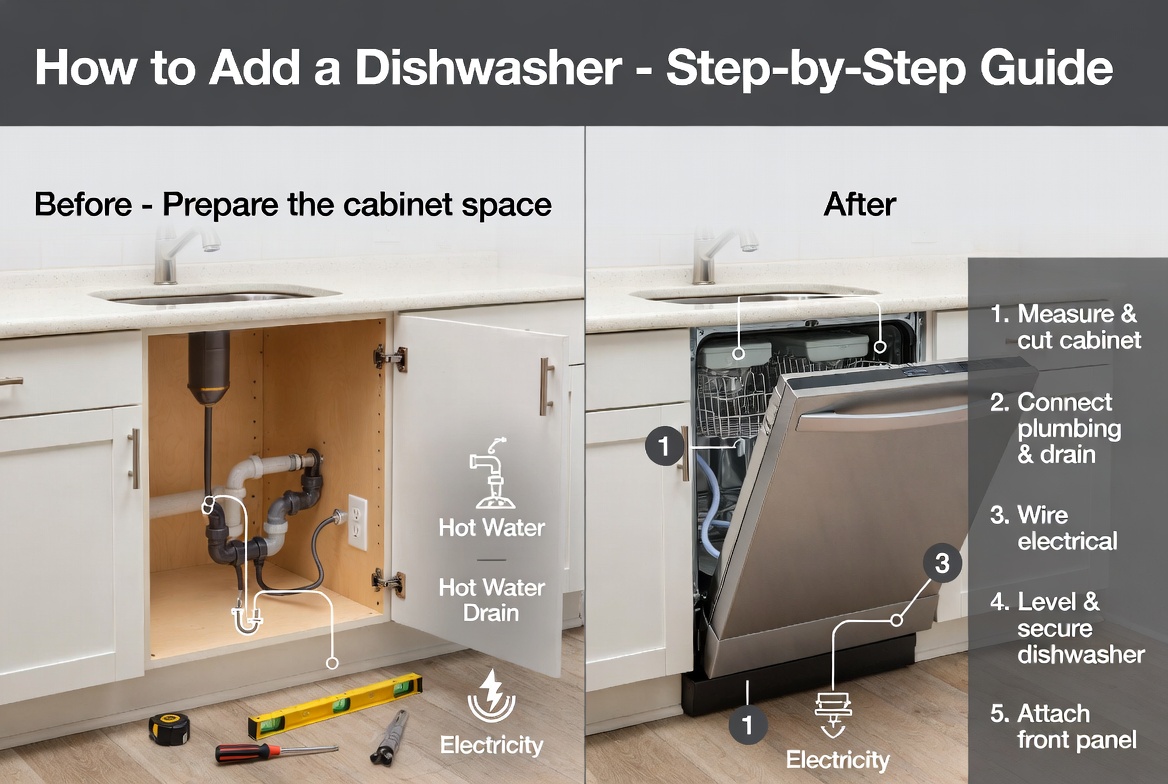
How to Add a Dishwasher?
So you’re tired of washing dishes by hand. You stand at your sink, water running cold, and think, “There has to be a better way.” Well, there is! Adding a dishwasher to your kitchen is one of the best upgrades you can make. The good news? It’s totally doable, and I’m here to walk you through every step.
This guide will show you how to install a dishwasher yourself or help you understand what needs to happen if you hire a pro. Either way, you’ll know exactly what’s involved.
Why Get a Dishwasher?
Before we dive into the installation, let’s talk about why a dishwasher is worth your time and money.
A dishwasher saves you hours every week. No more standing at the sink with pruny fingers. You just load it, add some soap, and press a button. Done.
They also use less water than hand washing. That means lower water bills and a smaller impact on the environment. Win-win.
Plus, your hands will thank you. No more hot water and harsh soap drying out your skin.
And here’s a bonus: dishwashers clean better than we do. The jets of hot water and powerful detergent get into places your sponge can’t reach.
What You Need to Know Before You Start
Adding a dishwasher isn’t super complicated, but you need to prepare. Take time to understand your kitchen setup before you begin any work.
Your Kitchen’s Current Setup
First, look at your kitchen cabinets. A standard dishwasher needs a 24-inch wide opening under your counter. Measure your space carefully. Get a tape measure and check twice. Seriously, measure again.
Look at the area under your sink. That’s usually where a dishwasher goes. It needs to connect to your water supply and drain line. If pipes are already running there (which they usually are), that’s perfect.
Check if you have a good spot with proper access. Can you reach the water connections? Can you route a drain pipe easily? These details matter.
Your Water and Drain Lines
Your dishwasher needs two main connections: water in and water out.
The water line brings hot water into the dishwasher. You’ll tap into your existing hot water supply. Look under your sink to find your hot water line. It’s usually a pipe coming from the wall or floor.
The drain line takes dirty water out. It connects to your sink’s drain. Your dishwasher shares the same drainage system your sink uses.
Your Electrical Setup
Here’s the thing about electricity: a dishwasher needs its own circuit. That means a dedicated outlet just for the dishwasher. No sharing with other appliances.
Check your circuit breaker box. You may need to add a new circuit, or you might have an empty slot ready to go. If you’re not comfortable working with electricity, hire a licensed electrician. This isn’t the place to learn on the job.
Space and Layout
Walk into your kitchen and really look at the layout. Think about how you use the space now. A dishwasher takes up a 24-inch opening, which is basically one cabinet space.
Where do you want it? Most people put it next to the sink, on either the left or right side. That makes sense because the water lines and drain are close by.
Think about traffic flow too. Will the dishwasher door hit someone when it opens? Will it block the refrigerator or other appliances? These questions matter before you commit.
Tools and Supplies You’ll Need
Let’s talk about what you’ll actually need to have on hand before you start this project.
Basic Tools
- Screwdriver set (both Phillips and flathead)
- Adjustable wrench
- Socket wrench set
- Tape measure
- Level
- Drill with bits
- Hose clamps
- Adjustable wrench
Materials and Parts
- Water inlet hose (if not included with dishwasher)
- Drain hose (if not included)
- Hose clamps and connectors
- Electrical outlet and wire (if needed)
- Shims for leveling
- Caulk and caulking gun
Safety Gear
- Work gloves
- Safety glasses
- Flashlight (for under-sink work)
Step One: Remove the Cabinet Space
Alright, let’s get started with the actual work.
First, you need to clear out a space for your dishwasher. If there’s a cabinet in the way, you’ll need to remove it.
Turn off the power to any outlets in that cabinet. Seriously, don’t skip this step.
Remove any items stored in the cabinet. Take out shelves if there are any. Then remove the cabinet itself. You might need to unscrew it from the counter and wall.
If the cabinet is nailed, use a pry bar to remove it carefully. Work slow so you don’t damage your counter or walls.
Dispose of the old cabinet or save it if you think you’ll use it later.
Now you’ve got an open space. This is exciting! You’re really doing this.
Step Two: Handle Your Plumbing
This is where you connect the water and drain lines. Take your time with this part. Water damage is not fun.
Shutting Off the Water
Before you touch any water pipes, shut off the water supply to your kitchen. Look under your sink for a shut-off valve. Turn it clockwise until it stops. If you can’t find a valve under the sink, you may need to shut off water to the whole house.
Once the water is off, run the tap to make sure. The water should stop flowing. Good.
Tapping Into the Hot Water Supply
Now, find your hot water line under the sink. This is the pipe that brings hot water to your sink.
Your new dishwasher needs its own connection to this hot water line. You’ll use a tee fitting to create a split in the line. This lets water flow to your sink and to your dishwasher.
Here’s how:
- Mark where you want to cut the line. Pick a spot that’s easy to reach.
- Use a pipe cutter to cut the line. Make a clean cut, not jagged.
- Attach a tee fitting to the cut end of the line. The tee has three openings: one in, two out.
- Reconnect your original hot water line to one opening on the tee.
- Attach a flexible water inlet hose to the other opening. This hose goes to your dishwasher.
Use hose clamps to secure everything. Tighten them firmly with your wrench.
Setting Up the Drain Line
The drain line is simpler than the water line. Grab the dishwasher’s drain hose. This hose carries used water out of the dishwasher.
Your dishwasher drain connects to your sink’s drain line. Look under your sink and find where the water goes down the drain. There’s usually a P-trap there (it looks like the letter P).
Create a connection point for the dishwasher drain. You can use a Y-fitting on the drain line. This lets your sink and dishwasher both drain through the same pipe.
Run the drain hose from your dishwasher to the drain connection under the sink. Don’t make tight bends in the hose. Bend it gently so water flows freely.
Use hose clamps to secure the drain hose. Make sure it won’t slip off.
Testing for Leaks
Turn the water back on slowly. Watch all your connections carefully. Do you see any drips? Do you hear any hissing sounds? These are signs of leaks.
If everything looks dry, great! If you see a leak, turn the water off again and tighten the connection. Try again.
Test the drain too. Fill your sink with water and let it drain. Watch the connections under the sink. Any leaks there?
Step Three: Handle the Electrical Work
Your dishwasher needs power. This means running an electrical line to where the dishwasher will sit.
What About Hiring an Electrician?
Honestly, this is the part where many people call a pro. Working with electricity is serious business. One mistake could cause a fire or electrocution. If you’re not confident with electrical work, hire a licensed electrician. It’s worth the cost for safety.
If You’re Doing It Yourself
If you have electrical experience, here’s the basic process:
Your dishwasher needs a dedicated 20-amp circuit. That means a circuit breaker just for this appliance.
Turn off power to the area where you’re working. Flip the main breaker switch if you need to.
Run wire from your circuit breaker panel to where the dishwasher will sit. Use proper gauge wire for a 20-amp circuit (usually 12-gauge).
Install an electrical outlet under the counter space where the dishwasher goes. The outlet should be positioned so the dishwasher plug reaches it easily.
Install a new 20-amp circuit breaker in your breaker panel (if you have space).
Connect the wire to the new breaker using the proper connections.
Flip the breaker on and test the outlet with a voltage tester. It should show power.
Again, if this seems overwhelming, call an electrician. This is not where you want to save money.
Step Four: Prepare the Opening
Now let’s get that space ready for your new dishwasher.
Clean out all the dust and debris from the cabinet opening. Use a vacuum if you have one. You want a clean space to work in.
Check the area for any sharp edges or protruding nails. Sand down any rough spots. The dishwasher will slide into this space, so you want it smooth.
Make sure the opening is the right size. Standard dishwashers are 24 inches wide, 33 to 37 inches tall, and 24 inches deep. Measure your opening in all directions to confirm it fits.
If the opening is too small, you’ll need to modify it. This might mean removing more cabinet or cutting into your counter. This is more complex work, so consider calling a pro if you’re not comfortable doing it.
Step Five: Slide In the Dishwasher
This is the fun part! You’re about to see your new dishwasher in place.
Getting the Dishwasher to Your Kitchen
First, move the dishwasher into your kitchen. These things are heavy, usually 70 to 90 pounds. Get help if you need it. Ask a friend to help you carry it or use a dolly to wheel it in.
Be careful not to bang it against doorways or corners. Damage to the exterior can lead to rust.
Positioning It
Roll the dishwasher up to the opening. Most dishwashers have wheels on the front legs. Use these wheels to slide it into position.
Slide it slowly. You want to make sure the drain and water connections align with where you set them up underneath.
Once the dishwasher is in the opening, check the fit. It should go in smoothly, with small gaps on the sides. These gaps will be filled with panels later.
Leveling It
Here’s a step people often miss: your dishwasher needs to be level. If it’s tilted, water won’t drain properly inside, and it won’t close right.
Use a level tool to check both side-to-side and front-to-back. Adjust the front legs by turning them (they usually have a hex nut you can turn with a wrench).
Shims are little wedges you slip under things to level them out. You can use shims under the side rails if needed to get everything perfect.
Keep checking with your level as you make adjustments. When it’s level, you’re ready to move on.
Step Six: Connect the Water and Drain
Now you’re going to connect your dishwasher to the hoses you set up earlier.
Water Connection
Locate the water inlet port on the back of your dishwasher. It’s a small opening. Attach your flexible water inlet hose to this port. Hand-tighten it first, then use a wrench to tighten it fully. Don’t over-tighten or you’ll damage the fitting.
Make sure the hose doesn’t kink as the dishwasher slides into place. Check the path the hose takes. Does it bend too sharply anywhere? Adjust as needed.
Drain Connection
Find the drain outlet on your dishwasher. It’s usually on the bottom back. Attach your drain hose to this outlet using a hose clamp. Make sure it’s secure.
The drain hose should slope downward as it goes to your drain connection. This helps gravity do the work. Avoid creating siphons or air pockets in the line.
Step Seven: Secure the Dishwasher
Once everything is connected and in place, you need to secure the dishwasher so it doesn’t move.
Check the top front edge of the dishwasher. There are usually clips or brackets here designed to attach to the countertop. Screw these into the underside of your counter. This keeps the dishwasher from shifting.
Use the screws that came with your dishwasher. If you don’t have screws, use appropriate countertop fasteners.
Make sure the dishwasher is held firmly in place. It shouldn’t wiggle or move when you push on it.
Step Eight: Add Filler Panels
The gaps on the sides of your dishwasher look unfinished. This is where filler panels come in.
Filler panels are decorative strips that match your cabinet style. They fill the spaces between the dishwasher and the existing cabinets.
Install the filler panels on both sides of the dishwasher (or one side if it’s against a wall). They usually screw in or glue on. Follow the manufacturer’s instructions for your specific panels.
Your kitchen is starting to look polished now!
Step Nine: Plug It In and Test
Time for the moment of truth! Plug your dishwasher into the electrical outlet you installed.
The dishwasher should power on. You might see lights or a display panel. Different models have different features.
Running Your First Cycle
Don’t put any dishes in yet. Run the dishwasher empty on a short cycle. This flushes the system and makes sure everything works.
Watch for leaks. Check under the sink and around the dishwasher base. You’re looking for any water dripping or pooling.
Listen to the sounds. You’ll hear water running, motors working, and spray arms moving. This is all normal.
Checking for Problems
After the cycle finishes, the dishwasher should empty and stop. Open the door and check inside. Is it dry? Good sign.
If you see water pooling inside, there might be a drain problem. If you see water leaking out, there’s a connection leak.
Turn off the water and figure out where the leak is coming from. Tighten connections as needed.
Step Ten: Load It Up!
Once everything works perfectly, it’s time to use your dishwasher for real.
Learn how to load it properly. Plates go in the lower rack, glasses in the upper rack. Place utensils handles-up in the basket so the sharp ends don’t poke anyone when you reach in.
Add dishwasher detergent. You can use pods, powder, or liquid. Check your dishwasher’s manual for the right amount and type.
Close the door, select your cycle, and push start. Then walk away and do something fun while it runs!
Troubleshooting Common Issues
Your dishwasher isn’t working right? Here are common problems and how to fix them.
Water Not Filling
If your dishwasher isn’t filling with water, check a few things:
- Is the water shut-off valve under the sink fully open? Sometimes it’s only partially open.
- Is the inlet hose kinked or bent? Check the path it takes and straighten it out.
- Is the inlet hose attached properly? Make sure it’s tight.
- Check your water supply. Run your sink to confirm water is flowing.
Water Not Draining
If water is pooling inside your dishwasher, you have a drain problem:
- Is the drain hose kinked? Check for sharp bends that block water flow.
- Is the drain hose clogged? Look inside the hose. You might see debris blocking it.
- Is the drain hose connected properly? Check the connection at both ends.
- Check your sink drain. If your sink is draining slowly, the problem might be there.
Leaks
Water leaking from your dishwasher is usually a connection problem:
- Check all hose connections. Are they hand-tight plus one wrench turn tight?
- Look at the inlet fitting. Is it leaking from the connection?
- Check the drain connection. Is water seeping out?
- Tighten the offending connection and test again.
Strange Noises
Unusual sounds coming from your dishwasher? Here’s what might be happening:
- Grinding or squealing: This might be the pump. Try a different detergent or check for debris in the pump.
- Rattling: Something might be loose inside. Check the spray arms and racks.
- Hissing: This could be air in the line. Run a cycle and see if it stops.
When to Call a Professional
Some situations call for a professional installer or plumber:
- If you’re not comfortable working with water or electrical connections
- If your kitchen layout requires significant modifications
- If you run into unexpected plumbing situations (old pipes that need replacement, no access to water lines)
- If your dishwasher isn’t working after you’ve tried basic troubleshooting
- If you need a new electrical circuit and don’t have experience with circuit breakers
Professionals have the right tools and knowledge to handle complications quickly. Sometimes it’s worth the money.
Final Tips for Success
Here are some things to remember as you tackle this project:
Take your time. This isn’t a race. Rushing leads to mistakes.
Read the manual. Your dishwasher came with instructions. They’re your friend. Follow them.
Measure twice, cut once. This old saying applies here. Double-check everything before you commit.
Keep the warranty intact. Some dishwashers have requirements for installation. Follow them to keep your warranty valid.
Maintain it properly. Once your dishwasher is installed, keep it running smoothly. Clean the filter regularly, use the right detergent, and run hot water through your sink before running a cycle.
Don’t skip the level check. A dishwasher that’s not level will drain poorly and may not last as long.
Label your shutoff valve. If you have a water shutoff just for the dishwasher, label it clearly. Future you will thank you.
Wrapping Up
Adding a dishwasher to your kitchen is a big project, but it’s totally doable. You’ve got this.
The key is planning ahead, taking your time, and not being afraid to call a pro if things get complicated. There’s no shame in hiring help. This is an investment in your home and your quality of life.
Your kitchen is about to get a whole lot easier to maintain. No more hours at the sink. Just load, add soap, and press a button. Your hands will be happier, and you’ll have more time to enjoy life.
If you’ve never tackled a project like this before, you’re braver than you think. And if you’re hiring someone to do it for you, that’s smart too. Either way, you’re getting a dishwasher, and that’s what matters.
Now go get yourself a dishwasher and join the clean-dish revolution. Your future self will be very grateful.