How to Add a Ground Wire to an Outlet?
So you’ve noticed your old outlets only have two holes. Or maybe you need to install a three-prong outlet in your home. Either way, you’re wondering how to add a ground wire to an outlet. The good news? You can do this yourself with the right information and a little patience.
This guide will walk you through everything you need to know. No fancy electrical jargon. No confusing technical mumbo jumbo. Just clear steps and honest talk about what grounding really means and why it matters.
What Does Grounding Actually Mean?
Let’s start with the basics. A ground wire is like a safety exit for electricity.
Imagine electricity as water flowing through a pipe. Water wants to move from high pressure to low pressure. Electricity works the same way. It wants to flow from high voltage to low voltage. Normally, current travels from the hot wire to the neutral wire and back to your home’s electrical panel.
But sometimes, something goes wrong. A wire gets damaged. A device breaks. Electricity escapes where it shouldn’t be. This is called a fault.
Without a ground wire, that stray electricity has nowhere safe to go. It might travel through you, through your device, or through your house in dangerous ways. A ground wire gives that electricity a direct path to the earth. It’s literally grounding the electricity so it can’t hurt you.
Think of it like this: when lightning strikes a building, it needs a way to safely reach the ground instead of jumping through the structure. A ground wire does the same thing for your outlets.
Why Your Outlets Need Grounding
Modern appliances need grounding for several reasons.
First, your safety matters. A properly grounded outlet protects you from electrical shocks. If something goes wrong inside a device, the electricity flows safely to ground instead of through your body.
Second, your devices live longer. Grounding protects your expensive electronics from power surges. That new television, computer, or microwave? Grounding helps keep it running smoothly.
Third, your home needs it for legal and insurance reasons. Most building codes require three-prong grounded outlets in kitchens, bathrooms, and garages. If you’re selling your home, inspectors will check for proper grounding. Insurance companies expect it too.
Types of Outlets You’ll Encounter
Before you start work, let’s talk about what you might see in your walls.
Two-prong outlets have one rounded or U-shaped hole and one straight hole. These are old. They only have a hot wire and a neutral wire. No ground wire. These outlets don’t meet modern safety codes.
Three-prong outlets have a U-shaped hole along with two regular holes. The U-shaped hole is for the ground pin. This outlet is what you want.
Ground fault circuit interrupter outlets (GFCI outlets) look similar to regular three-prong outlets. They have a test button and a reset button on the face. These are extra safe. Kitchens, bathrooms, and outdoor areas should have GFCI outlets.
What You’ll Need Before Starting
Don’t rush out to buy everything at once. Read through this section first so you know exactly what to gather.
Tools you’ll need:
- A voltage tester or multimeter (to make sure power is off)
- A screwdriver (usually Phillips head)
- Wire strippers (to remove insulation from wire)
- A cable stripper (helpful but not absolutely necessary)
- Needle-nose pliers (for bending wire)
- A flashlight or headlamp (working inside a wall box gets dark)
Materials you’ll need:
- Electrical wire (copper, 14-gauge or 12-gauge depending on your circuit)
- Wire nuts (to connect wires safely)
- The new three-prong outlet itself
- Electrical tape (though not strictly necessary with wire nuts)
Optional but helpful:
- Wire fish tape (to pull wire through walls)
- A stud finder (to know what’s behind your walls)
- Outlet box extenders (if your box is set too far back)
Check your local hardware store. Don’t worry about feeling lost there. Just show a worker a picture of what you need, and they’ll point you right.
Safety First: The Most Important Step
Before you touch anything, you need to turn off the power. This isn’t optional. This isn’t something to skip. This is the difference between a safe project and a dangerous one.
Find your home’s electrical panel. It’s usually in the basement, garage, or utility room. It’s a gray or metal box with a bunch of switches inside. Each switch controls power to different areas of your home.
You need to flip the switch (breaker) that controls the outlet you’re working on. If you don’t know which one, turn off the main breaker instead. Yes, your whole house will go dark. That’s fine. Safety first.
Next, use your voltage tester on the outlet. Touch one probe to the outlet. Touch the other probe to the ground. The tester should show zero voltage. No beeping. No lights. Nothing. That means the power is really off.
Still don’t trust it? Use a lamp. Plug it into the outlet. If the lamp doesn’t turn on, the power is off.
Only after you’ve confirmed zero power should you start working. Every single time.
Understanding Your Home’s Electrical System
Your home’s electricity starts at the utility company’s lines outside. It comes through a meter and into your electrical panel. The panel splits it into different circuits. Each circuit goes to different parts of your home.
Each circuit has a hot wire (colored black or red), a neutral wire (colored white), and usually a ground wire (colored green or bare copper). These wires run through your walls inside plastic or metal tubes called conduit.
Here’s what matters: if your home was built before grounding became standard, your walls might only have hot and neutral wires. No ground wire running through them.
This is where things get a bit tricky. You have a few options:
Option 1: Run new wire through the walls. This is the right way to do it. You install new three-conductor wire from your outlet back to the electrical panel. This new wire includes a ground conductor. It takes more work, but it’s the safest and most code-compliant option.
Option 2: Use the metal conduit as ground. If your home has metal conduit or metal-sheathed cable running to your outlet, the metal itself can work as a ground path. This is acceptable in some cases, but you need to make sure all connections are tight.
Option 3: Install a ground strap. This runs from your outlet box to a cold water pipe. Water pipes underground act as a ground. Again, this works but needs to be done correctly.
Option 4: Call a professional. If you’re unsure about any of this, hire a licensed electrician. It’s worth the cost.
For this guide, we’re going to focus on Option 1 because it’s the most reliable long-term solution.
The Step-by-Step Process
Ready to actually do the work? Let’s go.
Step One: Turn Off the Power and Remove the Old Outlet
We already talked about this, but let’s do it again. Turn off the breaker. Test the outlet with your voltage tester. Make absolutely certain the power is off.
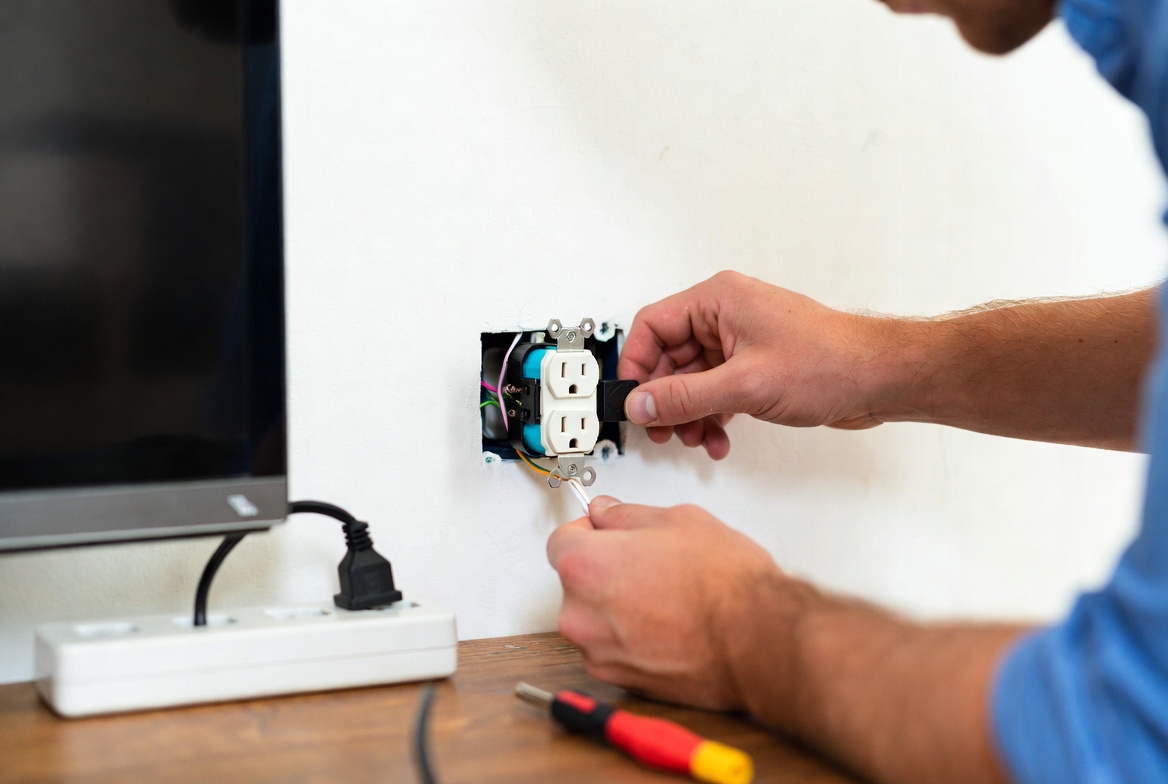
Now, unscrew the old outlet from the wall. There are usually two screws holding it in place. Unscrew both. Pull the outlet straight out toward you. You’ll see wires connected to the back or sides.
Look at the connections. The hot wire (black) connects to the brass screw. The neutral wire (white) connects to the silver screw. There might be two black and two white wires if the outlet is part of a circuit that continues to other outlets.
Take a picture with your phone. Seriously. You’ll want to reference it later.
Step Two: Disconnect the Old Wires
Using your screwdriver, loosen the terminal screws on the outlet. The wires should come free. If they’re stuck, wiggle them gently while loosening.
Once the wires are free, you can pull the old outlet completely out. Set it aside. You won’t need it anymore unless you’re keeping it as a spare.
Step Three: Prepare Your New Wire
If you need to run new wire from your electrical panel to the outlet, this is where it gets real.
You’ll be running three-conductor wire through your walls. Before you start pulling wire, you need to know where it’s going. You’ll need to drill or cut a path for it.
This is honestly the hardest part of the whole job. It requires you to think about your home’s structure. You’re drilling through walls, joists, studs, and possibly insulation.
Here’s a pro tip: use the existing wire path if possible. Your walls probably already have a path for electrical wire. You can usually run your new wire right next to the old one.
Use a fish tape to pull the wire through the walls. Insert the fish tape where you want the wire to go. Feed it through until it comes out the other end. Hook your new wire to it. Then pull the fish tape back through, which pulls the wire with it.
This takes practice. If it seems overwhelming, this is where you call a professional.
Step Four: Strip the Wire Ends
Once your new wire reaches the outlet, you need to prepare it for connection.
Using your wire stripper, carefully remove about half an inch of insulation from each wire end. The hot wire is usually black. The neutral is usually white. The ground wire is usually green or bare copper.
Strip each wire gently. You want to remove the plastic insulation without nicking the copper underneath. Nicked copper won’t conduct as well and can create safety problems.
Step Five: Connect the Ground Wire
Here’s the moment it all comes together.
Your new outlet has three terminals. The brass terminal is for the hot wire. The silver terminal is for the neutral wire. The green terminal is for the ground wire.
Take your ground wire (green or bare copper) and insert it into the green terminal. Use the terminal screw to tighten it firmly. Not overly tight, but snug enough that it won’t pull out.
Some outlets have a hole instead of a screw. If so, insert the ground wire straight into the hole and tighten any screw that locks it in place.
Step Six: Connect the Hot and Neutral Wires
With the ground done, the rest is easy.
Insert the black hot wire into the brass terminal. Tighten the screw.
Insert the white neutral wire into the silver terminal. Tighten that screw too.
Now all three wires are connected. Your outlet now has a ground connection.
Step Seven: Push the Outlet Back Into the Wall Box
Carefully fold the outlet and wires back into the wall box. Don’t force it. The wires should have enough slack that everything fits comfortably without pinching.
Push straight in. Don’t twist or angle it harshly. Once it’s flush with the wall, secure it with the mounting screws.
Step Eight: Install the Cover Plate
Screw the cover plate onto the outlet. Make sure it sits flush. It should look neat and finished.
Step Nine: Turn the Power Back On
Go back to your electrical panel. Flip the breaker back on. The outlet should now be live.
Test it with a voltage tester or plug in a device. Everything should work perfectly.
What If You Can’t Run New Wire Through the Walls?
Sometimes running new wire just isn’t practical. Maybe you live in an old building. Maybe the walls are solid concrete. Maybe you just don’t want to cut into your walls.
You still have options.
Metal conduit grounding: If your wires run through metal conduit, you can sometimes use the conduit as your ground path. The metal provides a low-resistance path to ground. You’ll need to verify that all connections between the conduit and your electrical panel are solid and tight.
GFCI outlets: If you really can’t install a proper ground wire, a GFCI outlet offers additional protection. It won’t give you true grounding, but it will protect you from electrical shocks. Install it as the first outlet in the circuit. Plug-in GFCI devices can protect the outlets downstream.
Water pipe grounding: Older homes sometimes used cold water pipes as ground conductors. You can run a ground wire from your outlet box to a cold water pipe with a proper ground clamp. The water in the pipes eventually reaches the earth, completing the ground circuit.
None of these are as good as a proper three-conductor wire, but they’re better than nothing.
Common Mistakes to Avoid
Let’s talk about what NOT to do.
Don’t skip testing for power. Seriously. Always test. Always confirm zero voltage.
Don’t mix up your wires. Hot goes to brass. Neutral goes to silver. Ground goes to green. Mess this up and you create a fire hazard.
Don’t use undersized wire. If your circuit is 20 amps, use 12-gauge wire. If it’s 15 amps, 14-gauge works. Check your breaker to know the circuit rating.
Don’t strip too much insulation. A quarter to half inch is right. More than that and you risk exposed copper touching other wires.
Don’t overtighten terminal screws. Snug is good. Crushing good is bad. You might damage the copper.
Don’t leave the outlet loose in the box. Push it all the way in and secure it properly.
Don’t assume the old outlet was correct. Just because the old outlet was wired a certain way doesn’t mean it was right. Look it up if you’re unsure.
When to Call a Professional
Be honest with yourself about your skill level.
Call a professional if:
- You don’t feel confident turning off power to your home
- You don’t feel comfortable running wire through walls
- Your home has outdated or unusual wiring
- You find damaged insulation or corroded wires
- The outlet box seems damaged or cracked
- You find black or burned wire
- You live in an area requiring licensed electricians to do this work
There’s no shame in calling a pro. Electrical work is serious. Your safety matters more than saving money.
Understanding Building Codes and Permits
Here’s something many DIYers skip: checking local codes and permits.
Building codes exist because people died making mistakes. Your area probably requires permits for electrical work. You might need a licensed electrician to do it. You might need an inspection afterward.
Call your local building department. Tell them what you want to do. They’ll tell you what’s required. Follow those rules. It protects you legally and keeps your home safe.
Grounding and Your Breaker Panel
We mentioned your breaker panel briefly, but let’s dig deeper.
Your panel is where all your circuits start. It’s also where your main ground and neutral are bonded together. This is critical. The bonding creates a continuous path to ground for all circuits.
When you run a new ground wire back to the panel, it connects to a ground bus bar. This bar connects to a ground rod driven into the earth outside your home. This completes the circuit: from your outlet, through the ground wire, to the panel, to the ground rod, to the earth, and back through the utility company’s lines.
This is why proper grounding to the panel is so important. It’s not optional. It’s the whole reason grounding works.
If you’re uncertain about your panel or don’t want to work inside it, call an electrician. They do this all the time.
Grounding vs. GFCI Protection
These are different things, and people often confuse them.
Grounding provides a safe path for electricity to reach the earth. It prevents stray current from hurting you or your equipment.
GFCI protection detects when current is leaking where it shouldn’t and cuts power instantly. It’s like a super-fast switch that stops current flow when it senses a problem.
You want both. A properly grounded outlet with GFCI protection is ideal. In bathrooms and kitchens, you absolutely should have GFCI outlets.
They work together. Grounding is your basic safety. GFCI is your extra layer of protection.
Testing Your Work
After you’ve finished, test everything.
Use a three-prong outlet tester. It’s a small device with three prongs. Plug it into your new outlet. It will show you if the outlet is properly grounded. Green lights mean everything is correct. Red lights mean something is wrong. Fix it before using the outlet.
Plug in some devices. Use them. Make sure everything works normally.
Watch for any odd smells, sounds, or sparks. If something seems wrong, turn the breaker off immediately and check your work.
Maintaining Your Grounded Outlets
After installation, your outlets need minimal maintenance.
Periodically check that they’re still secure in the wall. Wiggle the cover plate gently. It shouldn’t move.
Watch for discoloration around the outlet. Dark marks or scorch marks mean something is wrong. Don’t use that outlet. Have it inspected.
Don’t overload outlets. Plug too many devices into one outlet and it heats up. That’s not safe.
Keep outlets dry. Water and electricity don’t mix. If an outlet gets wet, turn off the breaker and let it dry completely before using it again.
The Real Cost of Doing This Work
Let’s talk money for a minute.
Materials cost maybe fifty to hundred dollars. Wire, outlets, and tools add up fast, but not too much.
Time is the real cost. Running new wire takes hours. You need to know your home’s structure. You need to be careful. Rushing electrical work causes problems.
A professional electrician might charge five hundred to two thousand dollars for this job. That seems like a lot, but they know the codes. They have insurance. They guarantee the work.
Consider your situation. If you’re just adding a single outlet and have basic skills, you might save money doing it yourself. If you need multiple outlets or major rewiring, professional help is worth it.
Final Thoughts on Grounding Outlets
Adding a ground wire to an outlet is doable for someone willing to learn and be careful. The key is respecting electricity. It’s powerful and can hurt you. But when handled correctly, your home becomes safer and your devices run better.
Start with understanding why grounding matters. It’s not magic. It’s simple physics. Electricity needs a safe path. A ground wire provides that path. Everything flows from that concept.
Take your time. Don’t rush. Test your work. Ask questions if you’re unsure.
Your home’s safety is worth the effort. Properly grounded outlets protect your family, your devices, and your property. That’s worth doing right.
If you’re unsure at any point, call a professional. There’s no prize for doing it yourself if you do it wrong. Safety always comes first.

Hi, I’m Mary, the founder of Homygear.com. I’m passionate about creating a comfortable, smart, and beautiful home. I share practical insights and real-world experience on home gear that makes everyday life easier. Behind the scenes, my dedicated research team studies products in depth, and our writers craft honest reviews using trusted, authentic sources—so you can choose home gear with confidence.