How to Add Freon to a Refrigerator?
Your refrigerator keeps your food fresh and cold, but what happens when it stops doing its job? If you open your fridge and find that the temperature isn’t as low as it should be, you might have a refrigerant problem. The good news is that you don’t always need to call a professional to fix this issue. Learning how to add freon to your refrigerator can save you money and get your appliance working again.
Freon is the key to keeping your refrigerator cold. Without it, your fridge becomes just a regular storage box. This guide walks you through everything you need to know about refrigerant, how to spot problems, and how to fix them safely.
What Is Freon and Why Does Your Refrigerator Need It?
Freon is a brand name for refrigerant, the liquid that flows through your refrigerator’s cooling system. Think of it as the lifeblood of your fridge. This special fluid works hard to pull heat from inside your refrigerator and move it outside, keeping your food at the right temperature.
The refrigerant cycle happens over and over again. The coolant starts as a low-pressure gas. A compressor squeezes it, turning it into a hot, high-pressure gas. The gas moves through the condenser coils on the back or bottom of your fridge, where it releases heat. The liquid then flows through an expansion valve, which drops the pressure and temperature. Finally, it enters the evaporator coils inside your fridge, where it absorbs heat from the food storage area.
Different refrigerators use different types of refrigerant. Older models often had R-12, a type of coolant that scientists found harmful to Earth’s ozone layer. Most modern fridges use R-134a, which is better for the environment. Some newer models use R-600a, a more efficient refrigerant. Your fridge’s manual will tell you which type your model needs.
Signs Your Refrigerator Needs More Freon
Your fridge won’t suddenly stop working if it runs low on coolant. Instead, you’ll notice problems that get worse over time. Here are the main signs that your refrigerator needs refrigerant added:
The Fridge Isn’t Cold Enough
The most obvious sign is that your fridge doesn’t keep food as cold as it should. You might notice that milk spoils faster than normal, or ice cream melts quickly. Check the temperature inside with a thermometer. Your fridge should stay between 35 and 38 degrees Fahrenheit. If it’s warmer than that, low coolant could be the problem.
The Freezer Frost Looks Different
Frost buildup in the freezer can tell you a lot about your system. When coolant levels drop, frost might build up on just one side of the freezer, or it might disappear completely. Uneven frost is a red flag that something’s wrong with your refrigerant flow.
The Compressor Runs All the Time
Your compressor is the engine of your cooling system. It normally runs in cycles, turning on and off throughout the day. If your compressor runs constantly without taking breaks, your coolant might be too low. This also means your electric bill will climb higher than usual.
You Hear Strange Noises
Low refrigerant can cause weird sounds from your fridge. You might hear hissing, bubbling, or gurgling noises coming from the back. These sounds mean the coolant isn’t flowing smoothly through the tubes.
The Pipes Feel Warm
Check the copper tubes on the back of your fridge. They should feel cool or cold to the touch. If they feel warm or room temperature, that’s a sign your refrigeration system isn’t working right.
Before You Start: Safety First
Adding coolant to your fridge requires care. Refrigerant can be dangerous if you don’t handle it properly. Here’s what you need to know before you begin:
Wear Protective Gear
Always wear safety glasses when working with coolant. Wear gloves too, but not latex gloves. Latex breaks down when it touches refrigerant. Use nitrile or vinyl gloves instead. You can also wear long sleeves to protect your skin.
Work in a Well-Ventilated Area
Make sure air can flow freely around your work space. Don’t work in a tiny closet or a sealed room. Good ventilation keeps you safe if any coolant leaks.
Never Mix Refrigerants
Each type of coolant is designed to work alone. Mixing different types can damage your compressor and make your fridge stop working entirely. Always use the exact type your fridge needs.
Read Your Fridge’s Manual
Your refrigerator’s manual has important details about your specific model. It tells you what type of coolant to use and other vital information.
What You’ll Need to Get Started
Before you add coolant to your fridge, gather your supplies. Having everything ready makes the job go smoothly:
Refrigerant
Buy the exact type your fridge needs. Common types are R-12, R-134a, and R-600a. The manual shows which one your model requires. You can find coolant at hardware stores, appliance stores, and online retailers.
Gauge Set or Pressure Meter
A gauge set lets you check the pressure inside your cooling system. This tells you how much coolant is in there. You can buy a gauge set made specifically for fridges, or a universal one that works with most models.
Access Valve Taps
These tiny tools connect your gauge set to the refrigerant line on your fridge. Some gauge sets come with them built in. Check your gauge kit to see if you need to buy them separately.
Screwdrivers and Wrenches
You might need these basic tools to remove panels or access the cooling lines. Keep both flathead and Phillips screwdrivers on hand.
Container for Old Refrigerant
If you need to remove old coolant, have a container ready to catch it. Some old coolant can be recycled, but you need to store it properly.
Safety Gear
Grab your safety glasses and nitrile gloves before you start.
Steps to Add Freon to Your Refrigerator
Now that you’re ready, here’s how to add coolant to your fridge. Take your time with each step.
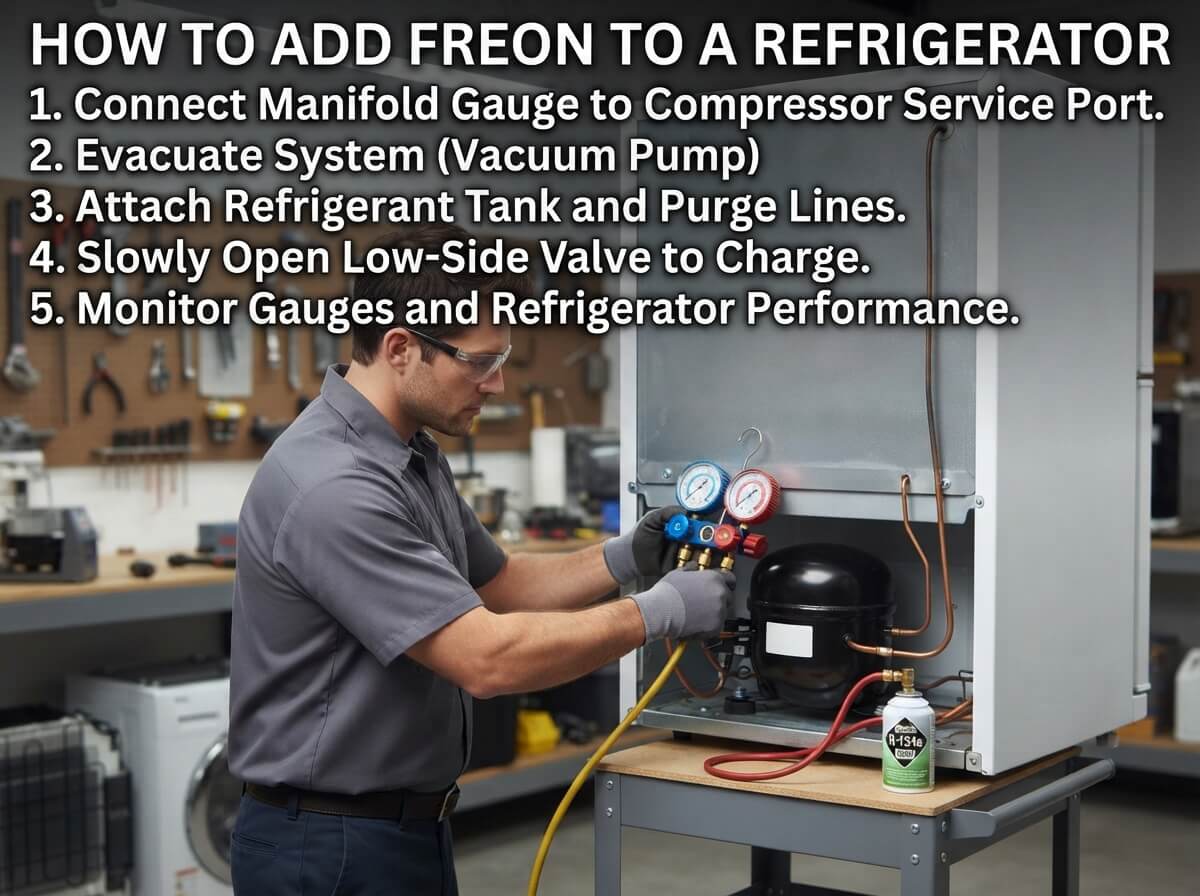
Step 1: Locate the Refrigerant Access Valve
Your fridge has tubes that carry coolant. You’ll see these copper tubes, usually on the back of the fridge near the compressor. The refrigerant access valve looks like a small metal piece sticking out from one of these tubes. On some models, it’s a screw-type valve. On others, it’s a push-type valve. Your manual shows exactly where to find it on your specific model.
Step 2: Check the Current Pressure
Attach your gauge set to the access valve. You’re looking for the pressure reading to understand your current coolant level. Different coolant types have different normal pressure ranges. R-134a, for example, usually reads between 25 and 35 PSI in your fridge when it’s off and at room temperature. If your reading is much lower, you’re running low on coolant.
Step 3: Access the Coolant Line
Some access valves let you connect your gauge set directly. On other models, you might need to remove a small cap first. Look at your fridge’s manual to see what you need to do for your model.
Step 4: Attach the Charging Hose
Your gauge set comes with hoses. The correct hose connects to the low-pressure side of your system. This is where you’ll add new coolant. Connect the hose to the access valve carefully.
Step 5: Add the Refrigerant Slowly
Open your refrigerant can and attach it to the gauge set’s hose, following the kit’s directions. Begin adding coolant slowly. Watch the pressure gauge as you work. You want to reach the proper pressure for your coolant type, but you don’t want to overcharge the system. Overcharging causes problems just like undercharging does.
Step 6: Monitor the Temperature
While you’re adding coolant, have someone check the temperature inside your fridge. You should see the temperature start to drop. As you add more coolant, the fridge should get colder. Stop adding coolant when the pressure reaches the right level and the fridge temperature improves.
Step 7: Close Everything Up Properly
Once you’ve added enough coolant, disconnect the hose from the access valve. Some valves have caps that you’ll need to screw back on. Let your fridge run for about 15 minutes. Then check the temperature again to make sure everything’s working right.
Common Mistakes to Avoid
Many people mess up when they try to add coolant for the first time. Here are mistakes you should avoid:
Adding Too Much Refrigerant
More coolant doesn’t mean a colder fridge. Overcharging actually hurts your system. It forces your compressor to work too hard and can damage it. Always follow the pressure readings in your manual.
Using the Wrong Type of Coolant
Never guess which refrigerant your fridge needs. Using the wrong type ruins your cooling system. Always check your manual first.
Forgetting to Wear Safety Gear
Coolant can burn your skin and eyes. Don’t skip the gloves and safety glasses, even if you’re in a hurry.
Working on a Hot Fridge
Your fridge needs to be off and at room temperature before you add coolant. A warm compressor and hot lines make the job harder and less accurate.
Ignoring Leaks
If your fridge keeps losing coolant, adding more is just a temporary fix. You have a leak somewhere. Find it and fix it, or your fridge will need coolant again soon.
When to Call a Professional
Some jobs are better left to experts. You should call a repair person if:
Your fridge leaks coolant regularly. A leak means you have a serious problem that requires special equipment to find and fix.
You don’t feel confident working with your fridge’s cooling system. There’s no shame in getting help.
Your fridge is under warranty. Doing this work yourself might void your warranty.
You can’t locate the access valve or don’t understand your manual. A professional can handle it.
Your pressure readings don’t match your manual’s specs even after you add coolant. This might mean something else is wrong.
Caring for Your Fridge After Adding Freon
After you’ve added coolant, keep your fridge running smoothly:
Keep the Coils Clean
The condenser coils on the back of your fridge collect dust over time. Dust stops heat from leaving the system, making your compressor work harder. Vacuum these coils every three to six months.
Check the Seals
Rubber seals around your fridge doors should be tight and clean. Dirty or damaged seals let cold air escape, making your fridge work overtime.
Don’t Overload Your Fridge
Too much food blocks airflow inside. Leave space for cold air to move around.
Keep Your Fridge Level
Make sure your fridge sits flat. Uneven fridges can affect coolant flow.
Let Hot Food Cool First
Never put steaming hot food straight into your fridge. Let it cool to room temperature first. Hot food makes your cooling system work much harder.
Understanding Refrigerant and the Environment
Modern coolants are much better for Earth’s environment than old ones. If your fridge is quite old and still uses R-12, you might think about upgrading to a newer model with more modern refrigerant. New fridges with R-134a or R-600a coolant use less energy and harm the ozone layer less.
When you dispose of old coolant, never just throw it away. Recycling centers often accept old refrigerant. Call your local waste management center to find a place that takes it. Proper disposal protects our planet.
The Bottom Line
Adding freon to your refrigerator is a job you can handle yourself if you take your time and follow directions carefully. The key is understanding what your fridge needs, getting the right coolant and tools, and working slowly and carefully through each step.
Your refrigerator works hard every single day to keep your food fresh. When it runs low on coolant, a simple recharge can bring it back to life. Whether you do it yourself or call a professional, addressing a coolant problem quickly stops your fridge from getting worse.
Remember to always wear safety gear, use the exact type of coolant your model needs, and follow your manual’s instructions. If you feel stuck at any point, don’t push forward. Getting help from a professional is always better than damaging your fridge.
Take care of your fridge, and it will take care of your food for years to come.

Hi, I’m Mary, the founder of Homygear.com. I’m passionate about creating a comfortable, smart, and beautiful home. I share practical insights and real-world experience on home gear that makes everyday life easier. Behind the scenes, my dedicated research team studies products in depth, and our writers craft honest reviews using trusted, authentic sources—so you can choose home gear with confidence.