How to Add an Extra Wall Plug Between Two Others?
You’re standing in your room looking at your wall outlets. Maybe you need to charge your phone, your tablet, and your laptop all at the same time. Your wall plugs are far apart, and you don’t have enough outlets where you need them. Sound familiar?
The good news is you can add extra wall plugs. It’s easier than you think. You don’t need to be an electrician or have years of experience working with electricity. With the right steps and a little patience, you can install a new electrical outlet right between two existing ones.
This guide will walk you through the entire process. By the end, you’ll know exactly how to add an extra wall plug so you can power all your devices without stress.
Why Add Extra Wall Plugs to Your Home?
Before we jump into the how-to part, let’s talk about why this project matters.
Modern homes have a problem. We use more devices than ever before. Phones need charging. Computers need power. Lamps, speakers, and fans all plug in. Your home was probably built with fewer outlets than you need right now.
Adding extra wall plugs gives you several benefits:
More Power Where You Need It
Think about your bedroom. Maybe you have one outlet near your bed. You need to charge your phone, your tablet, and run a lamp. That’s three things competing for one spot. An extra plug solves this problem in seconds.
Fewer Cords Running Across Floors
Long extension cords create hazards. People trip on them. They look messy. Extra outlets mean you don’t need those cords at all. You can plug devices right into the wall where they belong.
Safer and More Convenient
Power strips are okay for temporary needs. But they can overheat if you plug in too many things. Real wall outlets are safer for permanent setups. They’re also faster to use. You don’t have to fumble with a power strip. You just plug in and go.
Adds Value to Your Home
If you ever sell your place, more outlets make it more attractive to buyers. It shows your home is modern and practical.
Safety First: What You Need to Know Before Starting
Before you touch anything, you need to understand basic electrical safety. This is important. Electricity can hurt you if you don’t respect it.
Turn Off the Power
This is rule number one. You must turn off the electricity before you do any work. We’ll cover the exact steps in a moment. But understand this: never, ever work on electrical outlets while the power is on. It’s dangerous and could be fatal.
Wear the Right Gear
You don’t need a special outfit. But do wear clothes that cover your body. Closed-toe shoes are essential. Long hair? Tie it back. Metal jewelry? Take it off. You want nothing that could catch on anything or conduct electricity.
Get a Voltage Tester
This small device costs about ten dollars. It tells you whether electricity is flowing through a wire. Use it to confirm the power is off before you work. Seriously, do this. It takes thirty seconds and keeps you safe.
Know When to Call a Professional
If you feel scared, if something doesn’t look right, if you find aluminum wiring or anything unusual, stop and call an electrician. There’s no shame in this. Your safety matters more than saving a few dollars.
Tools and Materials You’ll Need
Gather these items before you start. Having everything ready means you won’t have to stop and search for tools in the middle of work.
Essential Tools
- A screwdriver (usually Phillips head, sometimes flat head)
- A voltage tester (non-contact type is easiest)
- A flashlight (work areas can be dark)
- A drywall saw or utility knife
- Needle-nose pliers (helpful for working with wires)
Materials
- New electrical outlet (the same kind as the others in your wall)
- Electrical wire (if needed, same gauge as existing wires)
- Wire connectors (the small plastic caps that join wires)
- Outlet box (a plastic or metal container that holds the outlet)
- Drywall patch kit (if you need to repair the wall)
- Electrical tape
Nice to Have
- A stud finder (helps you avoid wooden supports in the wall)
- A headlamp (frees up your hands while you work)
- Work gloves (protects your hands from rough edges)
Don’t feel pressured to buy fancy tools. Basic versions work fine for this job.
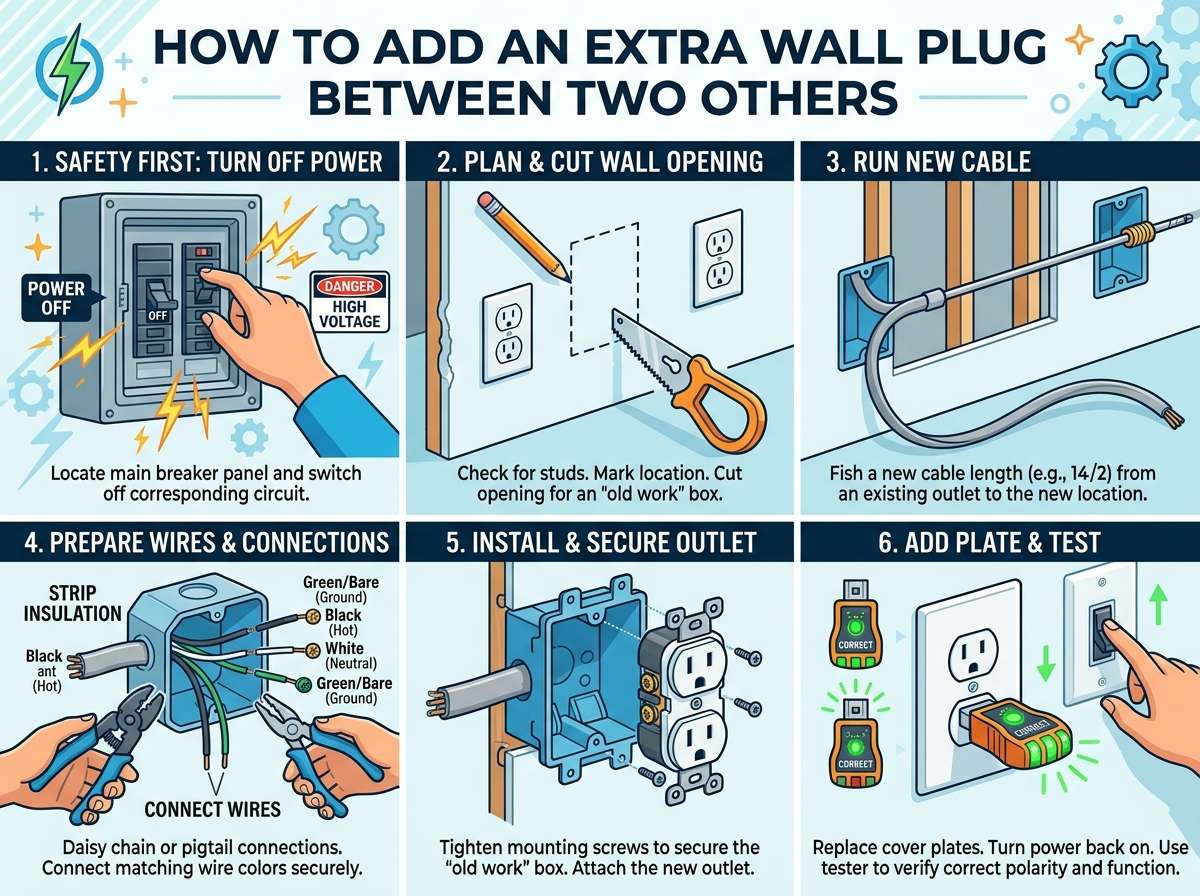
Step 1: Turn Off the Power
This is your first real step. Don’t skip it.
Look for your home’s electrical panel. It’s usually in the basement, garage, or a utility room. It’s a metal box with lots of switches. These switches control different areas of your home. Each switch is called a breaker.
You need to find the breaker that controls the outlets where you’re working. The best way is to turn off a breaker, go to that room, and test an outlet with your voltage tester. When the outlet doesn’t have power, you’ve found the right breaker.
Flip that breaker to the off position. It usually switches to the left.
Now test the outlets around where you’ll work using your voltage tester. Follow the instructions on the tester. Usually, you hold it near the outlet. If the light doesn’t turn on, you’re good. If it does, try another breaker.
Once you’ve confirmed the power is off, you’re safe to proceed.
Step 2: Choose Your Spot
You want to add a new outlet between two existing ones. This is smart because they’re usually connected to the same electrical circuit. The wiring is already there.
Look at the two outlets. Where would a new one fit best? Consider:
- Door frames and windows (avoid these)
- Studs (the wooden frames inside walls – use a stud finder to locate them)
- Visible and accessible locations
- Roughly equal distance between the two existing outlets
Measure the distance between the outlets. Now measure to find the midpoint. Mark that spot lightly with a pencil.
The new outlet needs to be at the same height as the others. Use a level to make sure your mark is at the right height.
Step 3: Cut an Opening in the Drywall
This step requires care but isn’t complicated.
The opening needs to be the size of your outlet box. Most boxes are about 2 inches by 3 inches. Check your box’s dimensions before you start.
Lightly score the drywall around your pencil mark with a drywall saw. Don’t press hard. You’re just marking the area. Once you’ve outlined the space, press harder and cut through the drywall.
Be careful. You don’t want to cut into electrical wires or pipes that might be inside the wall. Most outlets sit in the space between studs, which is usually safe. If you hit something solid, stop and pick a different spot.
Once you’ve cut through the drywall, carefully cut any extra material with your utility knife. You want a clean hole that fits your outlet box snugly.
Step 4: Install the Outlet Box
The outlet box is where your new outlet will sit. It mounts inside the wall.
Push the outlet box into the hole. It should fit snugly. Some boxes have little tabs on the sides that grip the drywall as you push the box in. Push until these tabs are flush with the drywall surface.
Check that the box is level. Adjust if needed.
If your box doesn’t grip tightly, use a drywall saw to adjust the hole size slightly. A snug fit is important because it keeps the box stable.
Step 5: Run the Electrical Wire
This is the part that intimidates many people. But it’s straightforward once you understand it.
You need to connect your new outlet to the existing electrical circuit. You have two options:
Option 1: Tie Into One of the Existing Outlets (Most Common)
This is the easiest way for beginners. You’ll use the wiring that’s already connected to one of the existing outlets.
Turn off the power (which you already did). Use your voltage tester to confirm there’s no electricity in the existing outlet.
Unscrew the outlet cover plate and remove the outlet. You’ll see wires connected to the back. There are usually three wires:
- Black wire (hot wire – carries power)
- White wire (neutral wire – completes the circuit)
- Bare copper wire (ground wire – safety protection)
These wires are connected to the outlet with screws. You’ll remove the outlet and use these wires to power your new outlet.
Carefully unscrew these wires from the outlet. Don’t pull on them. Gently loosen the screws until the wires come free.
Now you have a choice. You can either:
- Connect the wires directly from this outlet to your new outlet using wire connectors
- Run new wire from this outlet through the wall to your new outlet
For beginners, option one is simpler but only works if your outlet boxes are close together. If they’re far apart, you’ll need to run new wire.
If Running New Wire:
Get electrical wire that matches the gauge (thickness) of your existing wires. Usually, this is 14-gauge wire for standard home circuits.
Run the wire through the wall from the existing outlet to your new outlet. Try to keep it straight and protected. If you’re concerned about damaging the wire, run it through conduit – a protective plastic tube.
Connecting Wires Together:
Whether you’re connecting existing wires or new wires, the process is the same. Strip about half an inch of insulation from the end of each wire using wire strippers.
Hold the black wire from the existing outlet and the black wire from the new outlet together. Twist them clockwise until they’re tight. Screw a wire connector (wire nut) onto the twisted wires. Turn clockwise until snug. Don’t overtighten.
Repeat this process with the white wires.
For the ground wire, twist the bare copper wires together and use a wire connector, or connect them to the green screw on the outlet itself.
Use electrical tape to wrap the connection. This adds an extra safety layer.
Step 6: Install Your New Outlet
Now it’s time to put the new outlet in place.
Check that the new outlet box is secure in the wall. Push gently on the sides to confirm.
Take your new outlet. It has three screws on the back: one green (for ground), one brass (for hot/black), and one silver (for neutral/white).
Connect your three wires to these screws:
- Black wire to the brass screw
- White wire to the silver screw
- Bare copper wire to the green screw
Loosen each screw slightly. Insert the wire under the screw. Make sure the bare wire is fully exposed – don’t leave any insulation under the screw. Tighten the screw so the wire is held securely.
Gently push the outlet into the box. The screws that mount the outlet to the box should slide into the holes in the box.
Screw the outlet to the box using the provided screws. Don’t over-tighten. You want it snug, not crushed.
Step 7: Test Your Work
Before you close everything up, test your new outlet to make sure it works.
Go to your electrical panel and switch the breaker back on.
Return to your new outlet. Carefully insert a lamp or phone charger (something safe to test with). Does it turn on? Does it work?
Congratulations! Your outlet is working.
Now test it with your voltage tester from the other side. Confirm it has power. Test both the slots to make sure both sides work.
Step 8: Install the Cover Plate
Once you’ve confirmed everything works, install the cover plate.
Screw the outlet cover into the outlet. Center it so it looks neat and professional.
If you had to cut drywall, you might have extra space around the outlet box. Use a drywall patch kit to fill these gaps. Follow the kit instructions. Usually, you apply spackling compound, let it dry, and sand it smooth. Then paint it to match your wall.
Step 9: Seal Up the Existing Outlet
Remember the outlet you pulled wire from? You need to put that back together.
Connect the wires back to that original outlet using the same method we described above. Screw them to the appropriate screws.
Push the outlet back into its box and screw it in place.
Install the cover plate.
Test it to make sure it still works properly.
Common Mistakes to Avoid
Learning from others’ errors saves you time and trouble.
Leaving the Power On
This is dangerous. Always turn off the breaker and confirm with your voltage tester before touching any wires.
Using Wrong Wire Gauge
If your existing wires are 14-gauge, use 14-gauge for new runs. Using thinner wire can cause problems.
Forgetting the Ground Wire
That bare copper wire is crucial. It protects you from shocks and electrical hazards. Never skip it.
Overcrowding Boxes
Don’t stuff too many wires into your outlet box. If it feels crowded, you probably have too much in there. Keep it organized.
Skipping the Voltage Tester
This tool is cheap and essential. Use it. Seriously.
Not Patching the Wall Properly
Your wall patch should look seamless when done. Take time to make it neat.
Can You Put an Outlet Anywhere?
Not exactly. Some rules apply.
You can’t put an outlet inside a cabinet or closet where it might be hidden by items. It needs to be accessible.
You can’t put one in a location where normal use would keep it covered or inaccessible.
Bathrooms and kitchens have special rules. Outlets near water sources need special protection (called GFCI protection). Many areas legally require this. If you’re adding outlets in these areas, research your local codes or hire a professional.
Garages, basements, and outdoor areas also have specific rules about outlet types.
When in doubt, check your local building codes or ask a professional.
When to Call a Professional
Not every electrical project is for everyone. Call an electrician if:
- You find aluminum wiring (it looks silver instead of copper)
- The existing outlet feels hot or smells odd
- You’re unsure about anything at any point
- Your breaker keeps flipping off
- You hit something unexpected inside the wall
- You’re working in a bathroom or kitchen and unsure about codes
- You live in an older home with unusual wiring
There’s no shame in this. Professionals train for years for a reason. Your safety is worth the cost.
Why This Project Matters for Beginners
Adding an outlet teaches you valuable lessons about your home. You learn how electricity flows through your walls. You gain confidence working with basic tools. You develop respect for electrical safety.
Many people say this is their first home improvement project. They do it successfully and feel proud. That pride often leads to more projects. Before long, they’re fixing more things in their home themselves.
This project can be that starting point for you.
Final Tips for Success
Take your time. This isn’t a race. Rushing causes mistakes.
Double-check everything. Before turning power back on, confirm all connections are tight and correct.
Take pictures. If you’re nervous about reassembling something, take a photo before you take it apart.
Label your wires. Use tape to label which wire came from where if you’re not sure.
Consult your outlet’s instruction manual. It has details specific to your outlet model.
Ask for help. If a friend is handy, invite them to watch or help. A second set of eyes catches problems.
Stay organized. Keep your tools and materials in one spot so you don’t lose anything.
Conclusion
Adding an extra wall plug between two existing outlets is doable. You don’t need special training or advanced skills. You need patience, the right tools, and respect for electrical safety.
Follow this guide step by step. Turn off the power. Confirm it’s off. Install your outlet box. Connect the wires carefully. Test your work. Patch your wall. You’ll end up with a new outlet that works perfectly.
Your room will have more power options. Your devices will have places to charge. Your home will feel more convenient and modern.
And you’ll have done it yourself.
That feeling of accomplishment is pretty great. You looked at a problem, learned how to fix it, and did the work. That’s real skill.
So grab your tools, follow this guide, and add that extra wall plug. Your future self will thank you every time you need to charge something.
You’ve got this.

Hi, I’m Mary, the founder of Homygear.com. I’m passionate about creating a comfortable, smart, and beautiful home. I share practical insights and real-world experience on home gear that makes everyday life easier. Behind the scenes, my dedicated research team studies products in depth, and our writers craft honest reviews using trusted, authentic sources—so you can choose home gear with confidence.