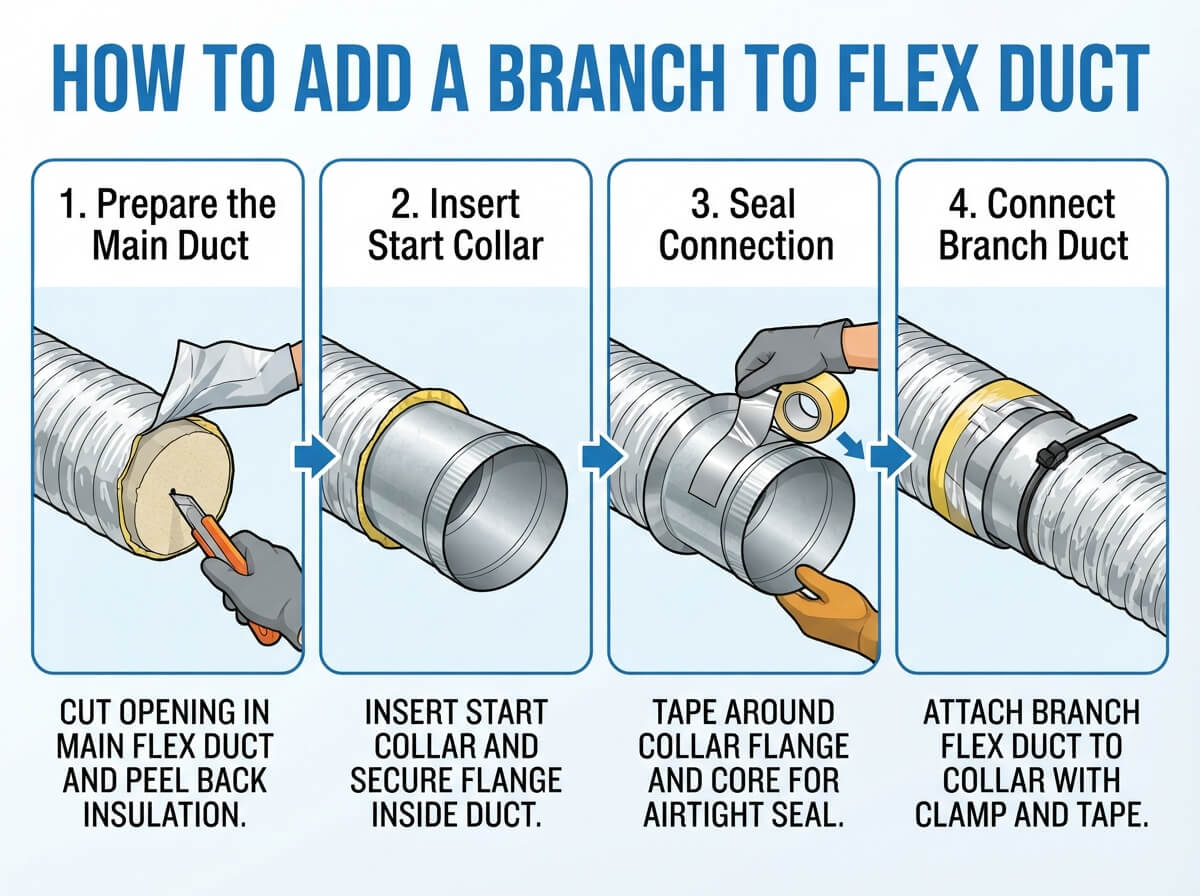
How to Add a Branch to Flex Duct?
If you’re working on your HVAC system or just trying to expand your ductwork, adding a branch to flex duct might seem scary at first. But here’s the good news: it’s actually pretty straightforward once you know the basics. This guide walks you through everything you need to do it right.
What is Flex Duct and Why Do You Need Branches?
Flex duct (also called flexible ductwork or flex tubing) is the soft, tube-like ducting you see in many homes and buildings. It’s not rigid like metal ductwork. Instead, it’s made with a flexible core and insulation, which makes it bend and shape easily.
Branches are smaller ducts that split off from your main ductwork line. They send air to different rooms or zones in your home. Your HVAC system needs this branching to deliver cool or warm air exactly where you want it.
Think of it like a tree: the main trunk is your primary duct, and the branches are the smaller lines spreading out to different areas. Each branch serves its own room or space. Without proper branching, some areas get too much air while others get too little.
Why Adding a Branch Matters
If you’re heating or cooling a new room, finishing a basement, or renovating a space, you’ll probably need to add a branch. Maybe your current setup leaves one area too cold or too hot. A new branch solves that problem by routing more air directly to that zone.
Proper branching also keeps your whole system balanced. It ensures air flows evenly throughout your home. When everything’s balanced, your system works better and costs less to run.
Tools and Materials You’ll Need
Before you start, gather your supplies. Having everything ready makes the job faster and smoother.
Tools:
- Tape measure (for sizing)
- Pencil or marker
- Utility knife or duct cutter
- Adjustable wrench
- Screwdriver
- Duct clamps or zip ties
- Ductwork sealant or mastic (this is important!)
Materials:
- Flex duct in the right size
- Duct collar or boot (the connector piece)
- Duct takeoff (the Y-shaped connector)
- Insulation wrap (if needed)
Get flex duct that matches your existing system. Sizes come in 4-inch, 6-inch, 8-inch, and larger diameters. Your main duct size usually determines what size branch you need.
Understanding Duct Sizing Basics
This is crucial. If your branch is too small, air doesn’t flow well. Too large, and you waste energy and money.
The size of your branch depends on three things: the square footage of the space it serves, the air flow rate your system needs, and the total size of your main duct. Most residential systems run on 4-inch, 6-inch, or 8-inch ducts.
A simple rule: count how much living space the branch will serve. Every 1,000 square feet typically needs a 6-inch duct in most standard systems. For smaller spaces (like a single bedroom), a 4-inch duct often works fine. Larger areas or heavily used rooms might need an 8-inch duct.
When in doubt, go slightly larger rather than smaller. A duct that’s too large just means a bit more air moving through (which is fine). A duct that’s too small creates problems.
Step 1: Plan Your Branch Route
Start by figuring out where your branch will go. You need a clear path from the main duct to your target room.
Walk the route carefully. Check for obstacles like beams, pipes, electrical wiring, or plumbing. Plan around them. A duct that has to make too many sharp turns loses air flow power. Try to keep turns gentle and gradual.
Also think about easy access. You want to be able to reach the branch later if you need to clean it or make repairs. Don’t tuck it into spaces you can never get to again.
Mark your route with a pencil. This becomes your roadmap for installation.
Step 2: Locate Your Connection Point
Find where your new branch will connect to the main duct. This is the starting point for everything.
Your connection point should be on a section of duct that’s easy to reach. Don’t try to connect to a part of the duct that’s buried in insulation or tucked behind other objects. You need room to work.
Check that the main duct is actually clean at this spot. Use a small brush or cloth to wipe away any dust or debris. A clean connection works better and seals properly.
Make sure this location actually makes sense for your branch destination. Don’t connect to a duct that goes to a completely different area of your home. The branch should head in the right direction.
Step 3: Cut the Opening
Now comes the hands-on part. You’re going to cut an opening in the main duct where your branch will connect.
First, mark your circle. The size should match your branch diameter. Use a tape measure and a pencil to draw a circle on the duct. If your branch is 6 inches, the hole should be about 6 inches across.
Here’s an important tip: position the hole on a relatively flat part of the duct. Don’t try to cut into the very bottom where condensation sits, and avoid the top if possible. The sides of the duct are usually best.
Cut slowly and carefully. Use a utility knife or a duct cutter. Some people use a drywall saw. Start with a small cut, then expand it. Go slow to avoid ripping the ductwork.
Clean up any rough edges with the knife. You want a smooth opening. Rough edges can tear things or let air escape.
Step 4: Install the Duct Takeoff
The duct takeoff is your connector piece. It’s usually Y-shaped and has three openings: one connects to the main duct, one continues the main duct, and one is for your new branch.
Actually, let me back up. There are different types of connectors. You might use:
- A boot connector (one large opening connecting to one smaller)
- A Y connector (splits into two branches)
- A T connector (branches off to the side)
For most single-branch additions, a boot connector works great. One end connects to your main duct, and the other end connects to your new flex duct branch.
Slide the connector into place. It should slide over the duct or fit snugly into your cut opening. Don’t force it. If it doesn’t fit right, check your measurements.
Step 5: Seal Everything Properly
This step is SO important. Most people skip it or do it halfway, and that’s a huge mistake.
Duct sealing keeps air inside the duct where it belongs. If there are gaps and leaks, cool air escapes into spaces where you don’t want it (like your attic or walls). This wastes energy and money. It also means less cold or warm air reaches your rooms.
Use ductwork mastic (a sticky sealant) or duct tape around all connections. Mastic is better than tape, honestly. It lasts longer and handles temperature changes better.
Apply mastic around the entire connection where the duct meets the takeoff. Use a brush or your finger to push it into every gap and seam. You want it to look like a smooth bead of caulk around the joint.
For extra security, add duct clamps around the connection. Tighten them snugly but don’t over-tighten. Over-tightening can dent the duct and reduce air flow.
Step 6: Route Your Branch Duct
Now run your new flex duct from the connector to your target location.
Support the duct as it runs. Use duct straps or hangers every few feet. This prevents sagging and keeps the duct from pinching closed in the middle. A pinched duct is basically useless.
Avoid sharp bends. Flex duct can bend, but sharp kinks kill air flow. Aim for smooth, gentle curves. Think of it like routing a hose – gradual bends work, sharp corners don’t.
Make sure the duct doesn’t touch anything hot (like exhaust pipes) or sharp (like exposed nails). These can damage the insulation or the duct itself.
Keep the duct away from direct sunlight if possible. UV light breaks down the outer covering over time. In areas that get sun, consider wrapping the duct with aluminum-backed insulation tape.
Step 7: Add Insulation if Needed
Your flex duct probably already has insulation wrapped around it. But if it doesn’t, or if you’re running the duct through a very hot or cold space, add extra insulation.
Use pipe insulation or duct wrap. Wrap it around the entire duct length. Seal any overlaps with tape made for this purpose (foil tape works well).
Insulation prevents heat transfer. In summer, it keeps hot air out of your duct. In winter, it keeps cold air from cooling your branch. Either way, insulation means your system works more efficiently.
Step 8: Connect to the Register or Vent
At the other end of your branch, you’re connecting to the room where the air comes out. This is where you attach your register, vent, or boot.
The register is the visible part – the louvered grille you see on the wall or ceiling. Your branch duct connects to the boot behind it.
Push the flex duct onto the boot connector. Make sure it goes on fully and sits tight. Use duct clamps to hold it secure.
Here again, seal any gaps with mastic. Even small leaks waste energy and reduce the air flow to that room.
Step 9: Test Your System
After everything is connected, test it. Turn on your HVAC system and check for air flow.
Feel the air coming from your new register. Is it strong or weak? If it’s weak, you might have a pinch in the duct, a leak, or a sizing problem.
Also check your main ductwork. Is air still flowing properly to other areas? A new branch shouldn’t mess up your existing system if it’s sized and installed correctly.
Walk around your home and check the temperature in different rooms. Things should feel more balanced now.
Common Mistakes to Avoid
Don’t skip the sealing step. Seriously. Unsealed ducts are worse than no branch at all. You lose efficiency and don’t get the results you want.
Don’t use regular duct tape for sealing. It’s called duct tape, but it doesn’t work well for actual ducts. The adhesive fails over time. Use mastic or foil tape instead.
Don’t pinch or kink the flex duct. This is the number one reason branches don’t work right. Bent ducts block air flow.
Don’t forget to support the duct. Sagging duct eventually kinks and fails.
Don’t use the wrong size. A branch that’s too small creates problems all through your system. Take time to measure and size correctly.
Don’t connect without cleaning the main duct first. Dust and debris prevent proper sealing.
Maintenance Tips for Your New Branch
Once your branch is installed, keep it working well.
Check it a couple times per year. Look for any damage, kinks, or loose connections. Fix problems early before they become big issues.
Make sure clamps are still tight. They can loosen over time.
Keep registers and vents clean. Dust buildup blocks air flow just like a kinked duct does.
Listen for strange sounds. A whistling noise usually means air is leaking. That’s a sign you need to check your seals.
When to Call a Professional
Some situations call for professional help. If you’re not comfortable working with your HVAC system, or if your home has a complex setup, hire someone. It’s worth it to get it right.
Also call a pro if you need to tap into an active duct that’s under pressure from your furnace or air conditioner. This can be tricky and dangerous without proper knowledge.
If you’re not sure about your ductwork size or your system’s capacity, ask a professional before you start. They can tell you exactly what you need.
Final Thoughts
Adding a branch to flex duct is totally doable for someone with basic skills and tools. Take your time, follow each step carefully, and don’t skip the sealing. That’s really the key to success.
A properly installed branch improves your home’s comfort and efficiency. You’ll notice better temperature balance and rooms that actually stay cool or warm like they should.
Remember: the foundation of good ductwork is good planning, proper sizing, careful installation, and thorough sealing. Get these right, and your branch will serve you well for years. Your HVAC system will thank you, and so will your comfort level.
Start your project with confidence. You’ve got this.