How to Install OSB Floor in Attic?
Installing OSB flooring in your attic might sound like a big project. But it’s actually something you can do yourself with the right tools and knowledge. This guide will walk you through every step. You’ll learn what OSB is, why it works great for attics, and how to install it safely and correctly.
What Is OSB and Why Use It in Your Attic?
OSB stands for Oriented Strand Board. It’s a type of engineered wood made from small wood strands. These strands are glued together and pressed into sheets. The result is a strong, affordable material that works well for attic floors.
OSB is different from plywood. Both are engineered wood products. But OSB uses smaller wood pieces than plywood does. This makes OSB cheaper. It also makes it a smart choice for attic projects where cost matters.
Why OSB Works for Attics
Your attic gets used less than other rooms in your home. You might store boxes up there. You might use it for seasonal items. You might just need a safe platform to walk on when checking your roof or HVAC system. OSB handles all these jobs well.
OSB sheets are strong. They don’t break easily under foot traffic. They resist moisture better than some people think, especially if you treat them right. And they’re lightweight. This matters because your attic’s support beams need to handle the weight. Lighter flooring means less stress on those beams.
The cost advantage is real too. If you’re adding a new attic floor, OSB costs much less than plywood or hardwood. You can cover more square footage for less money.
Planning Your Attic Floor Project
Before you buy a single sheet of OSB, spend time planning. Good planning saves money, time, and frustration later.
Take Measurements
Climb into your attic with a measuring tape. Measure the length and width of the space where you want to install flooring. Write these numbers down. Don’t trust your memory. Bring paper and pen.
If your attic is an odd shape, break it into rectangles. Measure each rectangle separately. Add them together. This gives you the total square footage.
Check Your Support Structure
Your attic has beams or joists that hold everything up. These are the bones of your home. They need to be strong enough to support OSB flooring plus whatever weight you’ll put on it.
Look at your joists. How far apart are they? Most attic joists are 16 inches apart. Some are 24 inches apart. The spacing matters for which thickness of OSB you need.
Check for damage too. Look for signs of rot, water damage, or insect problems. Fix any problems before you install flooring. Rotted wood can’t support weight properly.
Calculate How Much Material You Need
Here’s the simple math. Take your total square footage. Divide it by 32. This tells you how many sheets of OSB you need. Most OSB sheets are 4 feet by 8 feet, which equals 32 square feet per sheet.
Always buy a few extra sheets. You’ll make mistakes. You might cut pieces wrong. You’ll want spares on hand.
Get the Right Thickness
OSB thickness matters. You need thicker OSB if your joists are farther apart.
For joists spaced 16 inches apart, use 3/4 inch OSB. This is the most common choice. It balances strength and cost well.
For joists spaced 24 inches apart, use 7/8 inch or 1 inch OSB. The extra thickness prevents sagging.
For joists spaced 12 inches apart, you can use 5/8 inch OSB. But 3/4 inch is still a safe bet.
When in doubt, go thicker. Thicker OSB costs only a bit more. But it lasts longer and supports weight better.
Gathering Your Tools and Materials
You’ll need the right tools to do this job well. Don’t try to save money by skipping tools. Bad tools make the work harder and more dangerous.
Essential Tools
Circular saw or miter saw – You need this to cut OSB sheets. A circular saw works. A miter saw is nicer to use but not required.
Power drill – This drives fasteners fast. A cordless drill is perfect.
Tape measure – Get a long one. 25 feet is good for attics.
Pencil – For marking cut lines.
Safety glasses – Always wear these. Sawdust and flying debris are no joke.
Work gloves – Protect your hands from splinters.
Dust mask – OSB creates lots of dust when cut. A respirator is even better.
Level – Check that your flooring sits flat.
Pry bar – Useful for fitting pieces and adjusting as you work.
Stud finder – Helps you locate joists under any existing insulation.
Ladder – A sturdy extension ladder gets you safely into the attic.
Materials
OSB sheets – Get the right thickness and quantity as calculated above.
Fasteners – You have choices here. Screws hold better than nails. Use 2.5 inch or 3 inch wood screws. You’ll need about 25 fasteners per sheet. Nails work too if you use ring-shank nails. These grip better than smooth nails.
Construction adhesive (optional) – Spreads the fasteners. Helps prevent squeaking. A good add-on, not essential.
Felt or roofing tar paper (optional) – Creates a moisture barrier under OSB. Smart in humid climates.
Preparing Your Attic Space
Preparation determines success. Take time here. It makes installation easier and safer.
Clear the Space
Remove everything that’s currently in your attic. Boxes, seasonal items, old furniture. Everything goes out. You need clear access to the joists.
Check Insulation
Look at your attic’s insulation. If there’s batts or loose-fill insulation, you have two choices. You can leave it and install OSB over it. Or you can remove it.
Leaving insulation underneath is fine. OSB sitting on insulation still protects your home. The insulation keeps heat in or out depending on the season.
Removing insulation creates space. Your floor sits level on the joists directly. This is cleaner. But removing insulation is work. And you might disturb dust and particles.
Many people leave the insulation. Just make sure the OSB sits firmly on the joists. It shouldn’t rest only on insulation.
Locate and Mark Joists
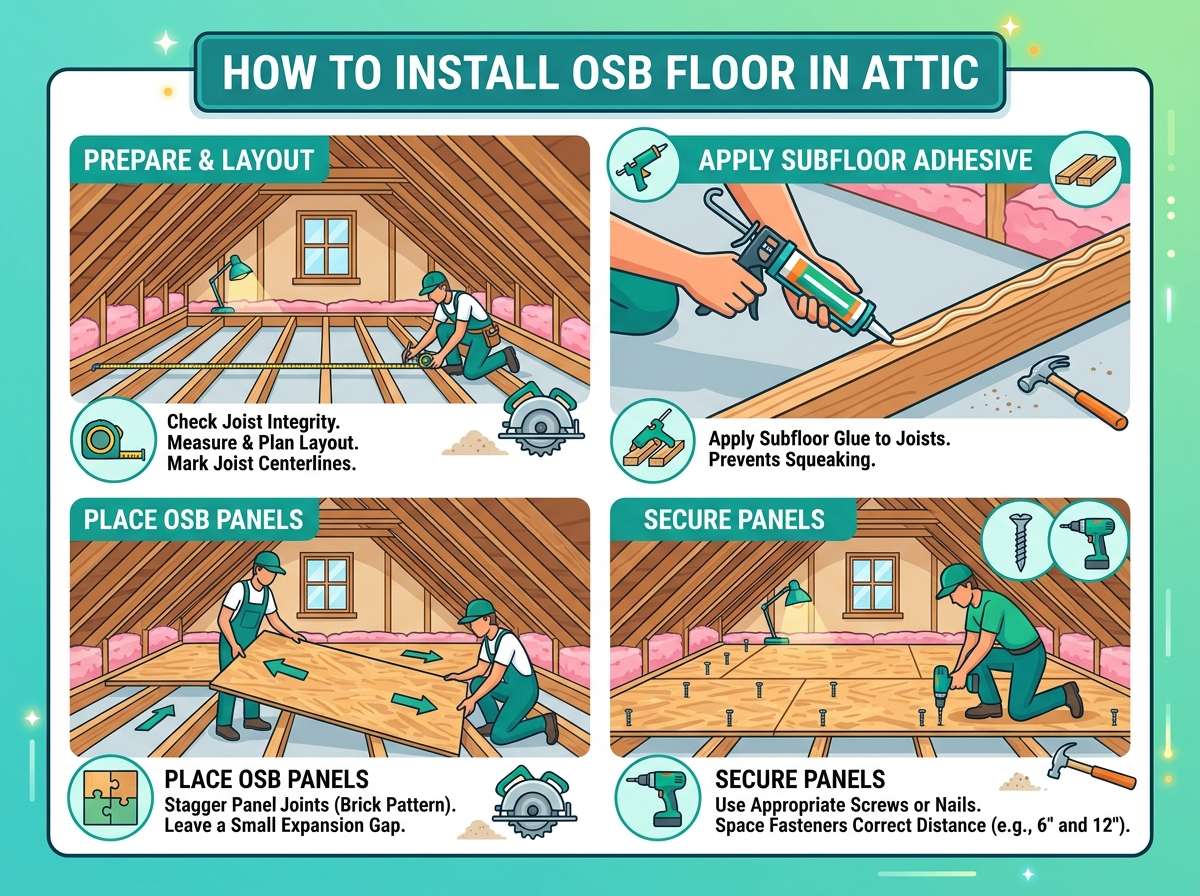
This is crucial. Your OSB must attach to the joists. Fasteners drive into joists. This transfers the weight properly.
Look at where the joists run. They usually run in one direction across the attic. Mark them with chalk or a pencil. You need to know their exact location when you’re cutting and fastening OSB.
If insulation covers the joists, brush it away gently along one joist line. This exposes the joist so you can mark it. Use your stud finder to locate joists beneath insulation.
Remove Obstacles
Check for pipes, ducts, and wiring in your attic. You’ll need to route OSB around them. Plan cuts to avoid these obstacles. Never cut through pipes or wiring.
Some people create box frames around obstacles. Then OSB fits around the boxes. This takes more time but protects your home’s systems.
Ensure Proper Ventilation
Your attic needs to breathe. Proper ventilation prevents moisture buildup and keeps your home healthy. Don’t block soffit vents or roof vents with OSB. Leave gaps if needed. These gaps let air flow.
Installation Steps
Now for the actual work. Take your time. Rush jobs lead to mistakes.
Start at One Corner
Pick a corner of your attic. Usually the corner closest to your entry point is smartest. Start there.
Measure from that corner. Determine where your first OSB sheet needs to sit. The edge should line up with the center of a joist. This gives you room to fasten on both sides.
Cut Your First Sheet
Look at the space you’re filling. Check if a full 4 by 8 sheet fits. If it does, great. You don’t need to cut.
If the space is smaller, you need to cut the sheet. Measure carefully. Mark your cut line with a pencil. Use your circular saw or miter saw to make the cut.
Cut on a sawhorse. Let the waste drop safely. Never put your hands near the blade.
Take your time with cuts. A straight cut is easier to work with. A crooked cut creates gaps. Gaps let air escape. They also look sloppy.
Position the Sheet
With a helper, lift your OSB sheet. Position it in the corner. Let it rest on the joists. Make sure it’s supported the whole way. No hanging edges.
Adjust it so edges align with joist centers. If your sheet doesn’t align perfectly with joists, that’s okay. You’ll fasten it to the joists that are underneath.
Fasten the Sheet
Now you drive fasteners through the OSB into the joists. This connects everything together.
Space your fasteners about 12 inches apart along each joist. Drive them straight down. Fasteners should go at least 2 inches into the joist. This ensures a solid grip.
If you’re using screws, a cordless drill makes this quick. If using nails, a nail gun saves your arm. A hammer works too. It just takes longer.
Fasten around the perimeter of the sheet first. Then fasten along the joists that run under the middle of the sheet.
Don’t use just a few fasteners in the middle and skip the edges. That creates weak spots. The whole sheet needs support.
Check Alignment
After fastening the first sheet, step back. Is it level? Does it feel solid underfoot? No bouncing?
Use your level to check. Adjust as needed before moving to the next sheet.
Install Subsequent Sheets
Your second sheet goes next to the first. Its edge should meet the edge of the first sheet over a joist. This creates a joint right on the joist.
Cut it to fit if needed. Position it. Fasten it just like the first.
Continue this pattern across your attic. Sheet by sheet. Row by row. Until your whole attic floor is covered.
Handle Edges and Gaps
As you get near walls or obstacles, you’ll need to cut pieces to fit. Measure gaps carefully. Cut OSB to fit those gaps.
The goal is complete coverage with minimal gaps. Small gaps are okay. Large gaps let things fall through. They also waste the insulation’s effectiveness.
Finishing Touches
Installation isn’t the final step. A few finishing touches protect your investment.
Seal Cut Edges
The edges you cut expose the OSB’s core. These edges can absorb moisture. Sealing them prevents this.
You can use paint, varnish, or edge sealant. Just one coat on cut edges. This takes an hour and prevents problems down the road.
Add a Moisture Barrier (Optional)
If you live in a damp climate, consider adding a vapor barrier. Roofing felt or tar paper works. Staple it between the OSB and joists before installing OSB. Or apply it after as a second layer.
A moisture barrier extends the life of your OSB. It’s optional but smart in humid regions.
Apply Finish (Optional)
Your attic floor is functional without paint. But paint makes it look better. It also protects the OSB surface.
Use simple latex paint. One coat is enough. Choose light colors to reflect heat and make your attic brighter.
Paint also marks the floor visually. You can see where you’ve already walked. This helps you avoid tripping hazards at night.
Safety Tips During Installation
Safety matters. Attics present unique challenges.
Watch Your Step
Attic joists are narrow. Walking on them takes balance. Go slow. Test each step. Don’t rush.
If you’re not comfortable with heights or narrow spaces, hire a professional. That’s okay. Not everyone is suited for attic work.
Use Proper Lighting
Attics are dark. Bring lights. A work light or headlamp makes a huge difference. You’ll see what you’re doing. You’ll avoid mistakes. You’ll stay safer.
Ventilation
Saw dust fills the air fast. Wear a dust mask. Open attic vents if possible. Keep a respirator nearby. Your lungs will thank you.
Secure Ladder Placement
Your ladder needs solid footing. Check that the ground under your ladder is level and solid. Have someone hold the ladder if possible.
A wobbly ladder causes falls. Falls are serious. Take time with this detail.
Common Mistakes to Avoid
Learning from others’ mistakes saves you headaches.
Insufficient Fastening
Some people use too few fasteners trying to save time. This creates a weak floor. Over time, the OSB sags. You’ll hear creaking. The floor feels bouncy.
Use enough fasteners. 25 per sheet is the standard. It takes extra time but pays off.
Fasteners Not Hitting Joists
If your fasteners miss the joists, they don’t do anything. They just poke holes in the OSB.
Know where your joists are. Mark them. Drive fasteners straight down into them. Missing joists wastes time and fasteners.
Blocking Ventilation
Attics need air flow. Some people cover vents with OSB without realizing it. This traps moisture. Moisture causes rot and mold.
Plan cuts to leave ventilation openings. Or frame around vents. Always maintain airflow.
Mixing Different OSB Thicknesses
Some people use whatever OSB they have. Mixing 3/4 inch with 1/2 inch creates an uneven floor. You’ll notice the difference. It’s uneven to walk on.
Use the same thickness throughout. It’s worth buying the right material.
Not Measuring Twice
Quick measurements lead to cut pieces that don’t fit. This wastes material. It creates gaps.
Measure carefully. Measure again. Measure a third time if you’re uncertain. Time spent measuring is time saved on cutting.
Maintenance After Installation
Your OSB floor will last years with basic care.
Keep It Dry
The main enemy of OSB is water. Keep your attic dry. Check for roof leaks regularly. Fix them immediately.
Run a dehumidifier in summer if you live in a humid area. This reduces moisture in the air.
Check for Damage
Walk your attic occasionally. Look for soft spots. Listen for creaking. These signs mean something’s wrong.
Soft spots mean water damage. Creaking means fasteners are loose. Both need attention.
Tighten any loose fasteners. Replace any damaged OSB sections.
Don’t Overload
Your attic floor has a weight limit. Don’t treat it like a storage unit. Spread weight across multiple joists. Don’t pile heavy items in one spot.
Heavy items in one spot concentrate weight. This can break through OSB or bend joists.
When to Call a Professional
Some situations need professional help. Recognize them.
Structural Problems
If your joists are damaged, rotted, or undersized, a professional should assess. Structural issues need expert attention.
Electrical or Plumbing
If major electrical or plumbing runs through your attic, a professional can route around them safely.
Extreme Slopes or Obstacles
Some attics have complex shapes, multiple obstacles, or extreme roof slopes. A professional handles these efficiently.
Lack of Confidence
If you’re unsure about any step, stop. Call a professional. A $500 professional fee beats a floor that fails.
Cost Breakdown
Let’s talk money. What does this project cost?
OSB Sheets – The biggest expense. A 3/4 inch sheet costs $20 to $35 depending on location and market. For a typical attic needing 20 sheets, you’re looking at $400 to $700.
Fasteners – Screws or nails. About $50 to $100 for a whole project.
Tools – If you don’t own any, basic tools cost $200 to $500. But you’ll use these for future projects.
Miscellaneous – Paint, sealant, moisture barrier. Figure another $50 to $150.
Total estimate for a 20-sheet project: $700 to $1,500 in materials. Add labor if you hire help.
Compare this to professional installation. Contractors charge $1,000 to $3,000 or more. Doing it yourself saves serious money.
Comparing OSB to Alternatives
You have other options for attic flooring. How does OSB compare?
Plywood – Stronger than OSB. Holds up better over time. Costs 20% to 40% more. For most attics, the extra cost doesn’t justify the benefits.
Hardwood – Looks great. Costs 3 to 5 times more than OSB. Overkill for an attic that’s rarely seen.
Particle Board – Cheaper than OSB. But weaker and more prone to damage. Not recommended.
Subflooring with Carpet – Soft underfoot. Costs more. Makes sense if you’re making a finished attic room.
For most attic floors, OSB is the right choice. It’s strong enough. It’s affordable. It works well.
Troubleshooting After Installation
A few problems might pop up. Here’s how to fix them.
Soft spots in the floor – This means water damage. Water soaks up from below. The OSB weakens. Find the leak source. Fix it. Replace the damaged OSB.
Squeaky floor – This happens when sheets rub together. Drive extra fasteners in the squeaky area. Or apply construction adhesive and clamp overnight.
Sagging floor – The OSB bends under weight. Usually means insufficient fastening or undersized joists. Add more fasteners. In extreme cases, add support beams.
Visible mold – High humidity causes mold. Run a dehumidifier. Improve ventilation. Wipe mold with bleach solution. It should prevent future growth.
Storing Supplies and Organization
Before installing, get organized. It makes the work go faster.
Sort fasteners by type. Keep screws in one bucket, nails in another.
Stack OSB sheets flat. Leaning them creates warping. Flat stacking prevents this.
Keep tools nearby. Organize your tools in one spot. Use a tool belt or bucket. You shouldn’t be searching for tools while halfway through the job.
Mark joists clearly. Use chalk to mark where joists run. Make your marks visible from across the attic. You’ll reference them constantly.
Final Checklist
Before you call the project done, use this checklist.
- [ ] All OSB sheets are fastened securely
- [ ] No gaps larger than 1/4 inch
- [ ] All ventilation openings are clear
- [ ] Fasteners are driven straight and fully seated
- [ ] The floor is level (or as level as possible)
- [ ] No electrical or plumbing issues
- [ ] The floor feels solid underfoot with no bouncing
- [ ] All cut edges are sealed
- [ ] Excess dust is cleaned up
- [ ] The attic entrance is accessible
If you’ve checked all these boxes, you’re done.
Conclusion
Installing OSB flooring in your attic is a doable project. It doesn’t require special skills. It just needs patience and attention to detail.
You’ve learned what OSB is. You know why it works for attics. You understand how to plan the project, gather materials, and install everything correctly.
The hardest part is often getting started. But once you begin, momentum builds. You’ll find a rhythm. Soon you’ll have a solid, usable attic floor.
Your attic becomes safer to walk in. You can store items more securely. You have a platform for maintenance tasks. All from a few sheets of OSB and some basic tools.
Take your time. Follow the steps. Don’t cut corners on fastening or measurements. Your future self will appreciate the solid work you’re doing today.
Now get out there and build something great.

Hi, I’m Mary, the founder of Homygear.com. I’m passionate about creating a comfortable, smart, and beautiful home. I share practical insights and real-world experience on home gear that makes everyday life easier. Behind the scenes, my dedicated research team studies products in depth, and our writers craft honest reviews using trusted, authentic sources—so you can choose home gear with confidence.