How to Maintain a Vacuum Cleaner Properly?
Your vacuum cleaner works hard every single day. It picks up dirt, dust, pet hair, and all sorts of mess from your floors so you don’t have to. But here’s the thing—most people forget to take care of their vacuum cleaners. They just turn them on, use them, and put them away. Then one day, the machine starts making weird sounds or doesn’t suck up dirt as well as before. That’s when people realize they need to do something.
Taking care of your vacuum cleaner isn’t hard. You don’t need special skills or expensive tools. In fact, regular vacuum cleaner maintenance can make your machine last years longer and keep it running like it’s brand new. This guide will show you exactly how to maintain your vacuum properly, so you can get the most out of your cleaning appliance.
Why Your Vacuum Deserves Attention
Let’s be honest—vacuum cleaners don’t get much love. We use them and forget about them until something goes wrong. But think about what your machine does. It pulls air through your home, collects dust and debris, and filters the air going back out. That’s a lot of work.
When you skip maintenance, your vacuum gets tired. The motor has to work harder. The filters get clogged. The brush roll tangles with hair. Soon, your machine doesn’t pick up dirt as well, and you end up pushing it around your home without really cleaning anything. Worse, your vacuum might break down completely, and you’ll spend hundreds of dollars on a new one.
Regular vacuum upkeep prevents all of this. It keeps your floor cleaning equipment running strong and saves you money in the long run. Think of maintenance as an investment. You spend a little time now, and your machine keeps working great for years.
Empty the Dust Container After Every Use
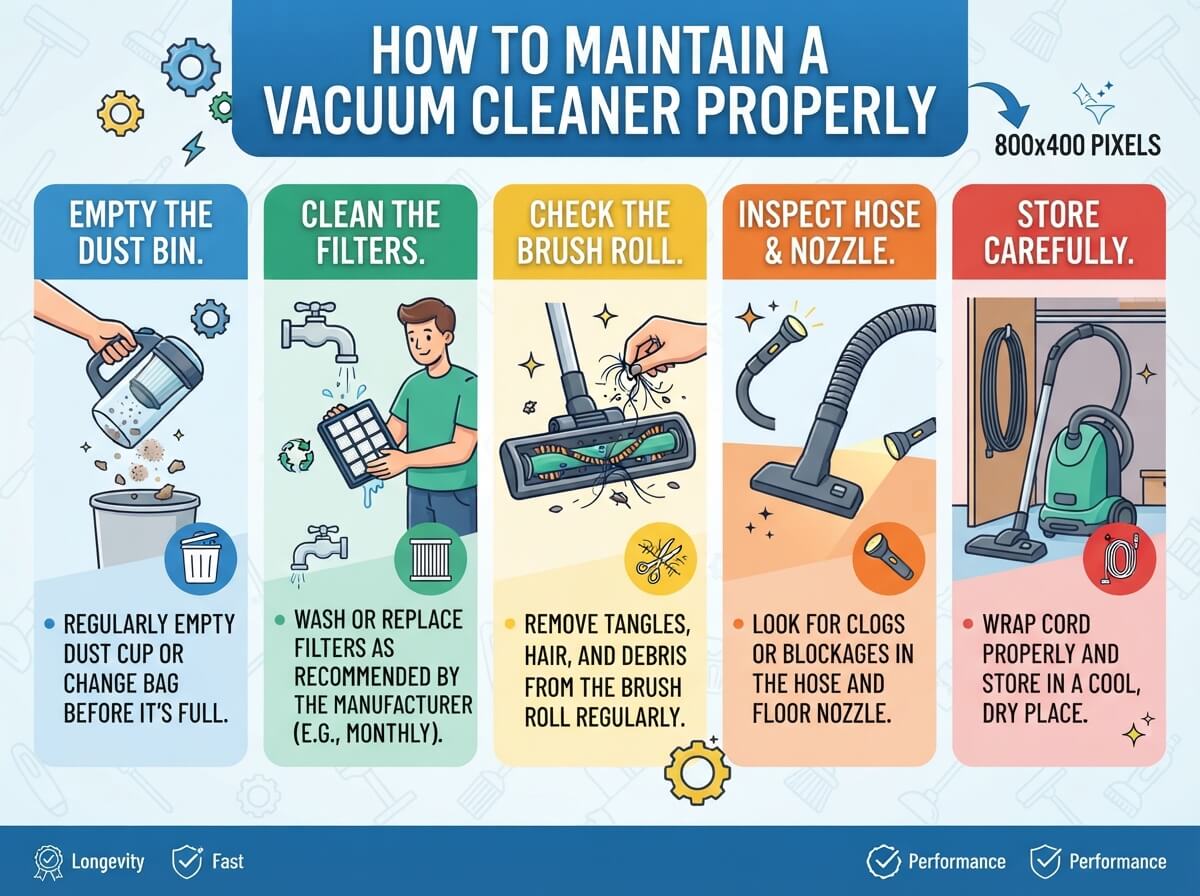
This is the most basic step, yet so many people skip it. Every time you finish vacuuming, empty the dust bucket or bag right away. Don’t wait until tomorrow or until it’s completely full.
Here’s why this matters. When your dust container fills up, it puts extra strain on your vacuum’s motor. The motor has to work harder to pull air through the packed debris. This makes your machine less efficient and wears it out faster. A vacuum that works with a full container doesn’t suck up dirt well either. Your floors won’t get as clean, even though you’re spending time vacuuming.
Emptying your dust container only takes thirty seconds. For bagless vacuums, unclick the container, hold it over a trash can, and tap out the dust. For bagged vacuums, replace the bag when it’s about three-quarters full. Keep extra bags on hand so you always have one ready.
As an added bonus, emptying your container keeps your home cleaner. All that dust stays trapped in the machine instead of floating around your living space. People with allergies or asthma notice a real difference when they empty containers regularly.
Clean or Replace Your Filters Regularly
The filter is your vacuum’s lungs. It traps tiny particles and stops dust from getting back into the air you breathe. A dirty filter makes your machine work twice as hard.
Most vacuums have two types of filters. There’s the main filter, which is usually shaped like a cylinder or accordion. Then there’s often a pre-filter that catches bigger particles before they hit the main filter. Both need attention.
Check your filters once a month. If they look dusty or gray, they need cleaning. You clean filters by tapping them gently over a trash can or rinsing them with water. Hold the filter up to a light. If you can barely see through it, definitely clean it.
Some filters are washable, and some aren’t. Check your vacuum’s manual to know which type you have. Washable filters can last years with proper care. Just rinse them in lukewarm water and let them dry completely before putting them back. Never use hot water or a dryer on filters. Heat can damage them.
Even with regular cleaning, filters eventually wear out. Most filters last between one to two years of normal use. Heavy use means you might replace them sooner. When your filter gets hard, stiff, or develops tears, it’s time for a new one. A new filter costs thirty to sixty dollars, but it keeps your vacuum working right and protects your lungs.
Tackle Tangled Hair on Your Brush Roll
If you have long hair or pets, you know how hair wraps around your vacuum’s brush roll. That spinning brush underneath your machine can look like it’s wearing a hair sweater.
This buildup does real damage. Tangled hair slows down the brush roll and makes your vacuum less effective. It also makes your motor work harder, which wears it out faster. Plus, wrapped hair creates friction that generates heat. Over time, this can melt parts of your vacuum.
Check your brush roll every week. Yes, every week. It only takes two minutes. Flip your vacuum over and look at the roller underneath. Most modern vacuums have an easy release button or handle that lets you remove the brush roll without tools.
Once you remove it, grab a seam ripper, small scissors, or a special vacuum cleaning tool. Carefully cut away any hair or string wrapped around the roller. Work slowly so you don’t damage the bristles. You want to see the clean rotating bars underneath.
Some vacuums let you flip a switch to reverse the brush roll direction, which helps push out trapped hair. If your machine has this feature, use it before physically removing the roller.
After you clean the brush roll, wipe it with a dry cloth. Then pop it back in place and make sure it spins freely. A clean brush roll keeps your vacuum strong and makes sure it picks up dirt on all your rugs and carpets.
Keep the Suction System Clear
Strong suction is what makes your floor cleaning equipment work. When your vacuum doesn’t pick up dirt well, the problem is usually a clogged suction pathway.
Run your hand over all the tubes and hoses on your vacuum. Squeeze the hoses gently. You’re looking for blockages. Sometimes a big piece of something gets stuck inside and stops the airflow.
Look at the connection points where hoses attach to the main unit. These spots collect debris. Twist off any hoses and peer inside. Do you see dust or dirt piled up in there? Use a broom handle or straightened coat hanger to push out blockages. Work carefully so you don’t create holes in the hose.
Check the floor head connection too. This is where the carpet cleaning attachment connects to the main body. Dust builds up here regularly. Clean out any debris you find.
Your vacuum also has an exhaust port, usually at the back. Make sure this opening stays clear so air can flow freely out of the machine.
Inspect and Clean the Floor Head
The floor head is the part that touches your carpet or hard floors. This component takes a beating. It scrapes along surfaces, picks up dirt, and sometimes gets damaged.
Look at the brush bristles. Are they worn down or splayed out? Worn bristles don’t work well. Are there chunks missing? Check for cracks in the plastic housing too. Small damage can get bigger over time.
Flip the floor head over and remove any tangled hair or strings. Wipe out collected dust and debris. A clean floor head means better contact with your floor and better cleaning results.
If your vacuum has adjustable height settings, make sure they still work smoothly. Sometimes the adjustment mechanism gets stuck with debris. A little cleaning and light lubrication can fix this.
Check and Clear the Wheels
Wheels help your vacuum glide smoothly across your floors. When they get clogged with hair and dust, your machine doesn’t move well. You end up pushing harder, which makes you tired and strains the motor.
Flip your vacuum over and look at all the wheels. Most machines have wheels at the floor head and some have wheels at the main body. Spin each wheel by hand. It should spin freely without jerking or stopping.
If wheels don’t spin easily, remove any hair wrapped around them. Use scissors or a seam ripper, just like you do with the brush roll. Wipe away dust and debris.
Sometimes wheels get stuck because dirt dried and hardened around the axle. A little warm water and gentle scrubbing with an old toothbrush can loosen things up. Dry everything completely before using your vacuum again.
Wheels wear down too. After a couple of years, they might look flat or develop cracks. Worn wheels make your vacuum harder to push. If replacing wheels isn’t too expensive, consider getting new ones. Your shoulders will thank you.
Wipe Down the Outside Regularly
Your vacuum’s exterior collects dust just like everything else in your home. A quick wipe with a dry or slightly damp cloth keeps it looking nice and helps you spot any damage early.
Check all the seams and connection points where you see cracks or loose plastic. Tighten any bolts or screws that feel loose. Most vacuums have a few bolts that can loosen up with regular use.
Look at the power cord. Does it have any damage, cracks, or bare wires showing? A damaged cord is dangerous. If you see damage, stop using the vacuum and get it repaired or replace the cord.
Make sure all the attachments are clean too. That hose, the wand, the different brush heads—dust covers all of them. Clean attachments make your vacuum work better and last longer.
Store Your Vacuum the Right Way
Where you keep your vacuum matters. Storing it in a damp basement or humid garage can cause rust and damage the electrical parts. A dry closet or cabinet works much better.
Coil the power cord loosely around the back of the machine. Don’t wrap it tight. Tight wrapping can damage the cord and create safety hazards. Most vacuums have cord storage hooks on the back for this reason.
Store attachments in a way so they don’t get crushed or bent. Hang them on hooks if you can. Keep bags or filters in a dry place where they won’t get damaged.
If you won’t use your vacuum for a few weeks, empty the dust container first. Leaving dust sitting in there can attract pests and create moisture problems.
Know When to Replace Parts
Some parts wear out and need replacement. This is normal. A vacuum that needs new parts isn’t dead—you just need to swap out the worn pieces.
Filters need replacement every year or two, depending on use. Brush rolls last two to three years usually. Bags and belts wear out regularly. Wheels, hoses, and floor heads can all eventually need replacement.
Check your vacuum’s manual to see which parts are user-replaceable. Some repairs need professional service, but many you can do yourself with basic parts from online retailers or vacuum shops.
Spending fifty to a hundred dollars on new parts keeps your vacuum working for several more years. That’s way cheaper than buying a new machine.
Test Your Vacuum Regularly
Every month or so, really pay attention while you vacuum. Does your machine make any new sounds? Does it suck up dirt as well as before? Does it pull or drag funny?
New noises often mean something is stuck or worn. Stop and investigate. Most times it’s just a bit of debris caught somewhere or a loose belt.
If your vacuum isn’t picking up dirt well, work through a checklist. Is the dust container full? Are the filters clogged? Is the brush roll tangled? Is the suction pathway blocked? Usually, one of these things is the culprit.
The sooner you catch problems, the easier they are to fix. Waiting until your vacuum completely stops working makes repairs more complicated and expensive.
Create a Vacuum Maintenance Schedule
Here’s a simple schedule that keeps your carpet cleaning device in top shape:
After every use: Empty the dust container.
Weekly: Check and clean the brush roll.
Monthly: Inspect filters, wheels, and the floor head. Wipe down the outside.
Every three months: Deep clean all hoses and attachments. Check all bolts and connections.
Every year: Consider replacing filters if they’re not in great condition. Inspect the belt for wear. Check the entire machine for damage.
Following this routine takes maybe fifteen to twenty minutes per month. That’s a tiny amount of time compared to how much you use your vacuum.
Conclusion: Your Vacuum Deserves Care
Maintaining your vacuum cleaner properly doesn’t require special knowledge or fancy tools. It just takes regular attention and a few minutes of your time each month. You empty containers, clean filters, remove tangled hair, and check for problems.
When you take care of your vacuuming equipment, it takes care of your floors. Your machine stays powerful and effective. It lasts years longer. You avoid expensive repairs or having to replace it completely.
Start today. Empty your dust container. Check your brush roll for hair. Tap out your filters. Do these three things right now, and you’re already ahead of most people.
From there, stick to the simple maintenance schedule. Make it a habit. Soon, keeping your vacuum in great shape will feel like second nature. Your floors will stay cleaner, your machine will work better, and you’ll save money in the long run. That’s what good cleaning appliance care does.
Your vacuum works hard for you. It deserves a little attention in return. Give it the maintenance it needs, and it will keep your home fresh and clean for years to come.